Hello!
Today I’ll walk you through the steps of setting up a single sign-on (SSO) service between Amazon Business and Authentik.
Introduction
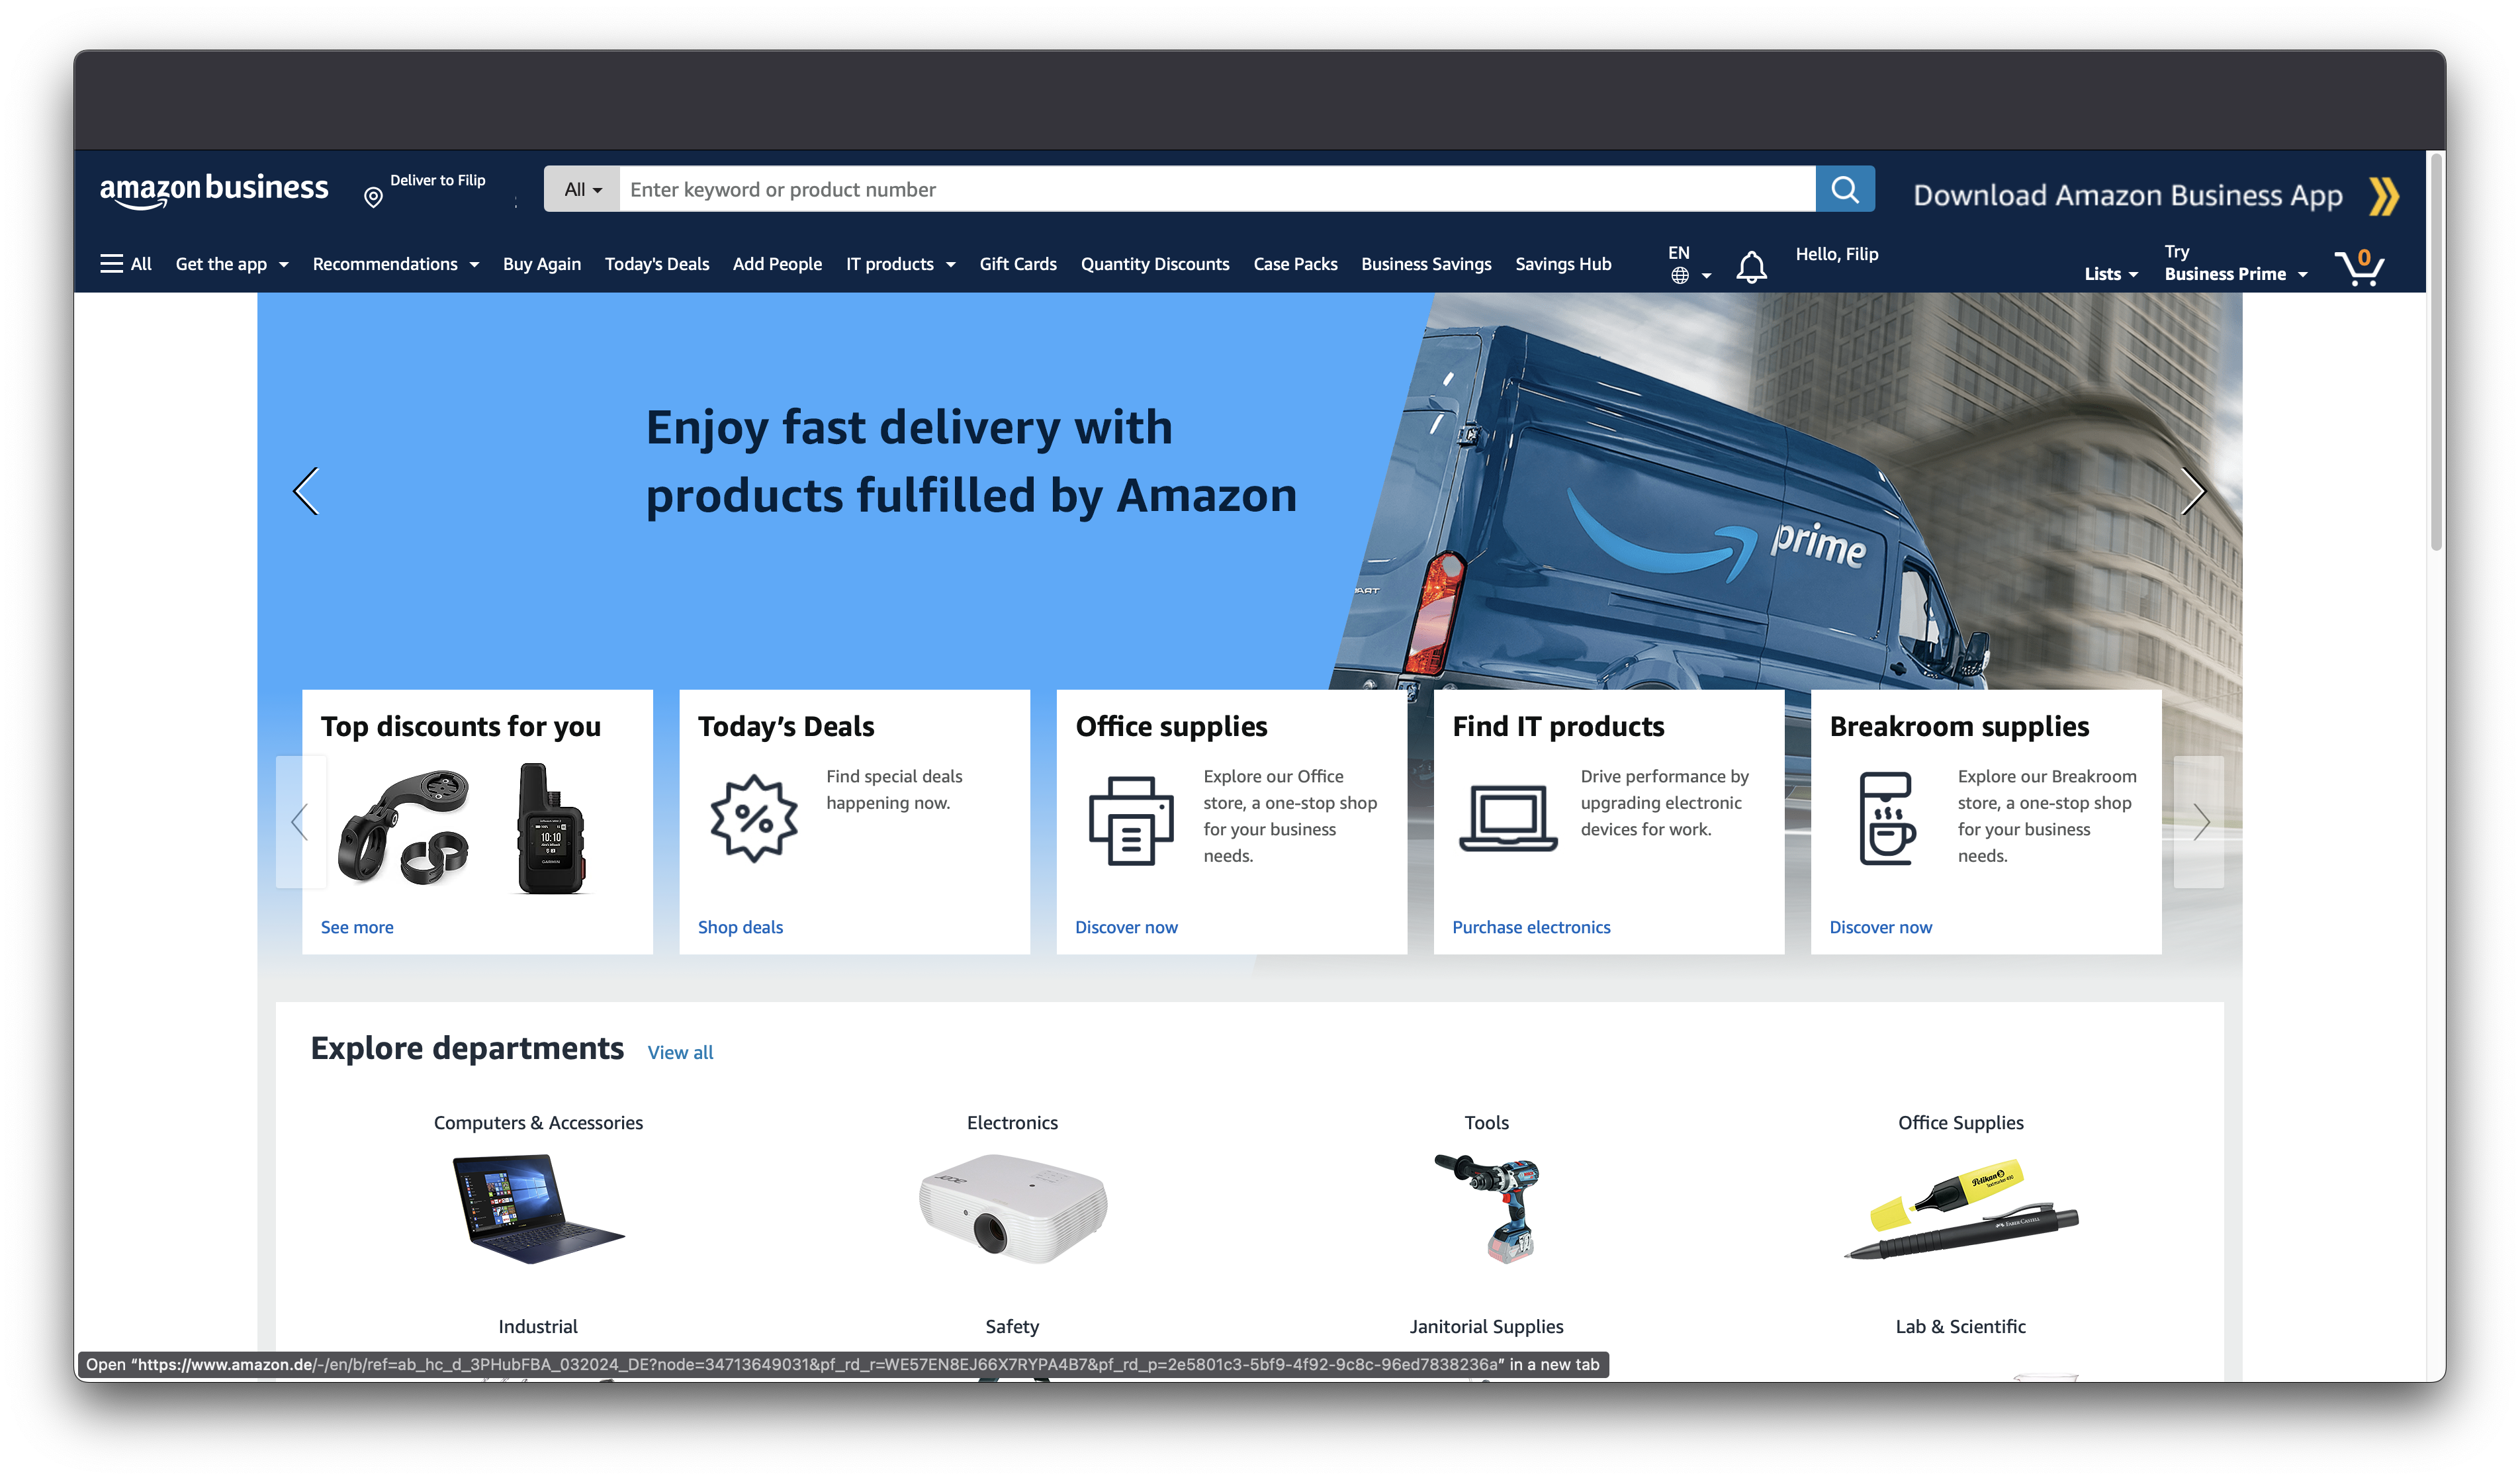
What is Amazon Business?
 Amazon Business is a business-to-business (B2B) platform created by Amazon that allows companies and organizations to purchase products and services in bulk quantities and prices. This platform is designed for companies, organizations and institutions, not for individual customers. It offers special wholesale pricing, reporting, purchase management and other features useful to businesses, providing access to millions of products from various categories.
Amazon Business allows central management of orders, purchasing policies and payments, and offers analytical tools and reports on spending and order management. It also allows integration with ERP systems and other tools used in companies.
What is Authentik?
![]() Authentik is an open source software that serves as an Identity Provider to manage user authentication and authorization. As an alternative to commercial services such as Okta or One Login, Authentik offers similar functionality in an open-source model. Other open-source tools with a similar purpose include Keycloak and Authelia, which also allow central management of user identities in applications and web services.
Authentik is an open source software that serves as an Identity Provider to manage user authentication and authorization. As an alternative to commercial services such as Okta or One Login, Authentik offers similar functionality in an open-source model. Other open-source tools with a similar purpose include Keycloak and Authelia, which also allow central management of user identities in applications and web services.
It stands out for its configuration flexibility and broad support for various authentication protocols, making it an excellent choice for organizations looking for an advanced but accessible open-source identity management solution.
Preparation
For the purpose of preparing the guide, let’s start with the domain names and identifiers described below. Keep in mind, however, that during the setup process you should adjust the settings according to your needs.
- Full domain name (FQDN) Authentik: https://auth.xyz.com,
- Registered business account on Amazon’s business platform,
- An administrator account on the Amazon Business shopping platform.
With these assumed values, we can move on to the actual part of the guide. Of course, if necessary, these values should be changed to suit your configuration.
What is the purpose of using Single Sign-On for Amazon Business?
The main goal of the Single Sign-On (SSO) implementation between Amazon Business and the identity provider is to provide smooth and centralized authentication integration.
![]() Amazon Business uses the standard Security Assertion Markup Language (SAML) 2.0 protocol, which means an SSO deployment can be easily integrated with any large identity provider that supports SAML. Amazon Business supports provider-initiated SAML with identity providers such as Okta, OneLogin, AWS SSO and Azure AD.
Amazon Business uses the standard Security Assertion Markup Language (SAML) 2.0 protocol, which means an SSO deployment can be easily integrated with any large identity provider that supports SAML. Amazon Business supports provider-initiated SAML with identity providers such as Okta, OneLogin, AWS SSO and Azure AD.
This allows organizations to use SSO to allow users to log into Amazon Business using the same credentials they use for other corporate applications. This approach brings the benefits of increased convenience, security and administrative efficiency.
What are the benefits of integrating identity providers with Amazon Business?
The use of Single Sign-On (SSO) between Amazon Business and various identity providers such as Authentik, Okta, OneLogin and Azure AD brings many benefits:
- Universality and flexibility – No matter what identity provider an organization uses, SSO allows users to seamlessly log in to Amazon Business using the same credentials.
- Centralized identity management – By integrating with an identity provider, the processes of creating, modifying and deactivating user accounts in Amazon Business can be automated and synchronized.
- Improved visibility and control – IDaaS (Identity as a Service) solutions, such as Okta and Azure AD, provide comprehensive reporting and analysis of access to Amazon Business, which improves security and compliance.
- Unified work environment – Users can freely switch between Amazon Business and other corporate applications without having to log in again, increasing productivity and satisfaction.
- Better data protection – Identity providers offer advanced authentication mechanisms, such as two-step verification, which further secures access to Amazon Business.
Regardless of the identity provider chosen, implementing SSO between it and Amazon Business benefits the organization with greater convenience, security and efficiency in managing access to critical business systems.
What is SAML?
SAML (Security Assertion Markup Language) is an open federated standard that allows identity providers (IdPs) to authenticate users and then pass authentication tokens to other applications, known as service providers (SP). SAML allows service providers to operate without performing their own authentication and identity transfer, integrating internal and external users. It also allows security credentials to be shared with a service provider on the network, usually within an application or service.
With SAML, secure, cross-domain communication is possible between the public cloud and other SAML-enabled systems, as well as a select number of other identity management systems that may reside on-premises or in another cloud. The protocol allows single sign-on (SSO) users in any two SAML-enabled applications to perform a range of security functions on behalf of one or more applications.
In a technical context, SAML refers to a variant of the XML language used to encode this information, and can include various protocol messages and profiles that are an integral part of the standard.
Step 1 – Configuration in Amazon Business
Log in
- First, log in to your Amazon Business account.
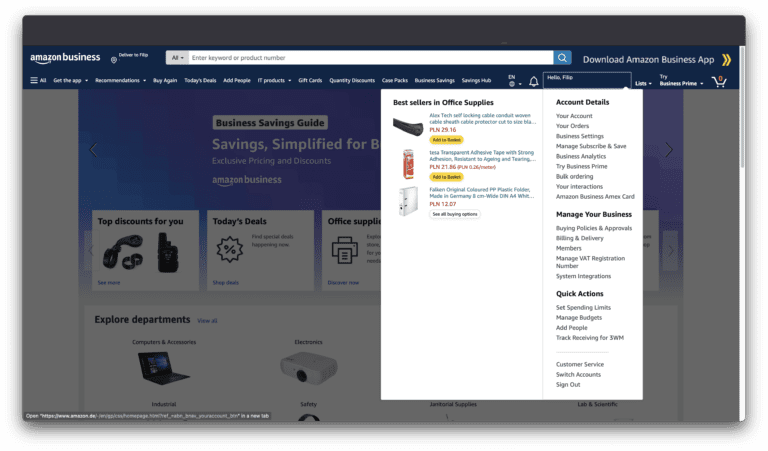
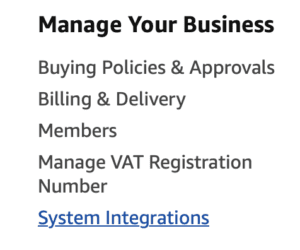
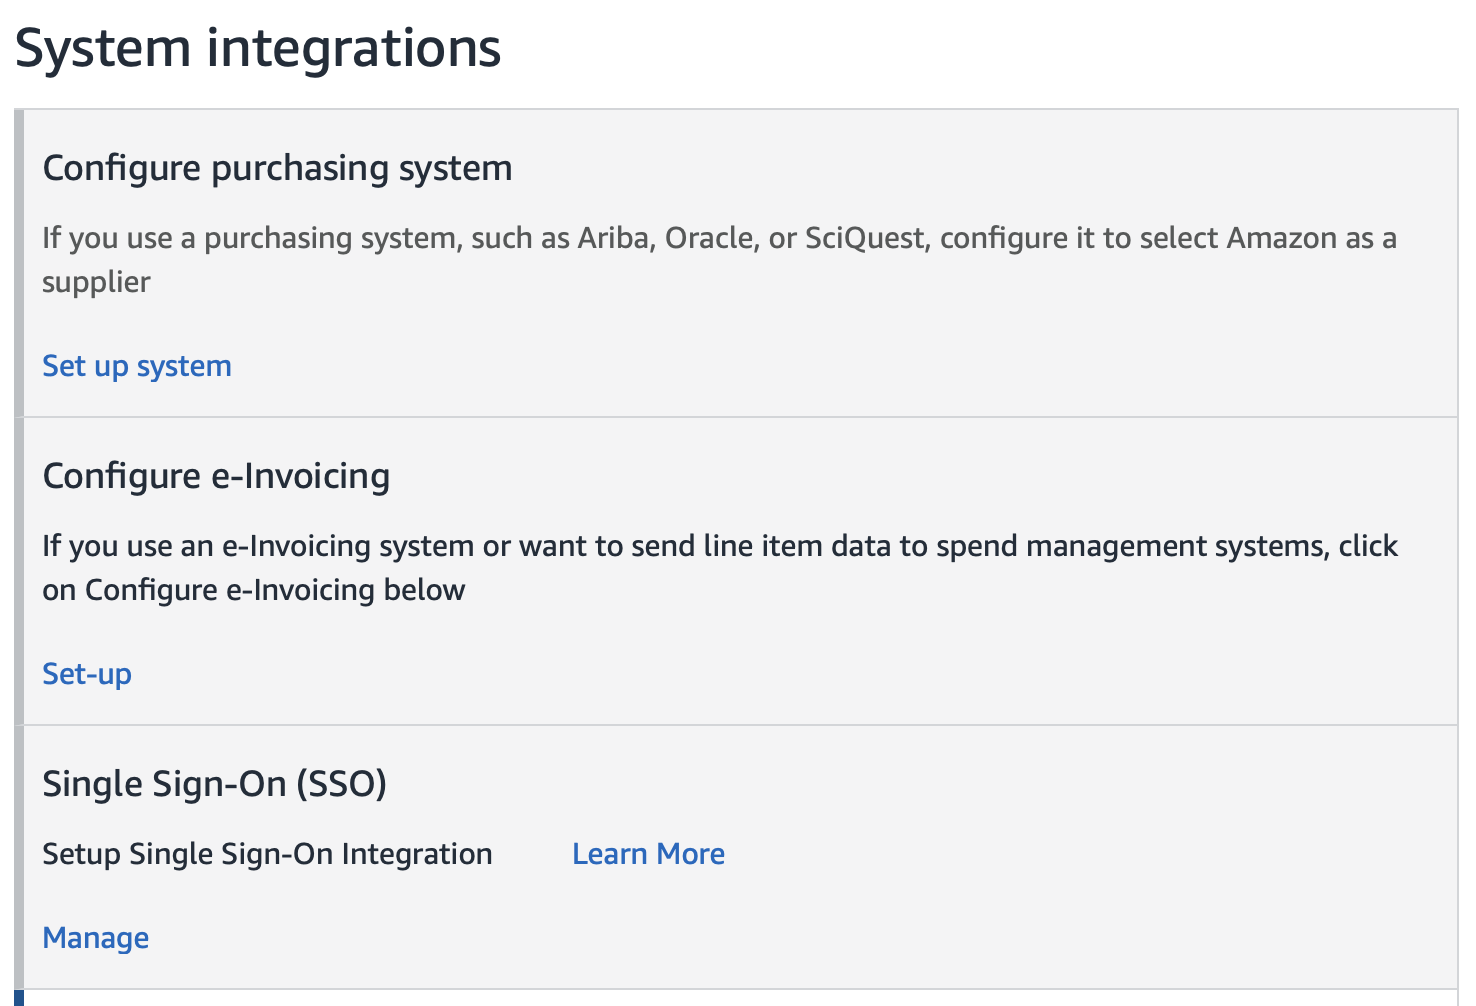
- From the Manage Your Business section, select System Integrations. Click on this link.
- From the System integrations category, select single sign-on (SSO) management. Click on Manage to open the SSO settings.
SSO configuration
- From the list of suggested identity providers, select Other
- Complete the following values:
- Enter your identity provider (IdP): np. authentik
- Encrypted SAML assertions: Off
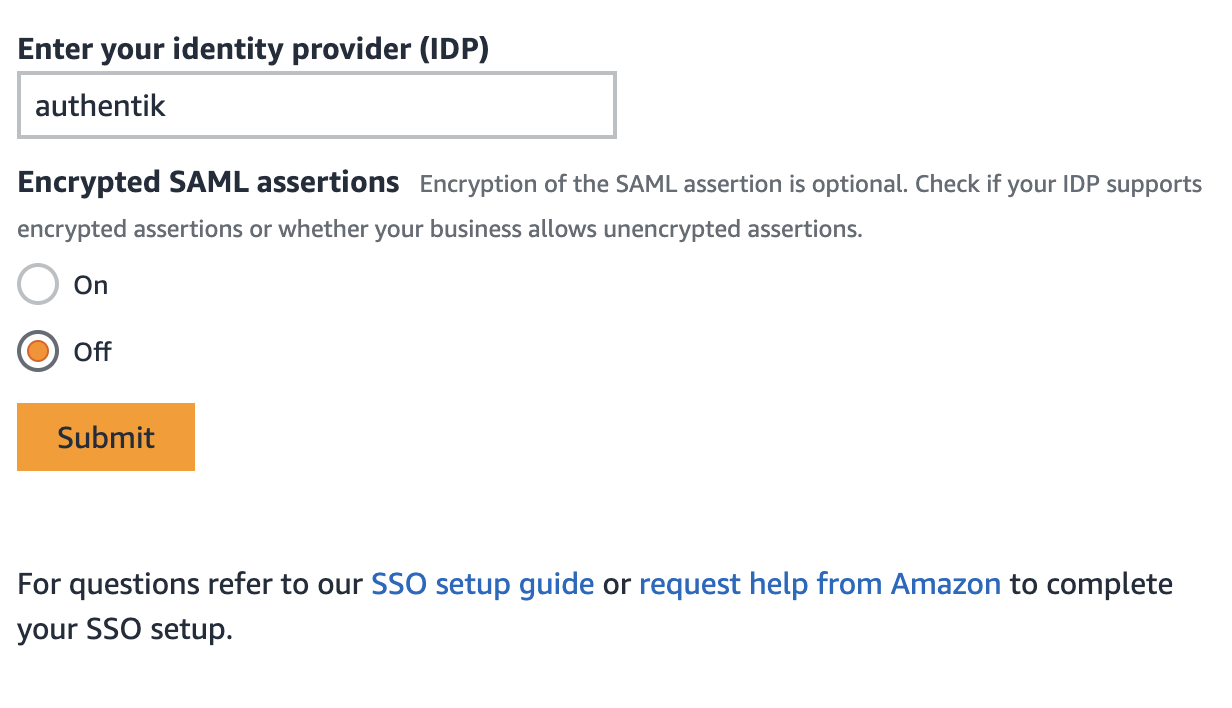
- Click Submit to proceed.
New user account defaults
- Select a default group and a default purchasing role.
- Default group: Select the group to which new users should be added by SSO. New employees can start shopping immediately, as their accounts will be automatically created the first time they log in.
- Default buying role: set the default role for new users: Punchout (PPI) or Requestioner (Direct Buy). If you are using a procurement system and want your users to follow the order flow by default, choose Punchout. Otherwise, select Requestioner to enable employees to shop directly through the Amazon Business website.
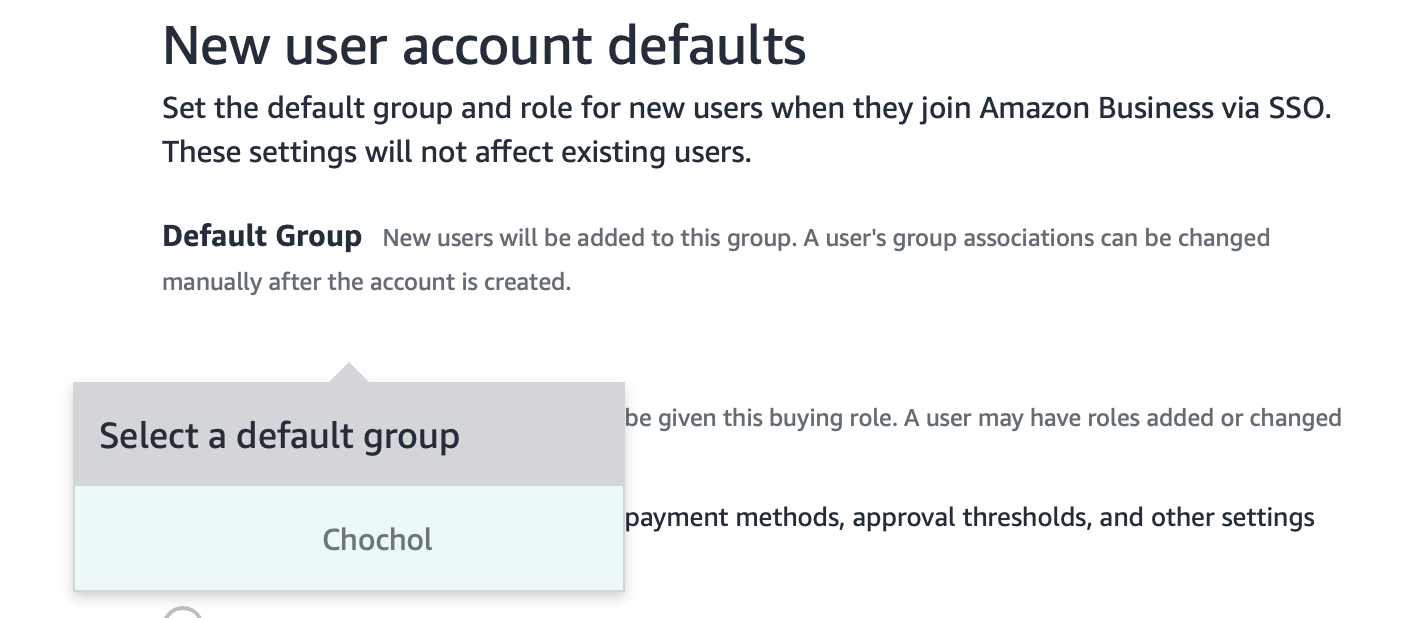
- Proceed further.
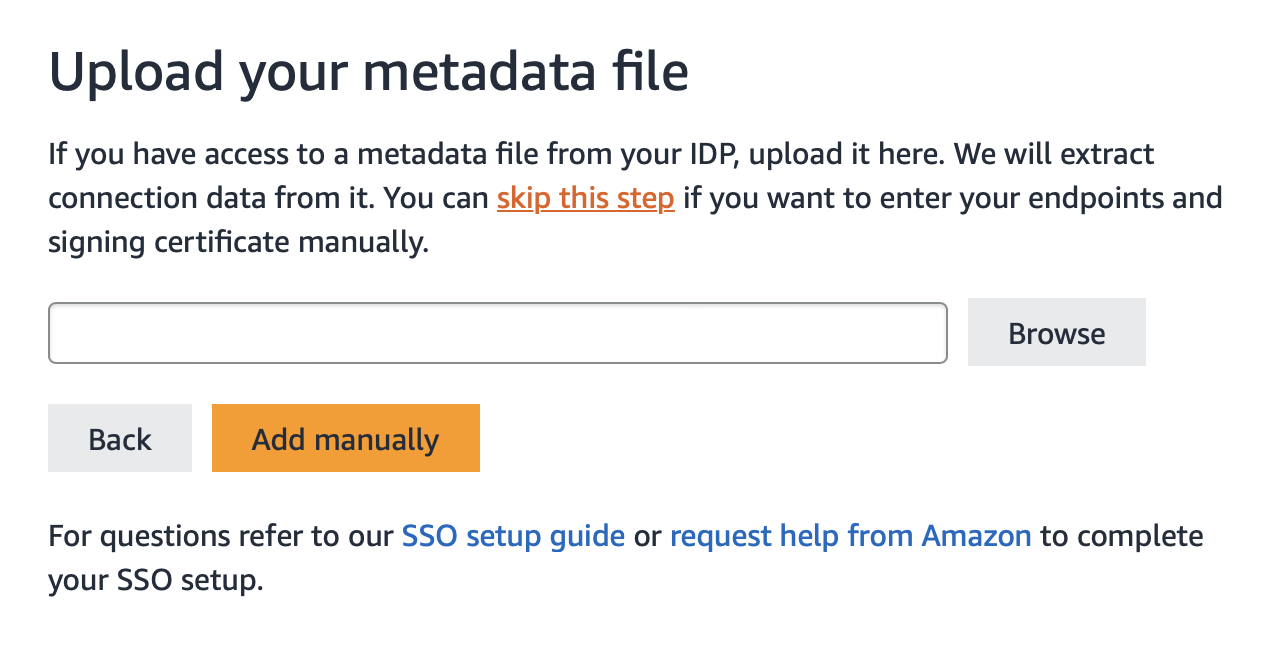
Upload your metadata file
- Click Add manually to fill in the configuration values manually.
Connection data
- Enter the following values:
- EntityID: https://auth.xyz.com
- A globally unique URL provided by the identity provider.
- IssuerUrl: https://auth.xyz.com
- A URL that uniquely identifies the SAML identity provider.
- HTTP-Redirect: https://auth.xyz.com/application/saml/amazon/sso/binding/redirect/
- Determines how the browser redirects the user to the IDP for authentication.
- If you use a different provider name in Authentik, the link should look like this: https://auth.xyz.com/application/saml/[FILLTHERE]/sso/binding/redirect/
- HTTP-Post: https://auth.xyz.com/application/saml/amazon/sso/binding/post/
- If you use a different provider name in Authentik, the link should look like this: https://auth.xyz.com/application/saml/[FILLTHERE]/sso/binding/post/
- Signing Certificate Public Key: Enter the public certificate generated by your SSO Authentik.
- This makes it possible to verify signatures and establish trust in the messages exchanged. Make sure you have correctly entered the complete contents of the certificate.
- The public key is located: Admin Interface -> System -> Certificates -> authentik Self-signed Certificate -> Download Certificate,
- Download file,
- Open with notepad or other simple text editor,
- Copy the entire contents of the file,
- Paste in place of Signing Certificate Public Key.
- This makes it possible to verify signatures and establish trust in the messages exchanged. Make sure you have correctly entered the complete contents of the certificate.
- EntityID: https://auth.xyz.com
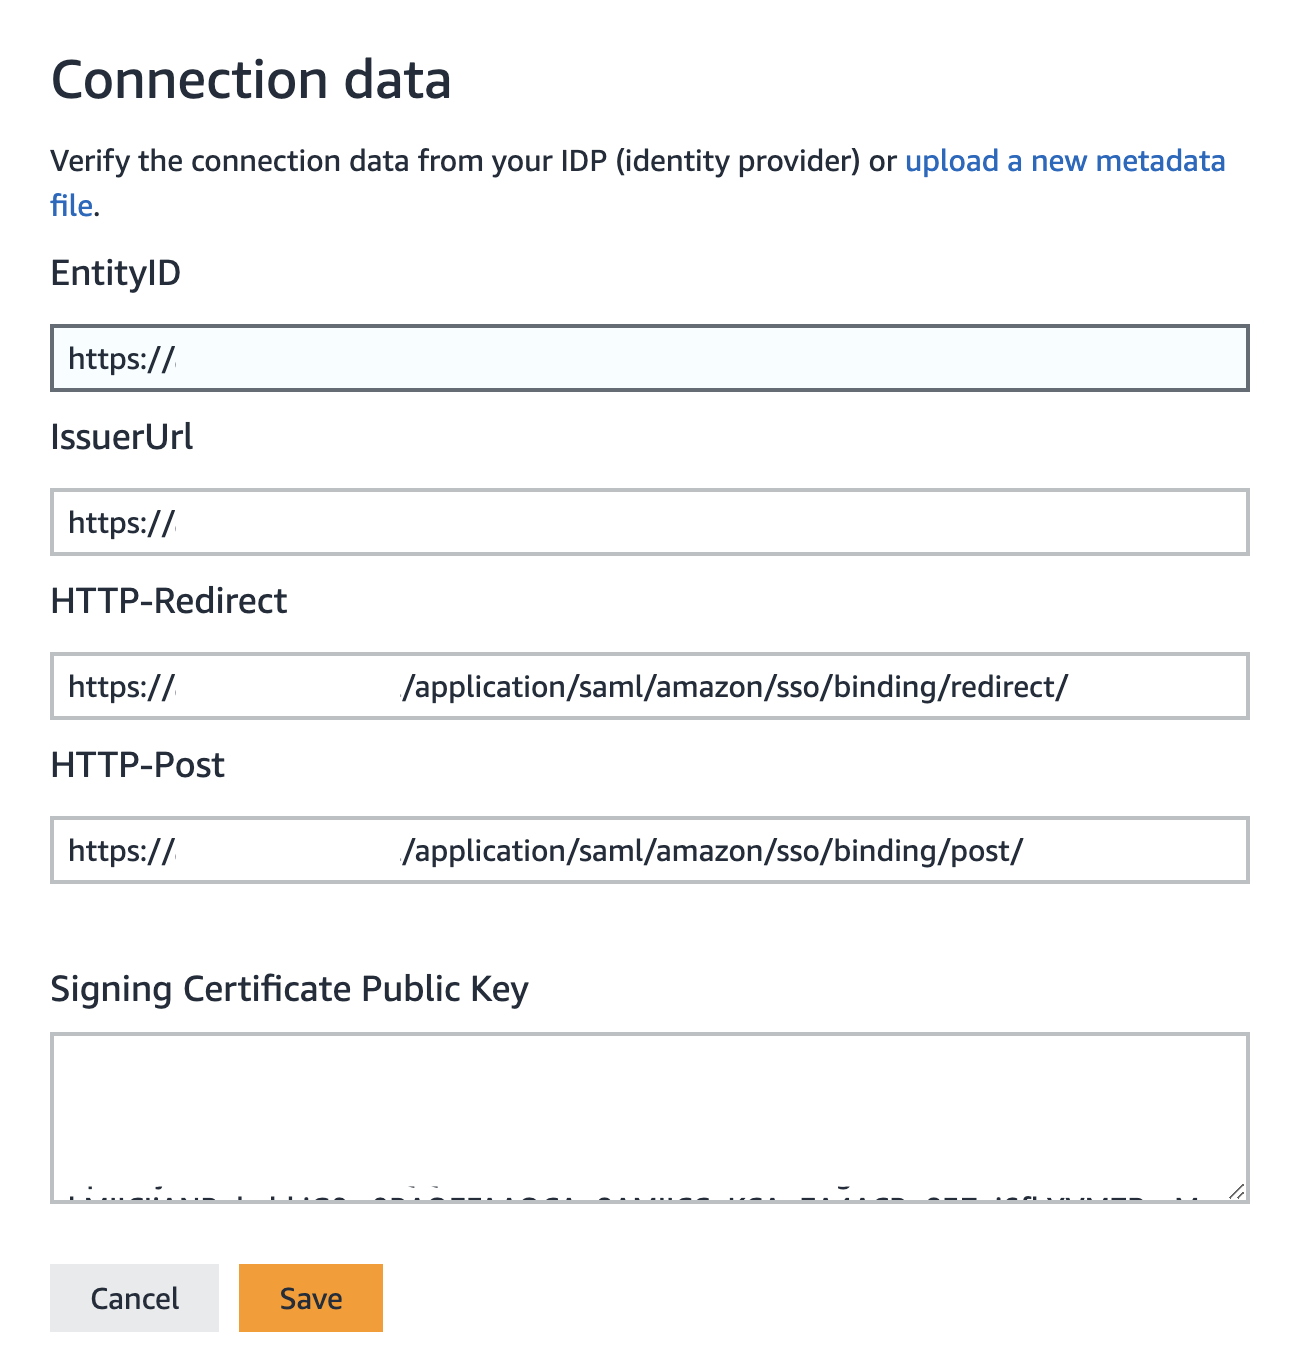
- Click Save to move on.
Attribute statement
- We will need to provide user attributes that will be passed as part of the SAML response. At this stage, click Skip.
- Attribute mapping – fill in:
- E-mail: http://schemas.xmlsoap.org/ws/2005/05/identity/claims/emailaddress
- Select Full Name from the menu: http://schemas.microsoft.com/identity/claims/displayname
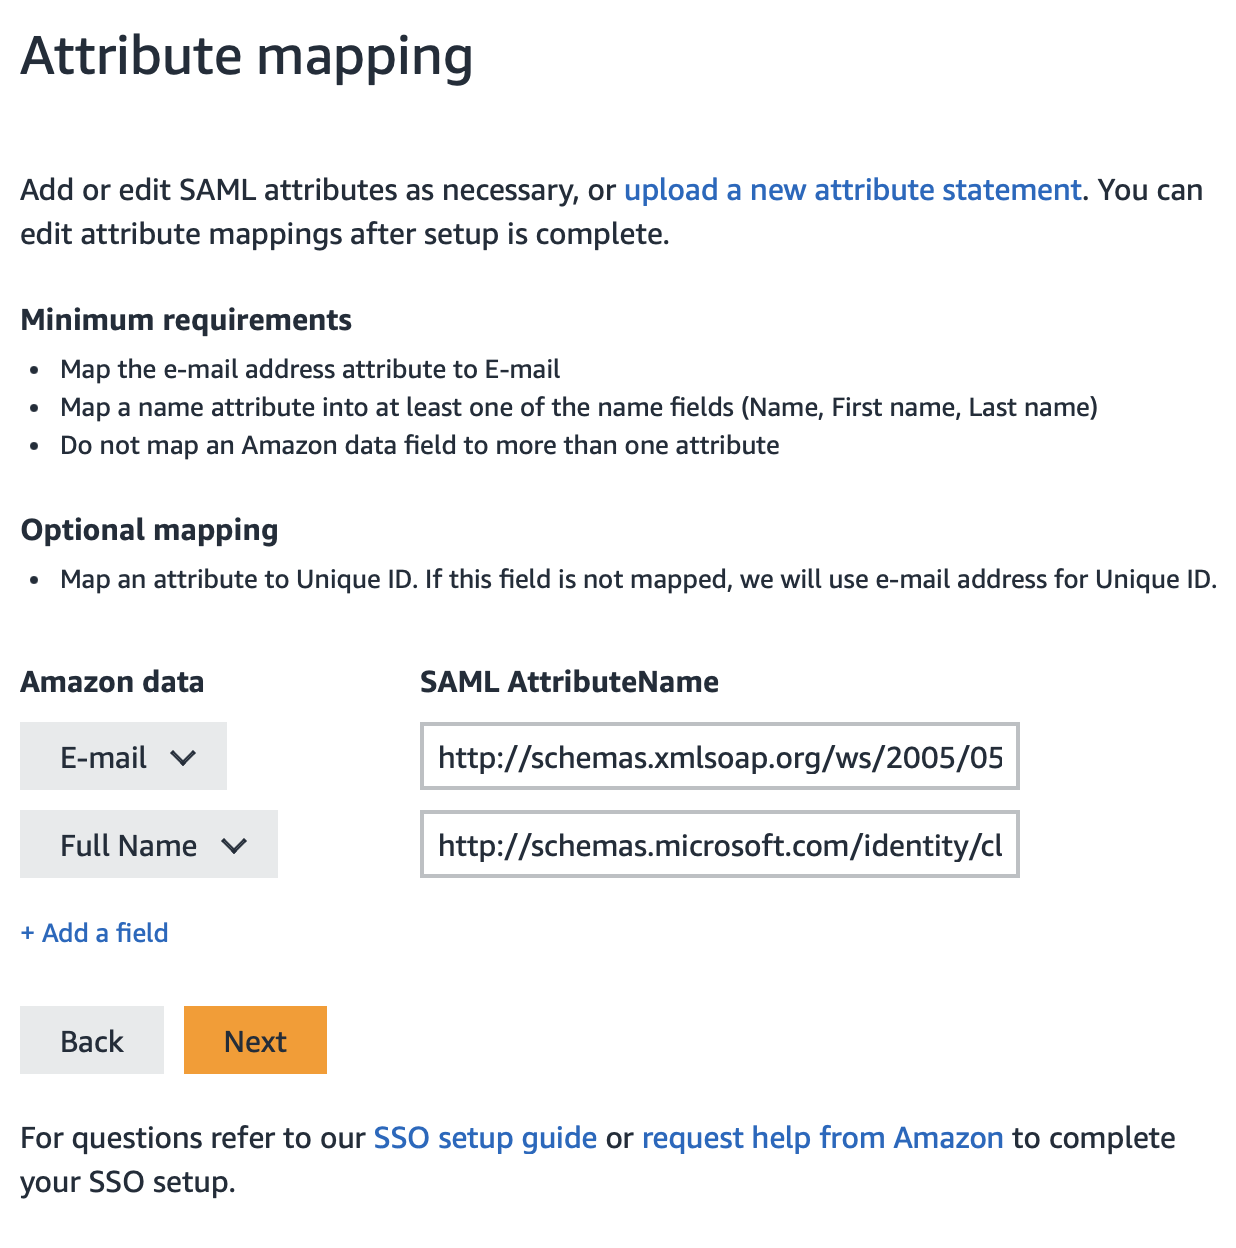
- Make sure the above attributes are mapped correctly. This will transfer the necessary user information from the identity provider to Amazon Business during single sign-on (SSO).
- Click Next to move on.
Amazon connection data
- Download the Metadata XML file. This file will be necessary to configure the provider in Authentik.
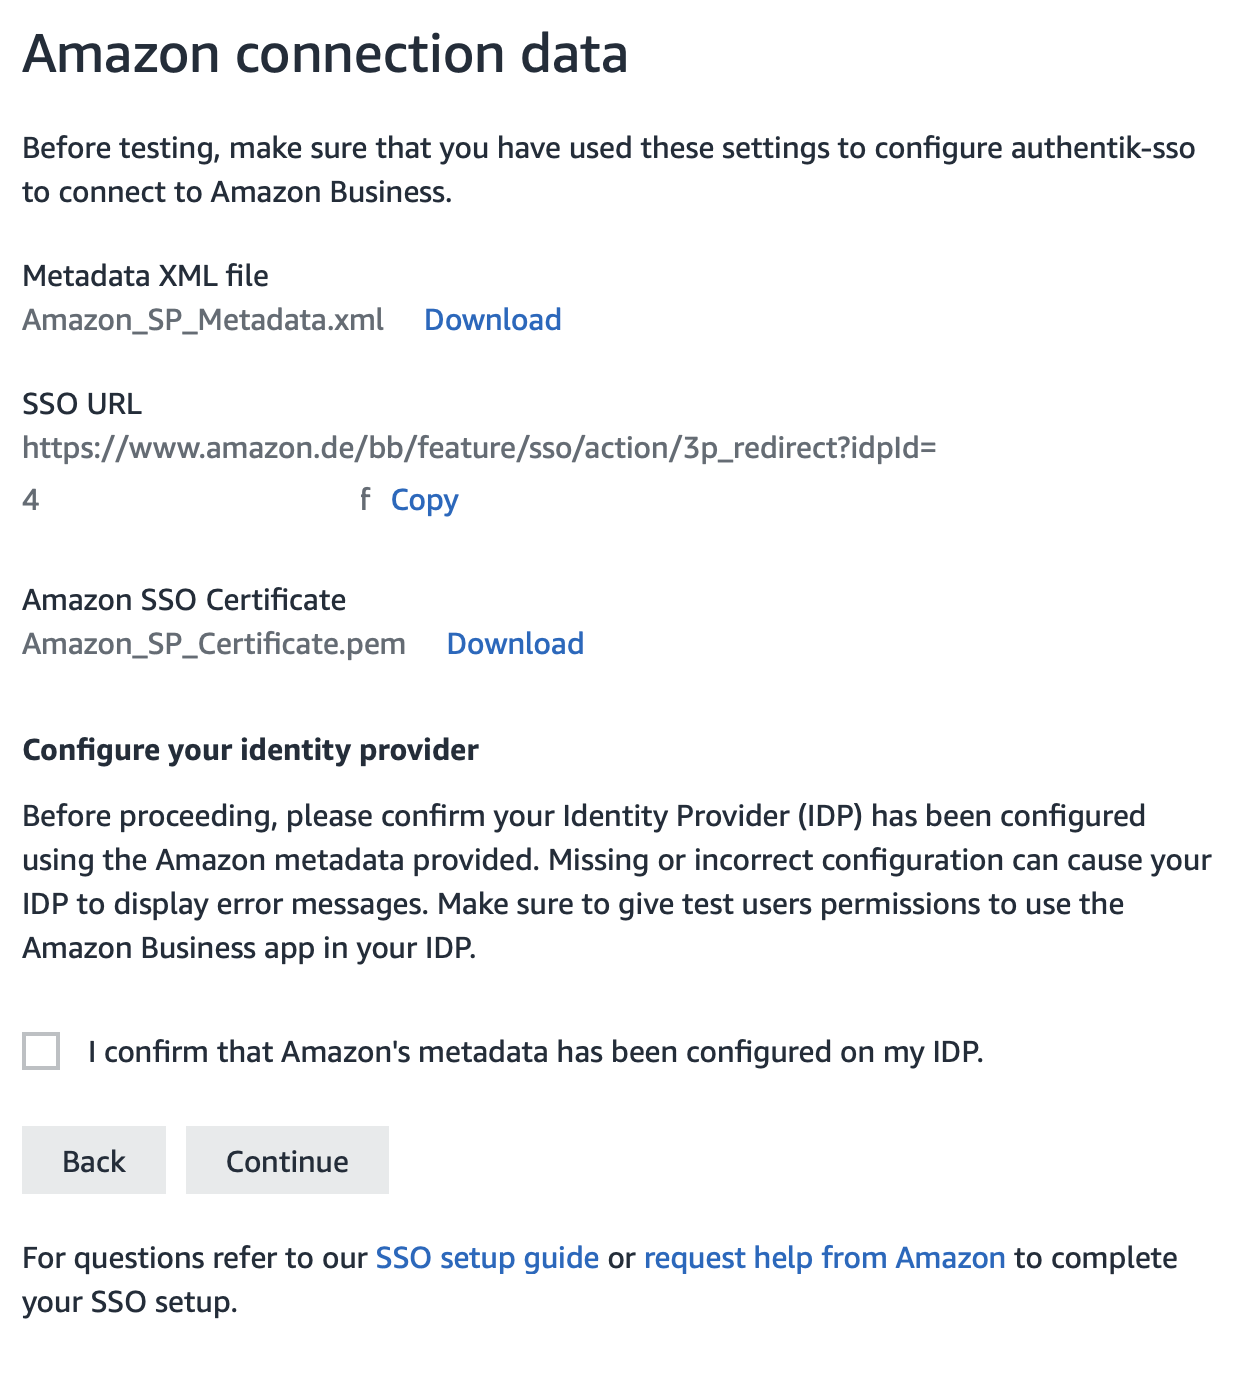
- Check the confirmation of your identity provider and click Continue.
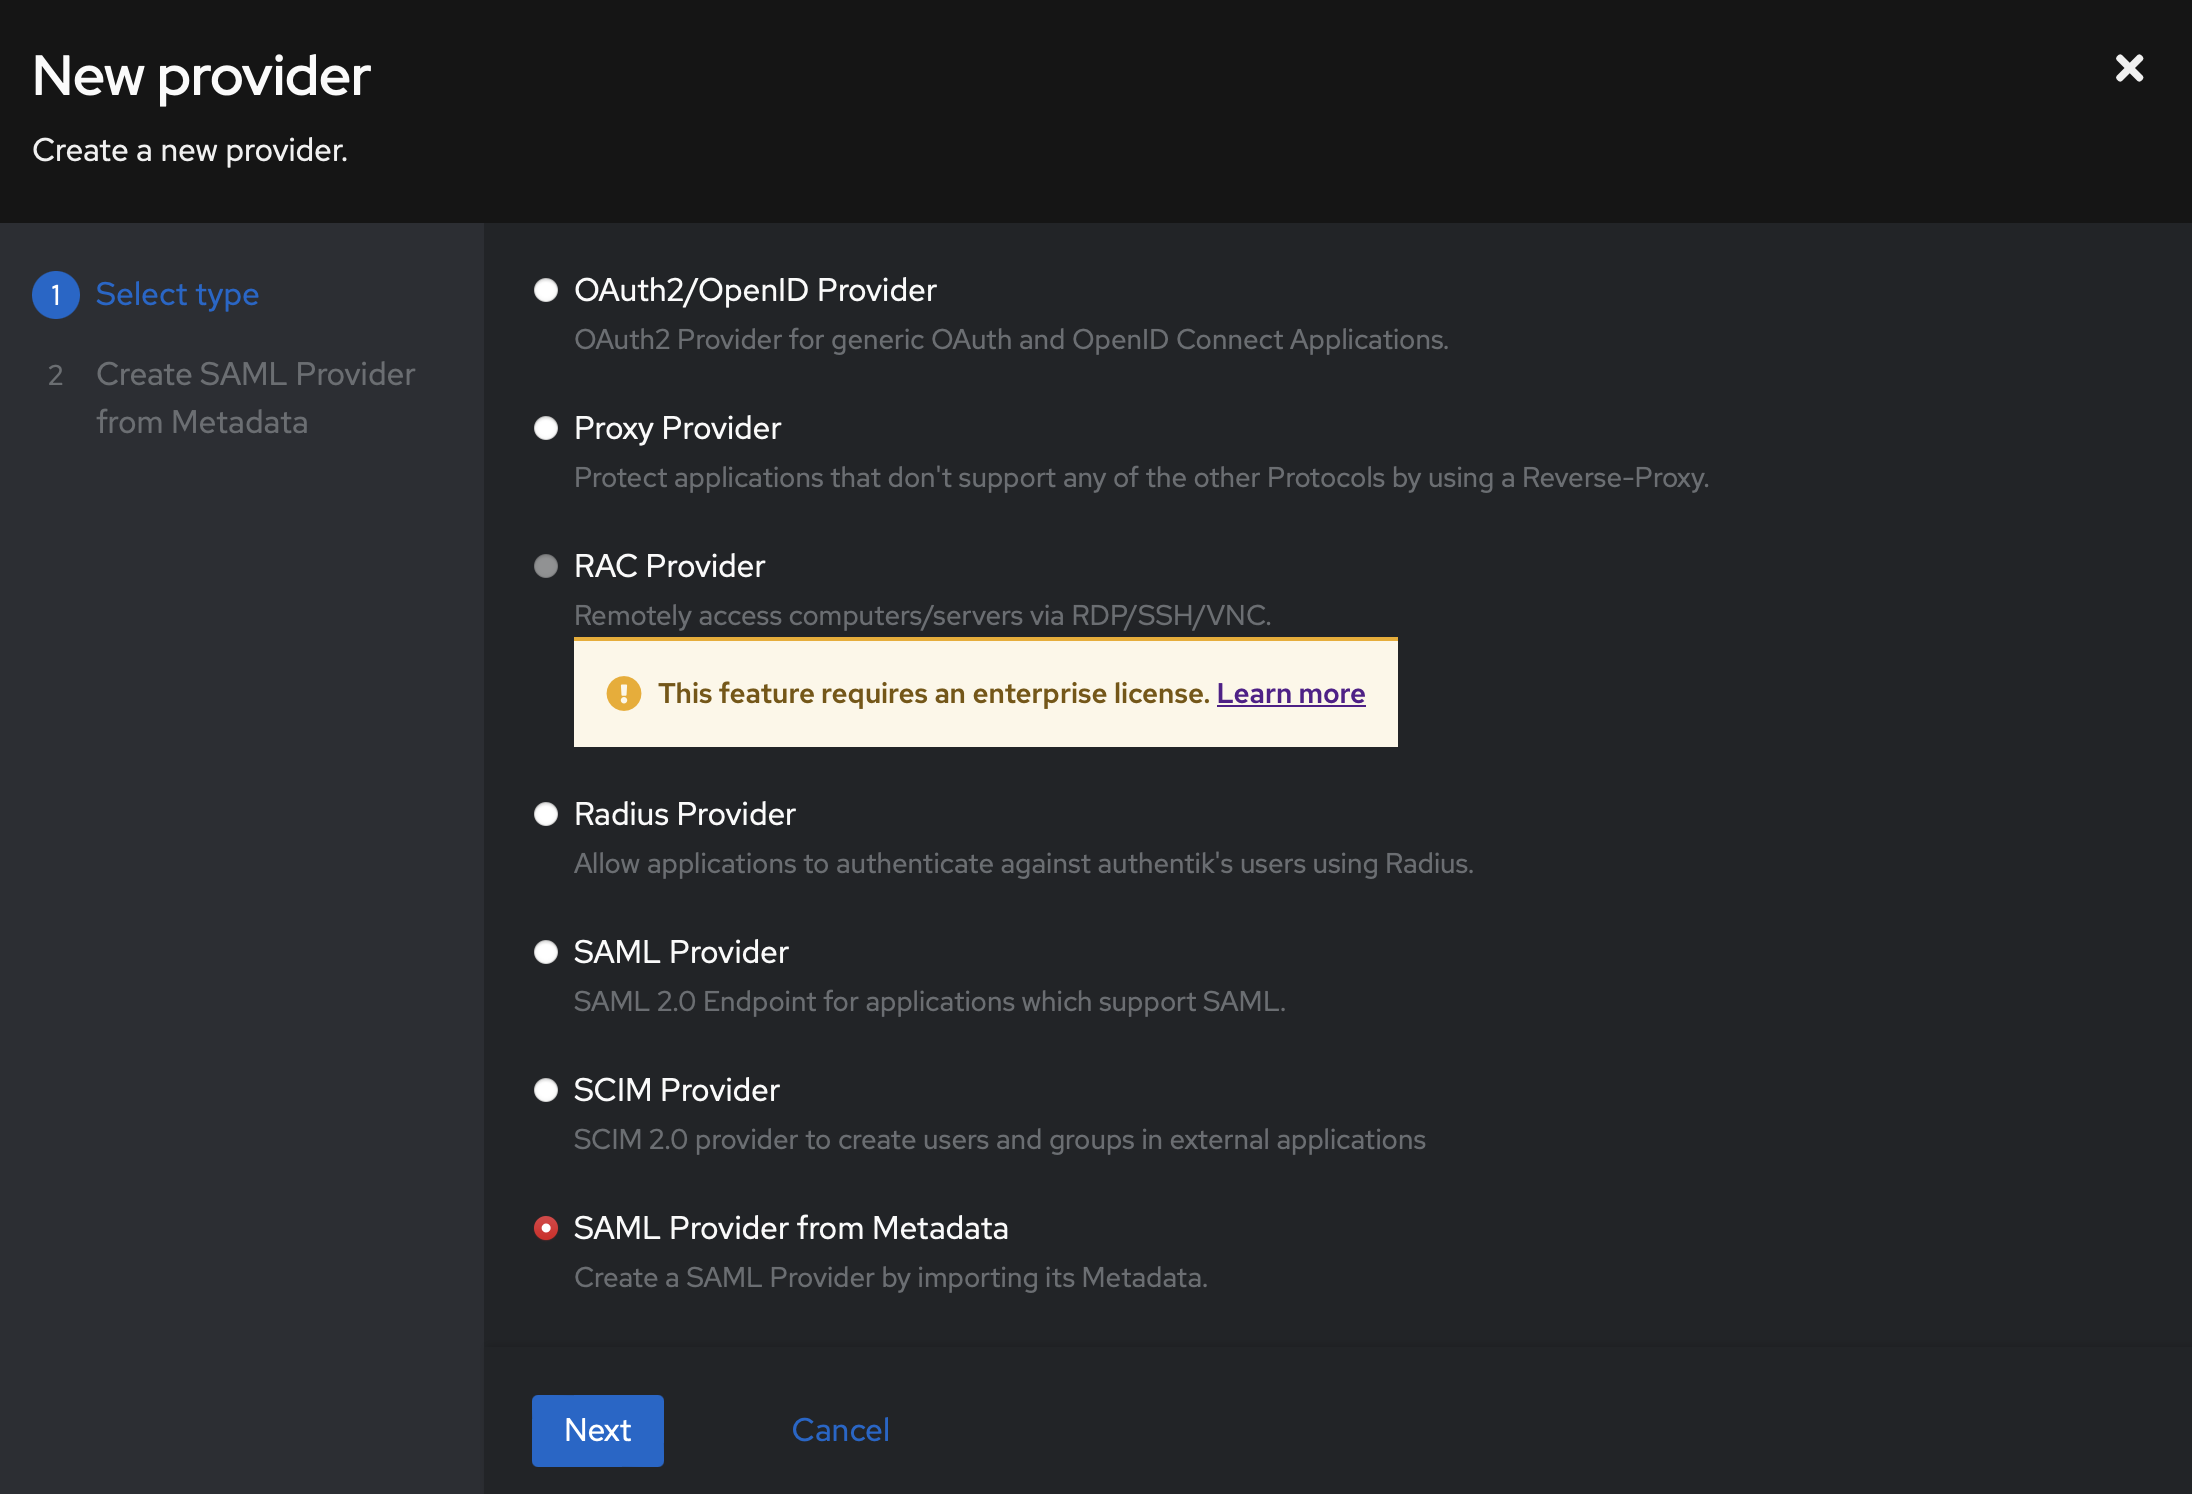
Step 2 – Configuration in Authentik
- First, log in to your account and go to the Authentik administrative interface.
- After successfully logging in, go to the Applications tab on the left side of the screen and then select Providers.

- Click Create and select the type of SAML Provider from Metadata. The next step will be to click Next to proceed.
- Complete the parameters:
- Name: amazon
- Authorization flow: choose your configured or set explicit or implicit consent. (This setting refers to the function used during authorization for this application – we define whether Authentik should display a button that allows you to go to the application after logging in, or simply redirect you without asking).
- Metadata: Upload the metadata file in XML format, previously downloaded from the Amazon Business website when setting up SSO.
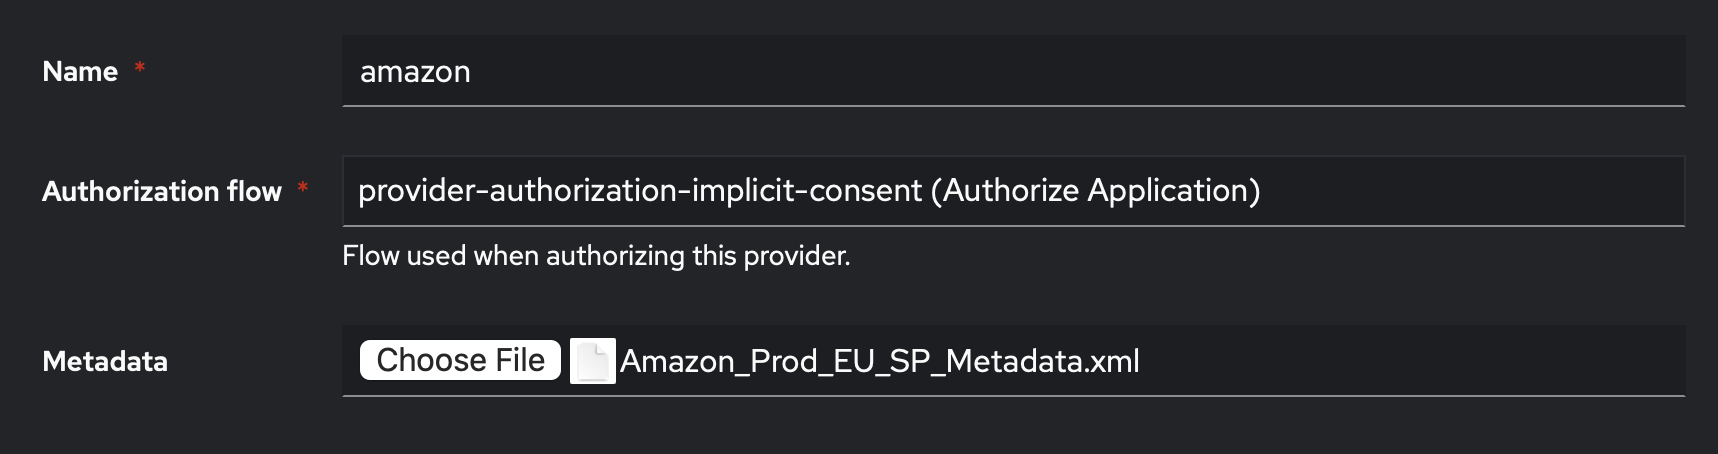
- Save with the Finish button and wait for the configuration to be pulled from the file.
- On the main screen of the provider list, you will see the SAML Provider you just created for Amazon.

- We still need to hook the Authentik certificate to this provider. Go back to the SAML Provider configuration for Amazon.
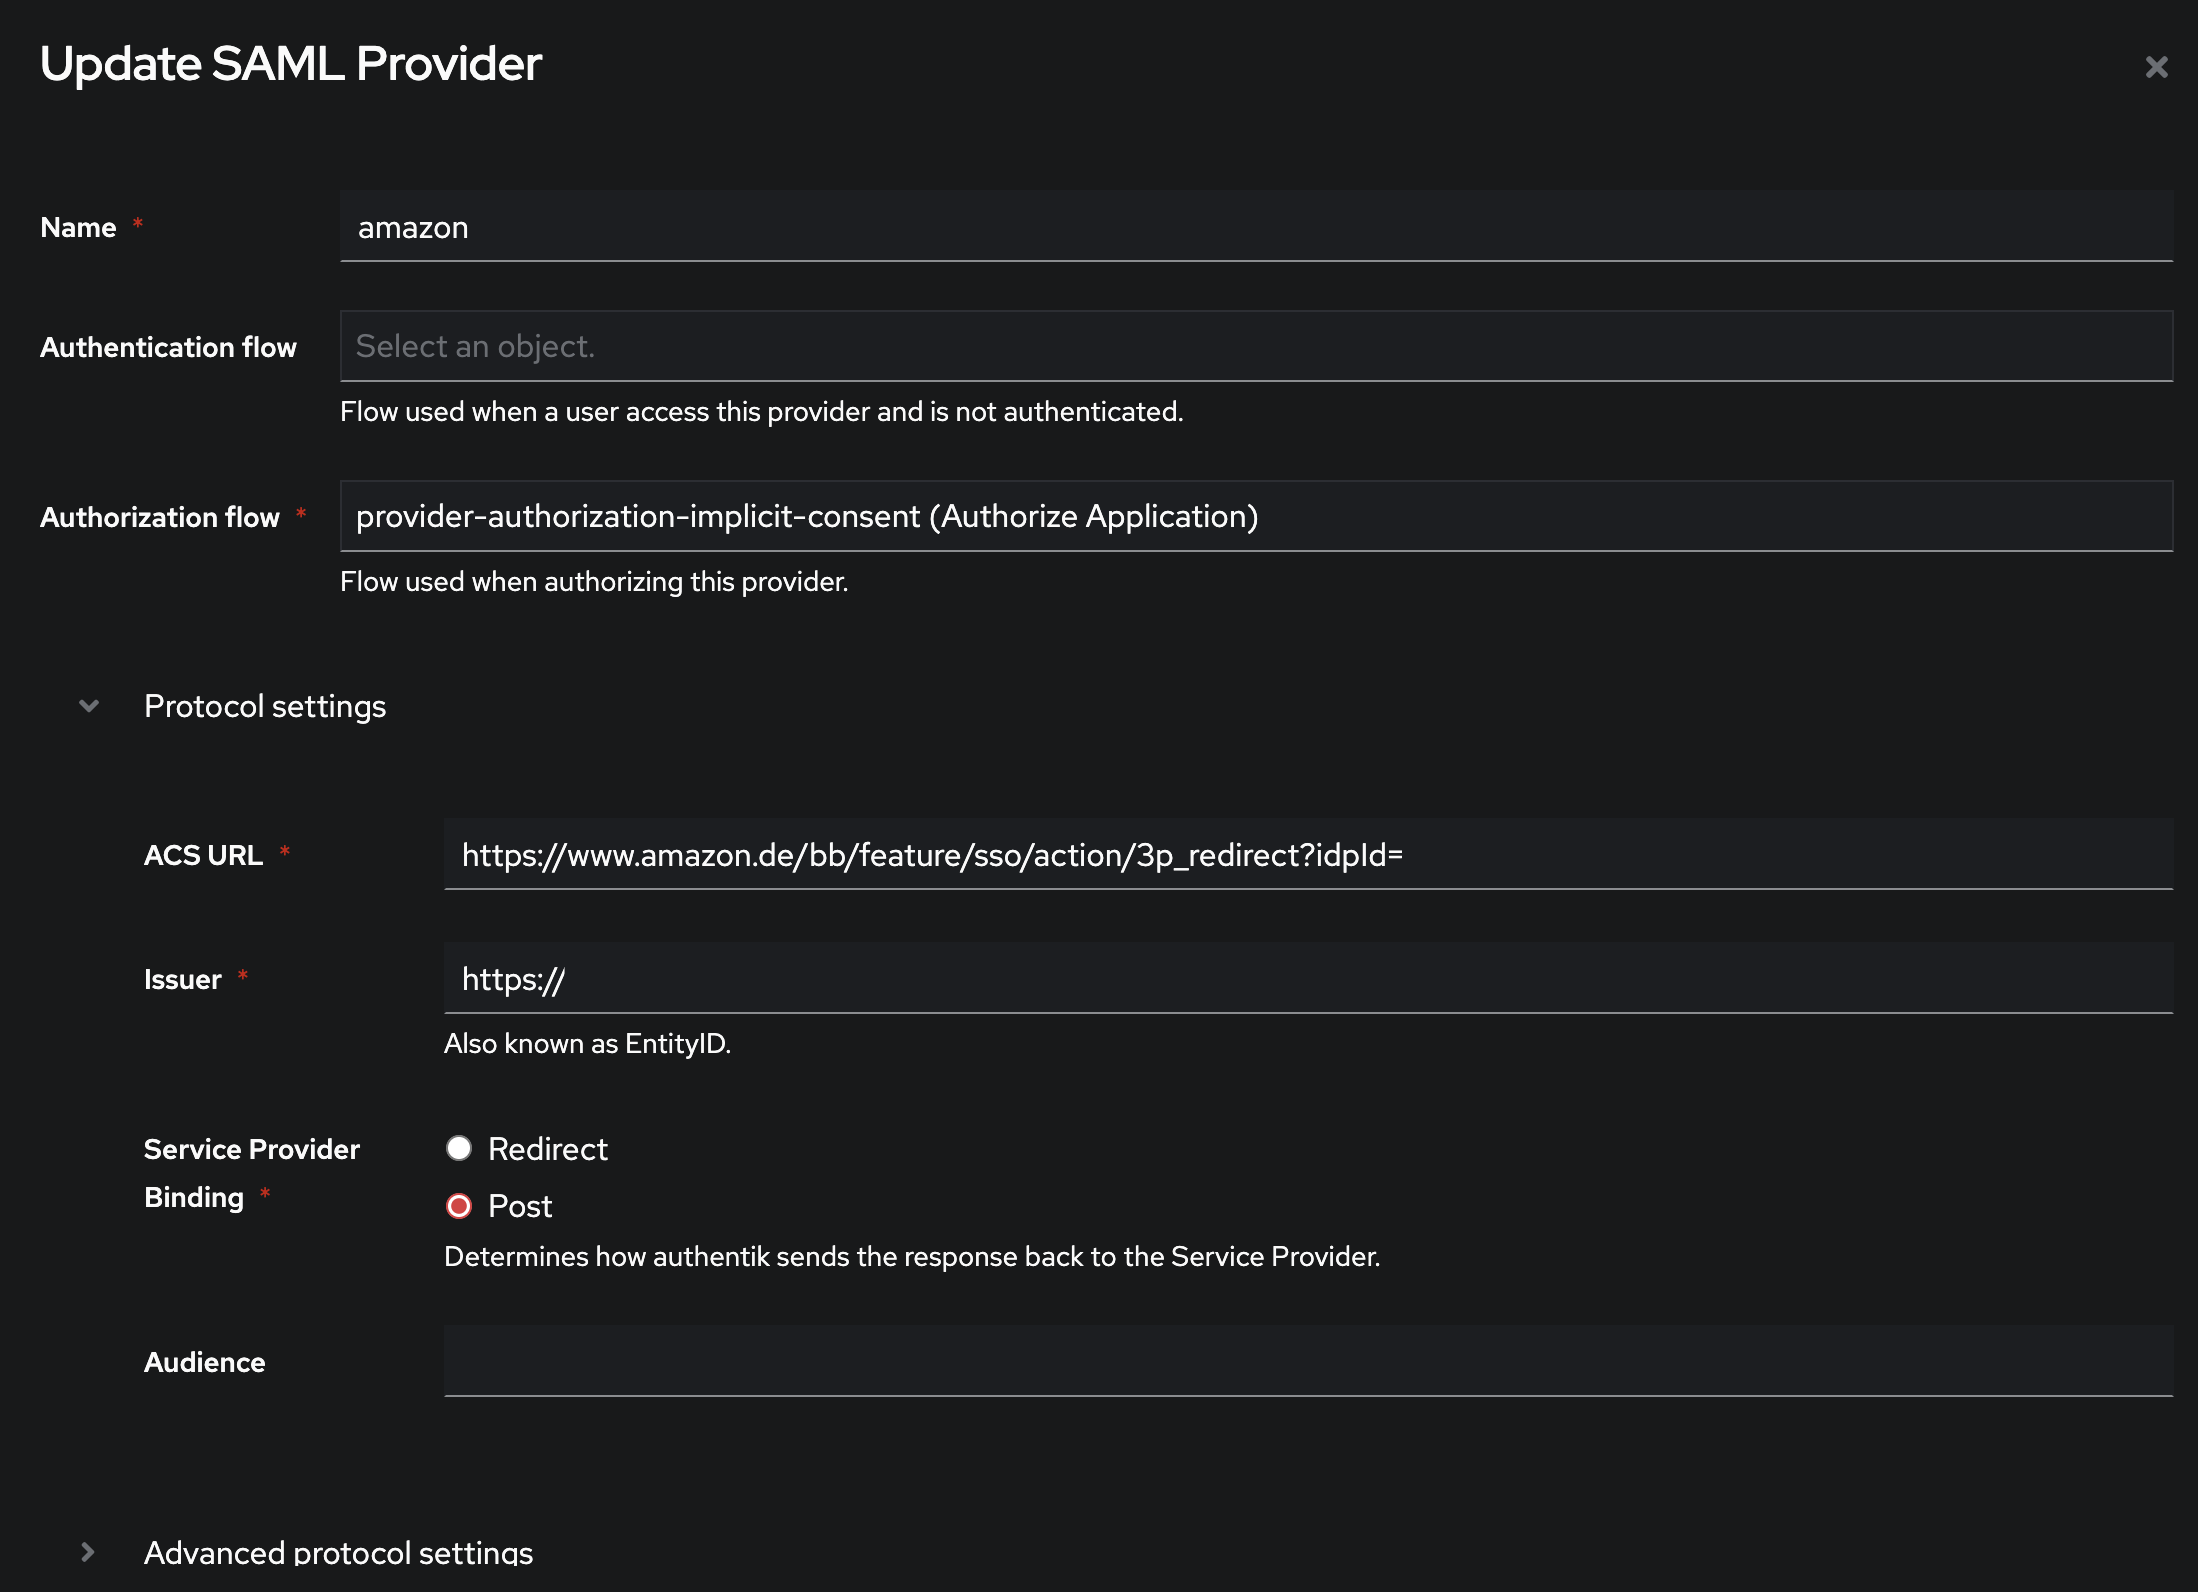
- Go below to the Advanced protocol settings section.
- Signing Certificate: Select the default certificate from Authentik or another one you configured earlier (instead of the default one).
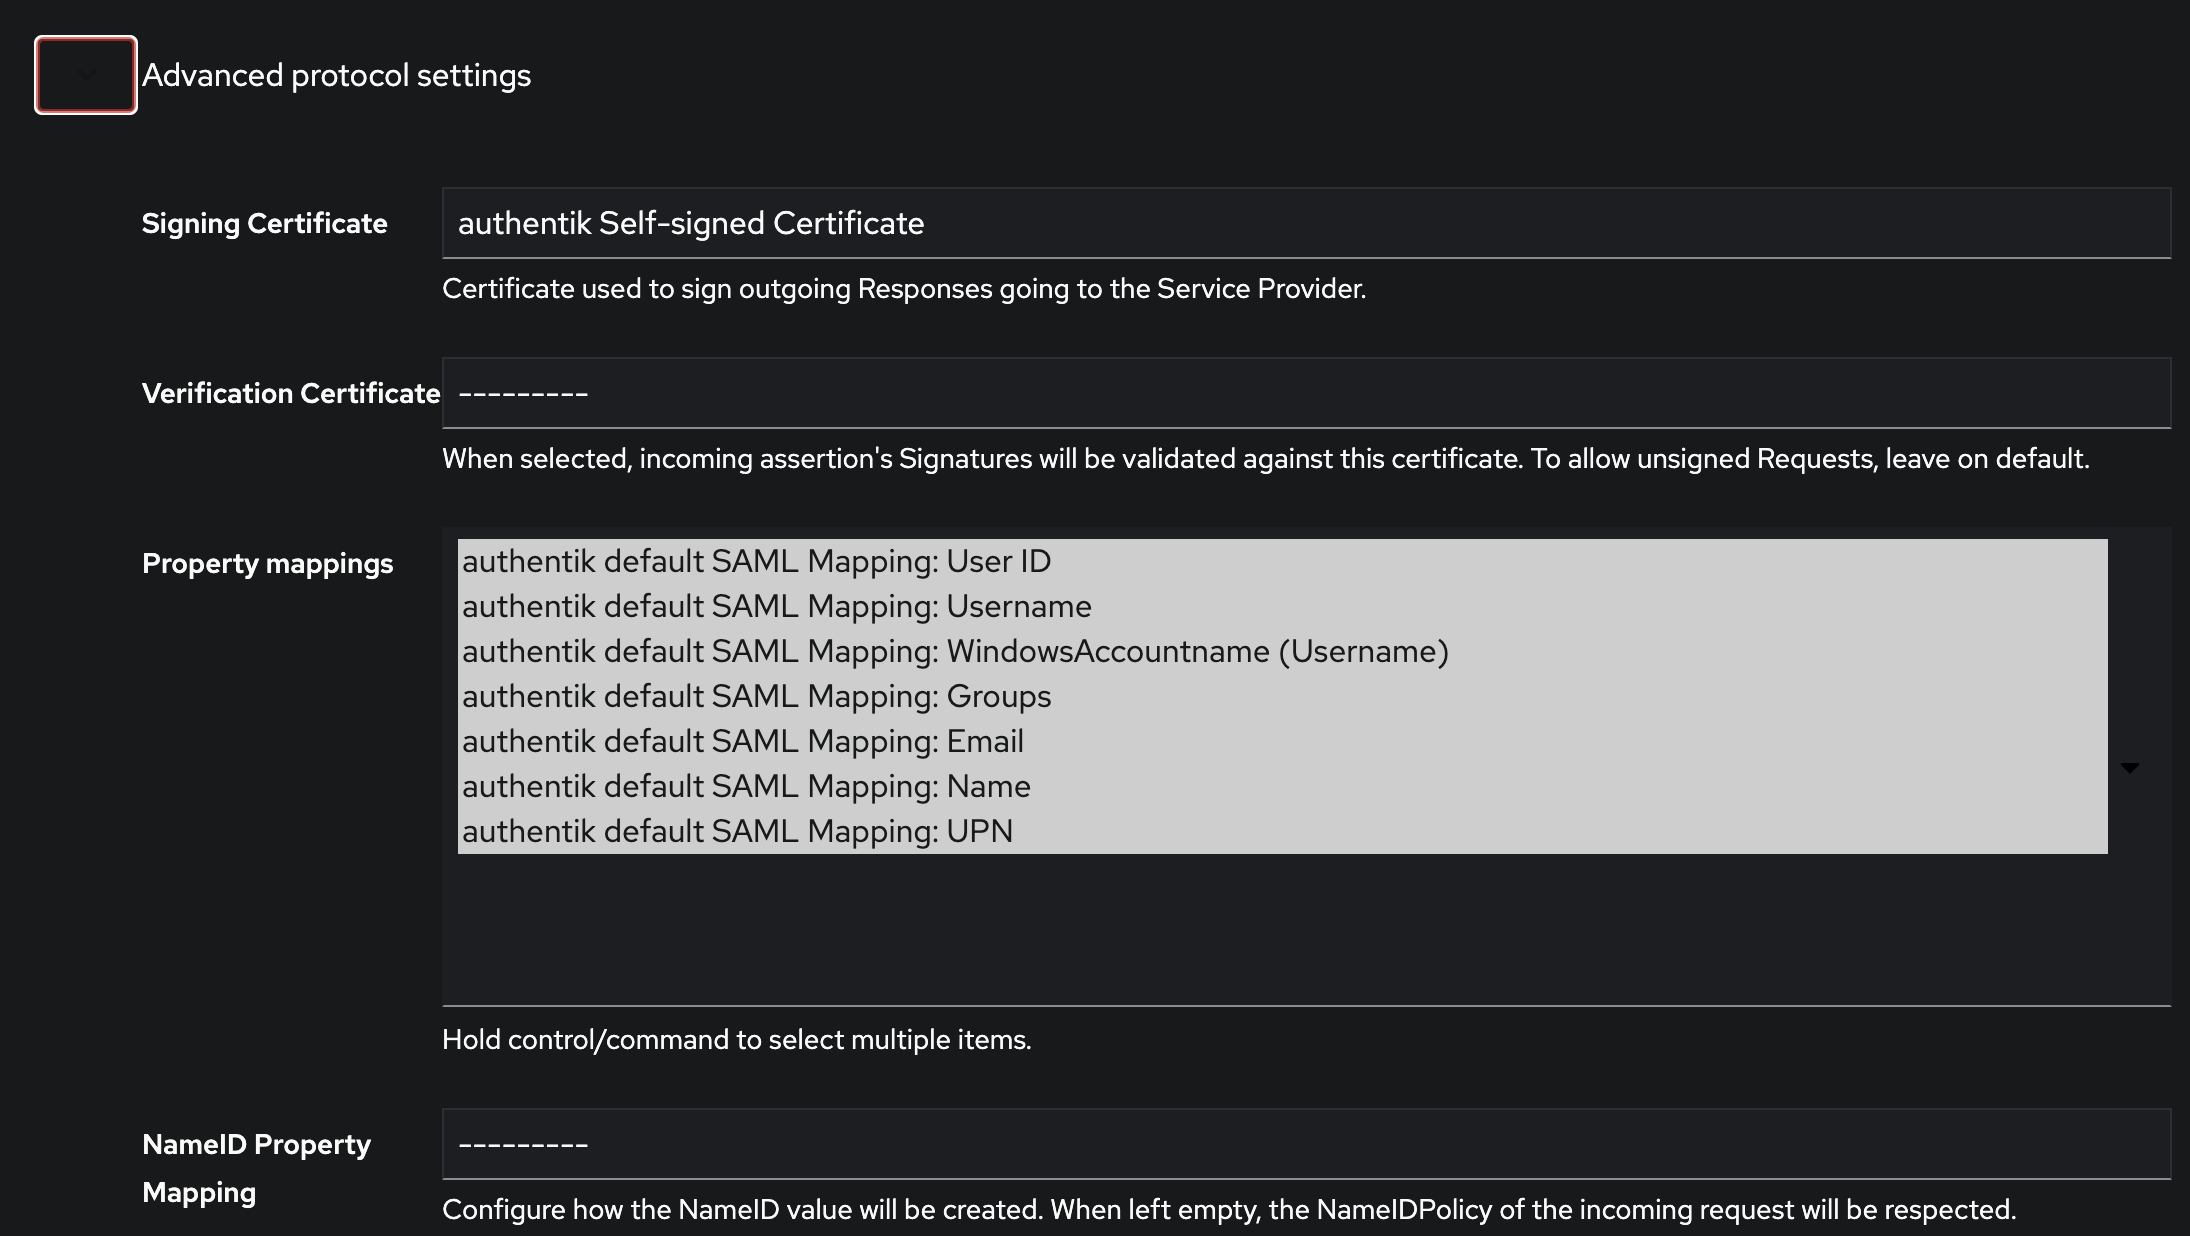
- Save your settings. We will now move on to creating applications in Authentik.
- On the left side of the screen, select Applications and then Applications again.
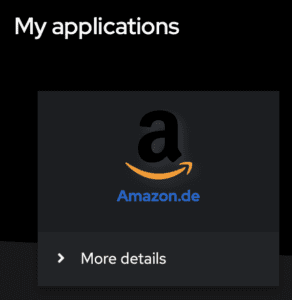
- Kliknij Create and fill the application with the following values:
- Name: Amazon.de
- Slug: amazon
- Provider: amazon
- UI Settings you may or may not want to complete.
- Icon: download the Amazon icon from the Internet and upload it.
- Publisher: i.e. Amazon Inc.
- Description: example My company’s shopping center on Amazon Business
- Finally, confirm the creation of the application with the Create button.
Step 3 – Check the configuration in Amazon Business
Testing the connection
- To test the performance of our configuration with the identity provider, click the button to start testing. A new browser tab will open, which will redirect you to IdP for authentication. In Authentik, log in as a user who has access to the Amazon Business application. If you are already authenticated, Amazon will attempt to profile you using SSO to Amazon Business. After successful authentication, you will be able to go to the Amazon.de website.
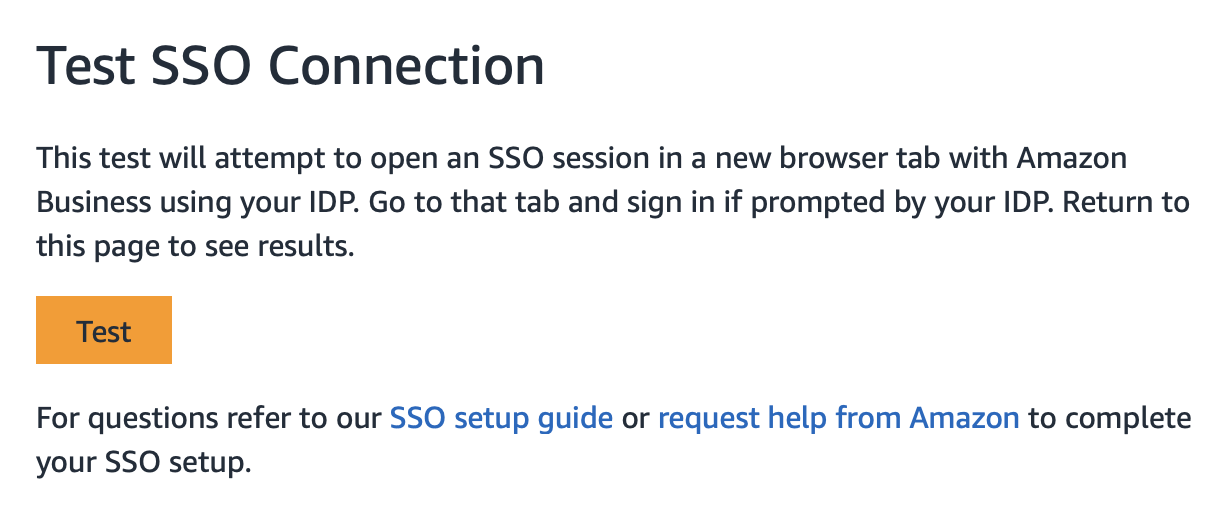
- If the test is successful, you will then see a summary of this in a message on Amazon’s website.
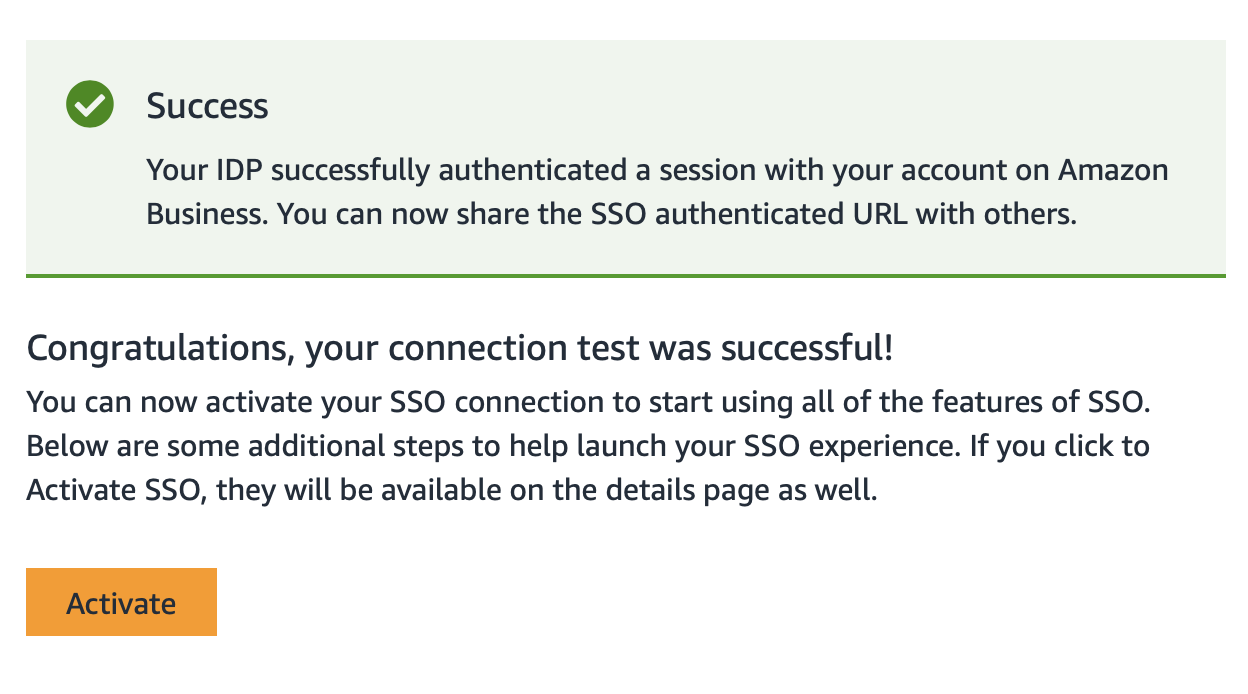
- Check the box confirming the completion of all tests. The first time someone logs into Amazon Business using SSO, they will automatically receive an Amazon Business account.
Activation of communication with identity provider
- Confirm the configuration check and accept the start of the connection on the so-called production to activate communication with the identity provider.
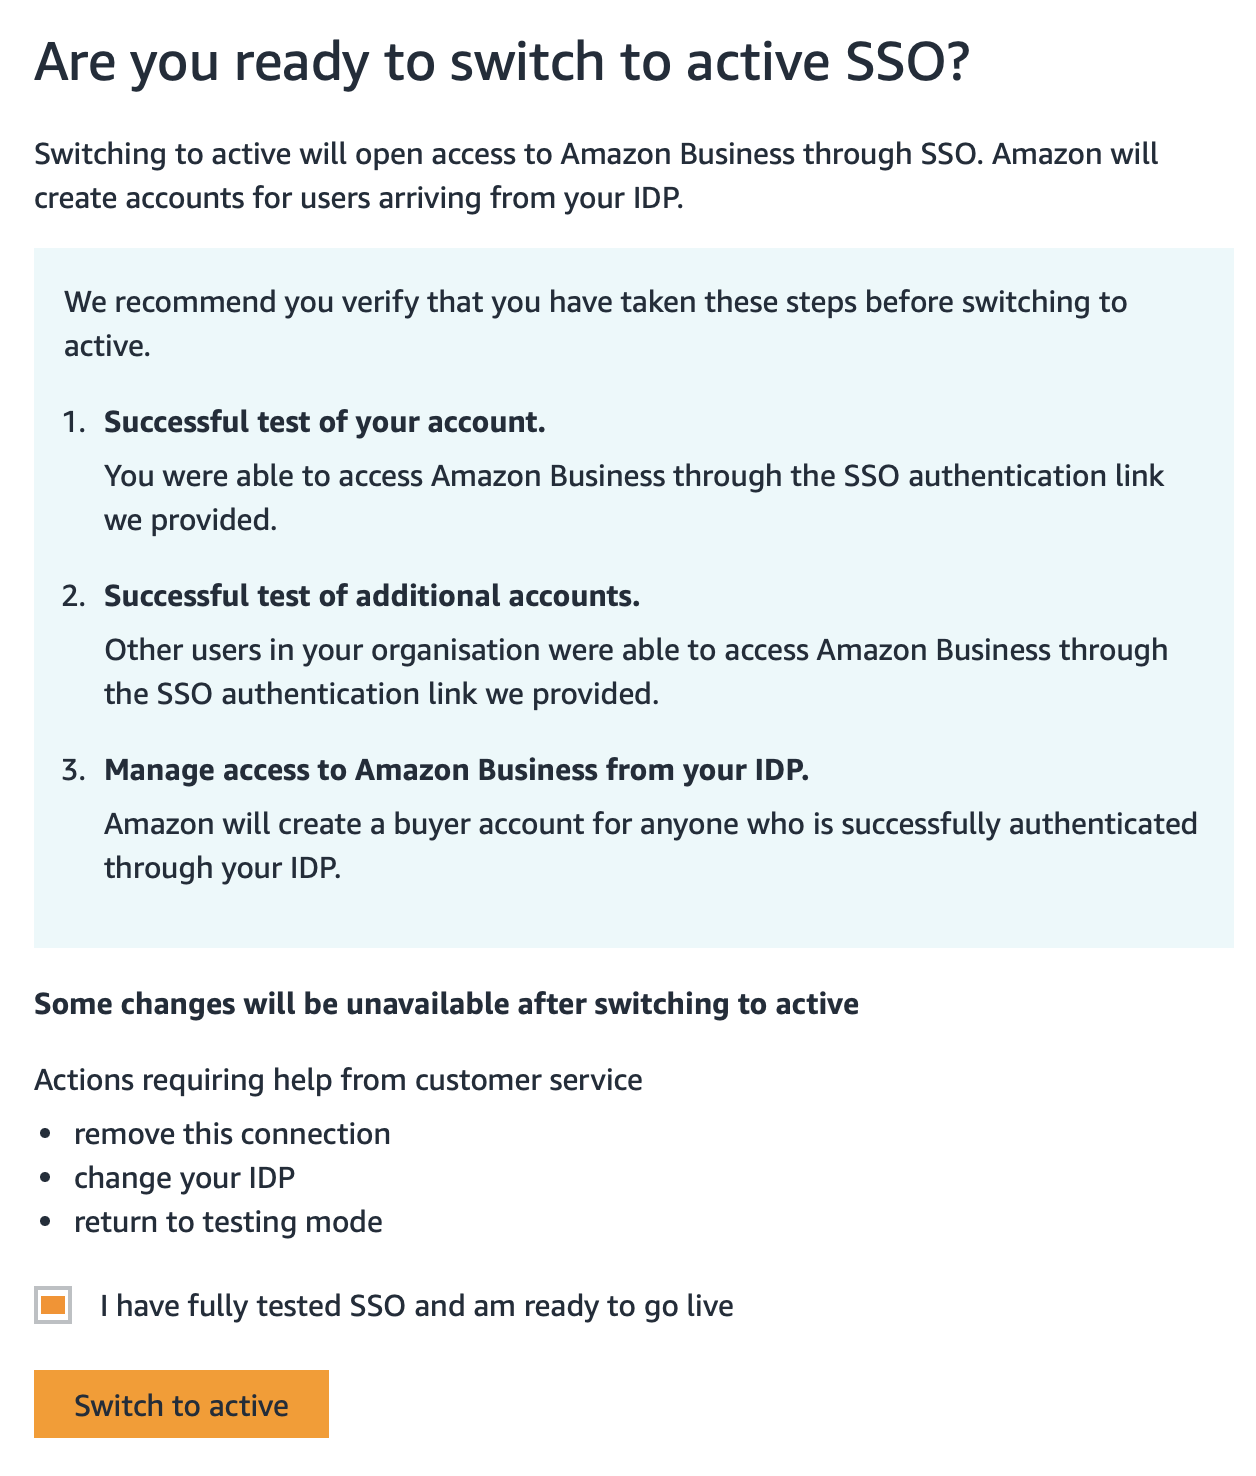
- Check the confirmation to test the settings and click Switch to active.
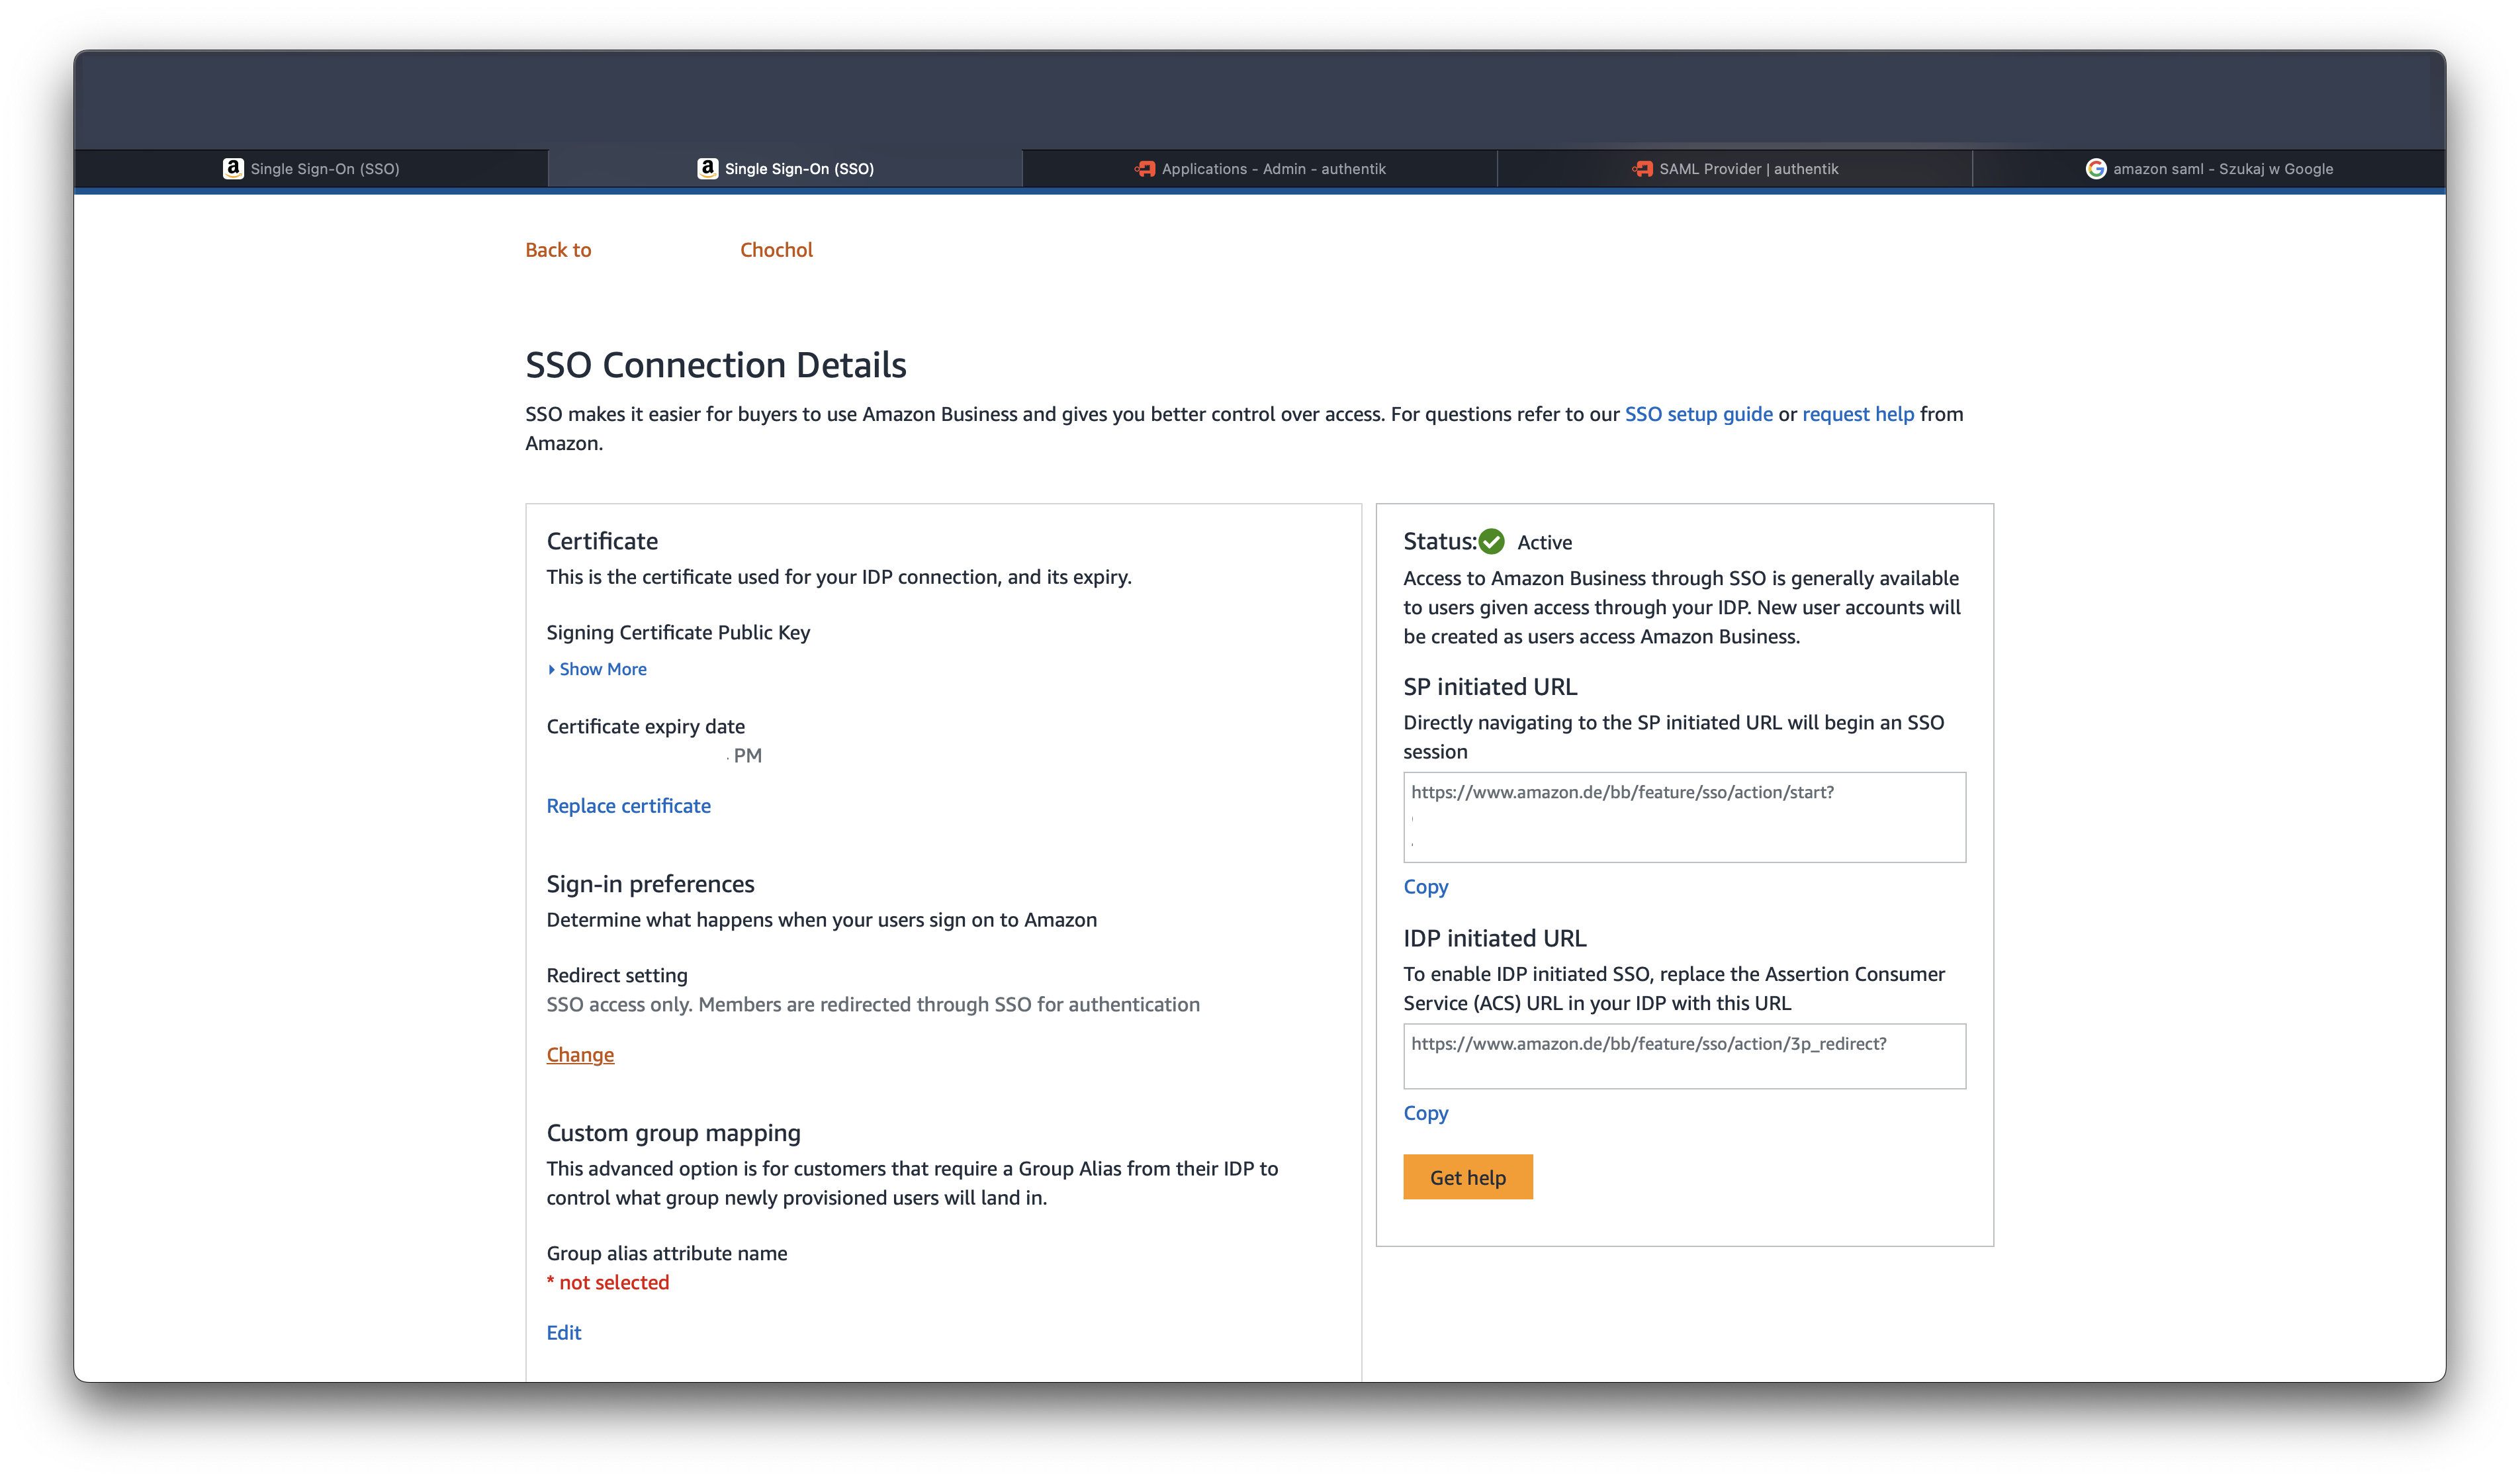
Confirming SSO settings in Amazon Business
Leave a Reply