
Hello!
Today, I’ll be presenting a tutorial that’s particularly useful for network enthusiasts and MikroTik device users. Our focus is on configuring the Leox LXT-010S-H module in a Mikrotik RB5009 router, specifically with an Orange Poland internet connection. This step is crucial for those who wish to upgrade their standard ISP-provided module to this more sophisticated device.
For acquiring a GPON SFP module, you can visit the official distributor using the provided link. It’s important to note that my recommendation is based purely on personal experience and is not influenced by any sponsored collaboration or affiliate agreement. My own purchasing experience with this process has been positive, and I confidently recommend the same to you. This hands-on approach will ensure you get the right product for your networking needs.
What is the Leox LXT-010S-H module?
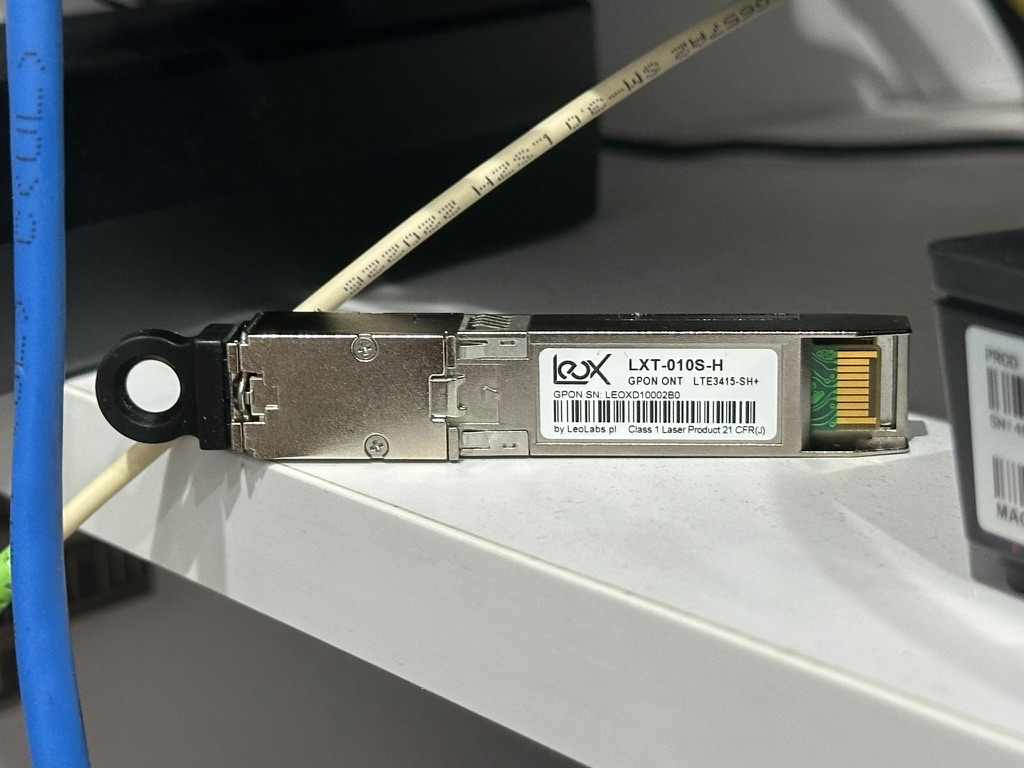
The Leox LXT-010S-H module is a GPON SFP module designed to provide triple-play services (internet, video, voice) in FTTH (Fiber To The Home) or FTTP (Fiber To The Premises) applications. It is compatible with most OLT (Optical Line Terminal) vendors, making it a universal solution for a variety of network needs.
Technical parameters
- ITU-T G.984 compliant GPON interface, with download speeds of 2.5 Gbps and upload speeds of 1.25 Gbps.
- Support for the full range of FCAPS functions (management, monitoring, maintenance) through compliance with the standard OMCI (ONT Management and Control Interface) definition.
- 3.3V DC single power supply.
- Layer 2 of network communication.
- SFP 2X10 Electrical Connector.
- 1 GPON port (SC/UPC).
- Industrial temperature range from -40°C to 85°C.
- Features such as IGMP snooping v2/v3, use of VLAN (Q-in-Q), translation and tagging on each Ethernet port.
- Management by OMCI.
- 2.5 Gbps speed setting possible.
- Compatibility with a variety of OLT vendors, including Huawei, Dasan, ZTE, and others.
The cartridge is equipped with the Realtek RTL9601CI chipset, has 128 MB of flash memory and 32 MB of RAM. It runs on Linux 3.18 and supports a TTL UART interface with a transmission rate of 115200 8-N-1, accessible from the top surface of the module. The module supports dual boot, which means it contains two operating system images – one for use and the other as a backup.
The Leox LXT-010S-H module is clearly, therefore, a highly configurable and versatile device that can be adapted to different network environments and user requirements.
Preparation
Some ISP may have specific requirements for the equipment used to connect to their networks, and failure to comply with these requirements can lead to a variety of consequences, including the possibility of voiding warranties, service quality problems and even, in extreme cases, termination of the contract. It is always a good idea to be aware of any potential consequences to avoid surprises in the future.
Before you start configuring the Leox GPON ONT module on your Mikrotik router, there are several key preparatory steps you should follow to ensure a smooth and successful setup:
Router
- Router selection: When selecting a router for configuring the Leox GPON ONT module, it’s critical to ensure that you’re using the right model. In this tutorial, I’m using the Mikrotik RB5009UPr+S+IN, which is notably equipped with an SFP+ port. It’s this specific port that we will utilize for connecting the Leox module. This detail is crucial because the Leox module is not compatible with a standard SFP port (without the plus). Therefore, choosing a router model like the RB5009UPr+S+IN, which has the necessary SFP+ port, is key to the successful integration of the Leox GPON ONT module into your network setup.
- Router firmware: RouterOS v7.13.2
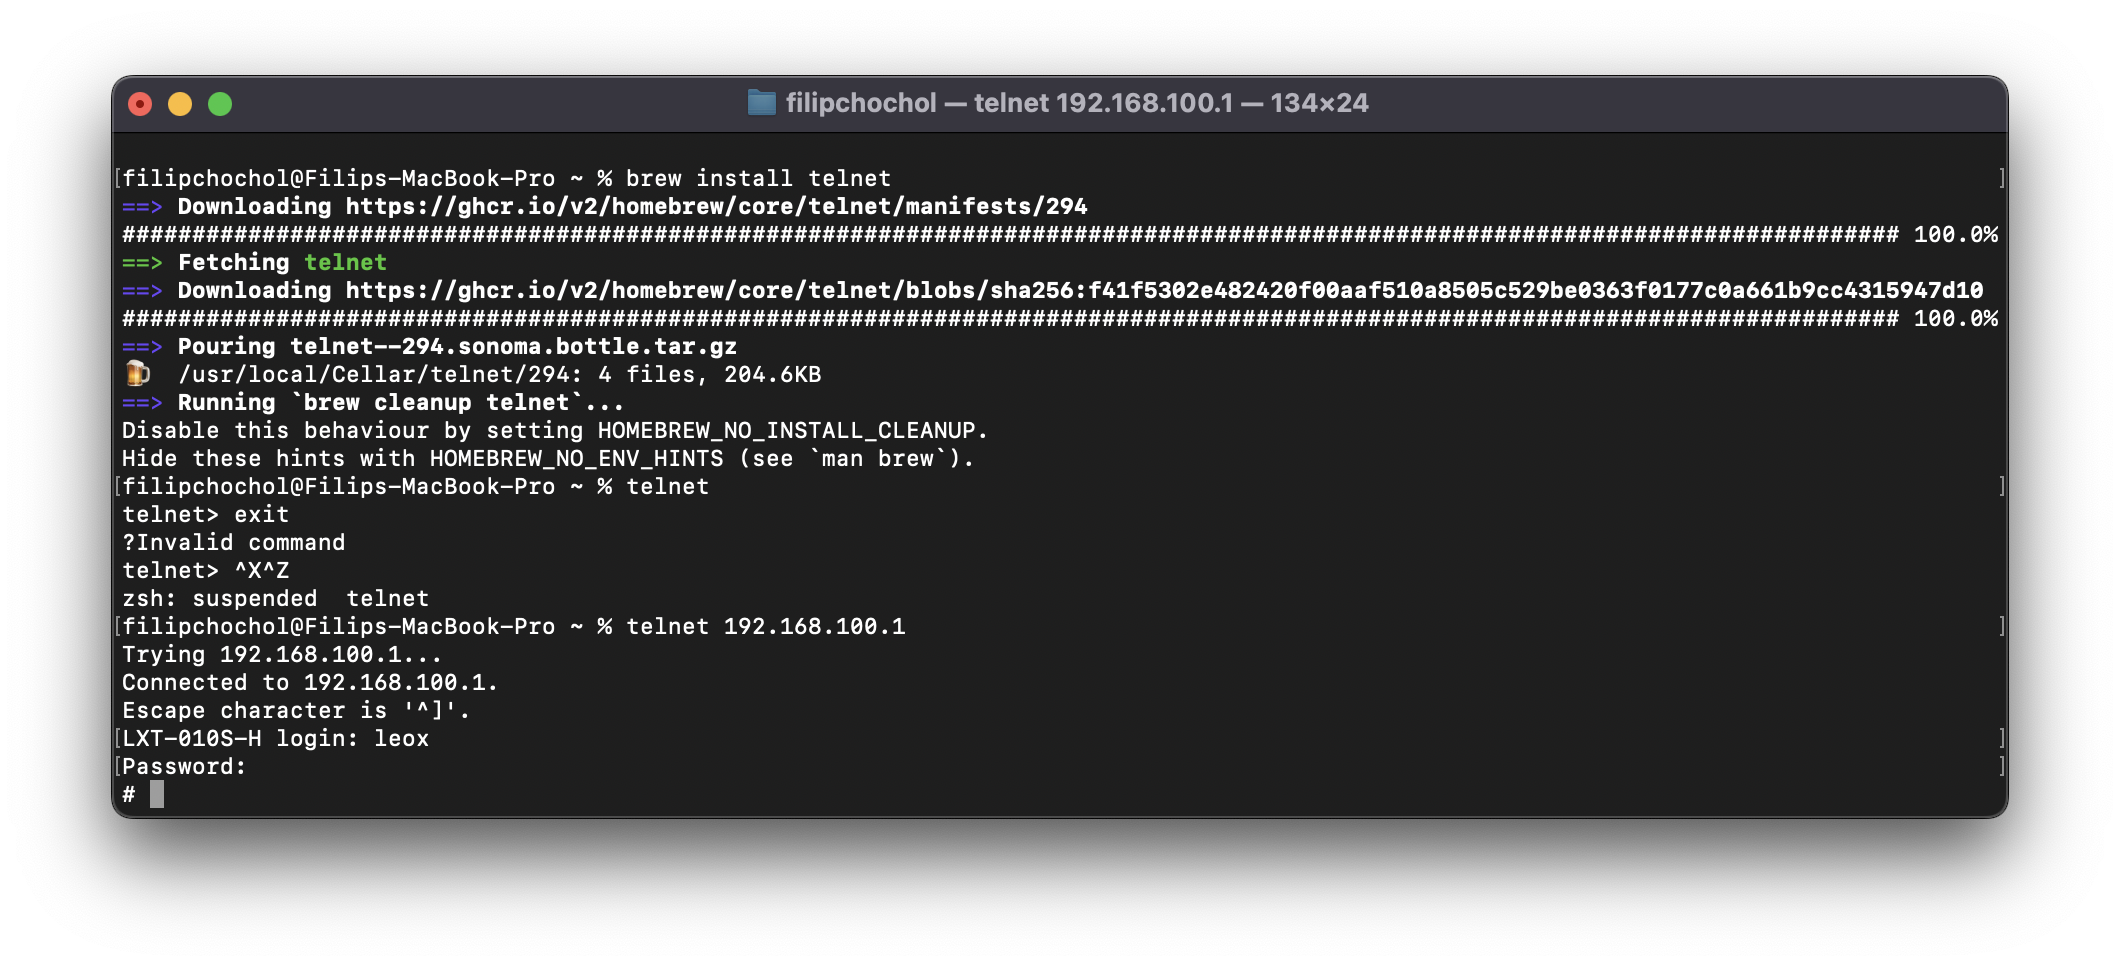
Telnet
- For configuring the Leox GPON ONT module, we will use the Telnet protocol. This method of communication is extremely useful, as it allows access to settings that may not be available in the module’s WebGui interface. With Telnet, we can make a complete and detailed configuration of the device.
- It is also important to pay attention to system compatibility, especially for users of macOS computers, where Telnet is not installed by default. If you need instructions on how to install Telnet on a Mac, you can use my tutorial, which describes the process in detail. The guide contains all the necessary information and steps to help you install Telnet on your macOS device.
Login details from the operator
When setting up your GPON ONT module with a Mikrotik router, it’s essential to prepare the correct login details from your ISP for successful configuration. Here’s a summary based on different ISPs:
- Orange FTTH (PL): Typically, user authentication is carried out using PPPoE data. You’ll need to note down your PPPoE username and password, as these will be crucial for the configuration steps. Also, remember that Internet access with Orange often involves VLAN 35.
- Supermedia (Warsaw, PL): Authorization might be based on the ONT’s serial number, with IP addressing assigned via DHCP. Static IP addresses are usually linked to a device’s MAC address.
- Netia (PL): As of January 2023, Netia has started to restrict the use of third-party ONT modules. If you’re considering using an external module to leverage higher bandwidth offerings, such as 2000 Mbps, you might face limitations due to these new policies.
- Other Providers: Authorization processes can vary with different ISPs. While some may use straightforward username and password authentication, others might have more complex schemes. It’s advisable to consult with your ISP or refer to their documentation for specific requirements related to authorization and IP address allocation.
Step 1 – Configuration in Mikrotik
Option A: No factory settings
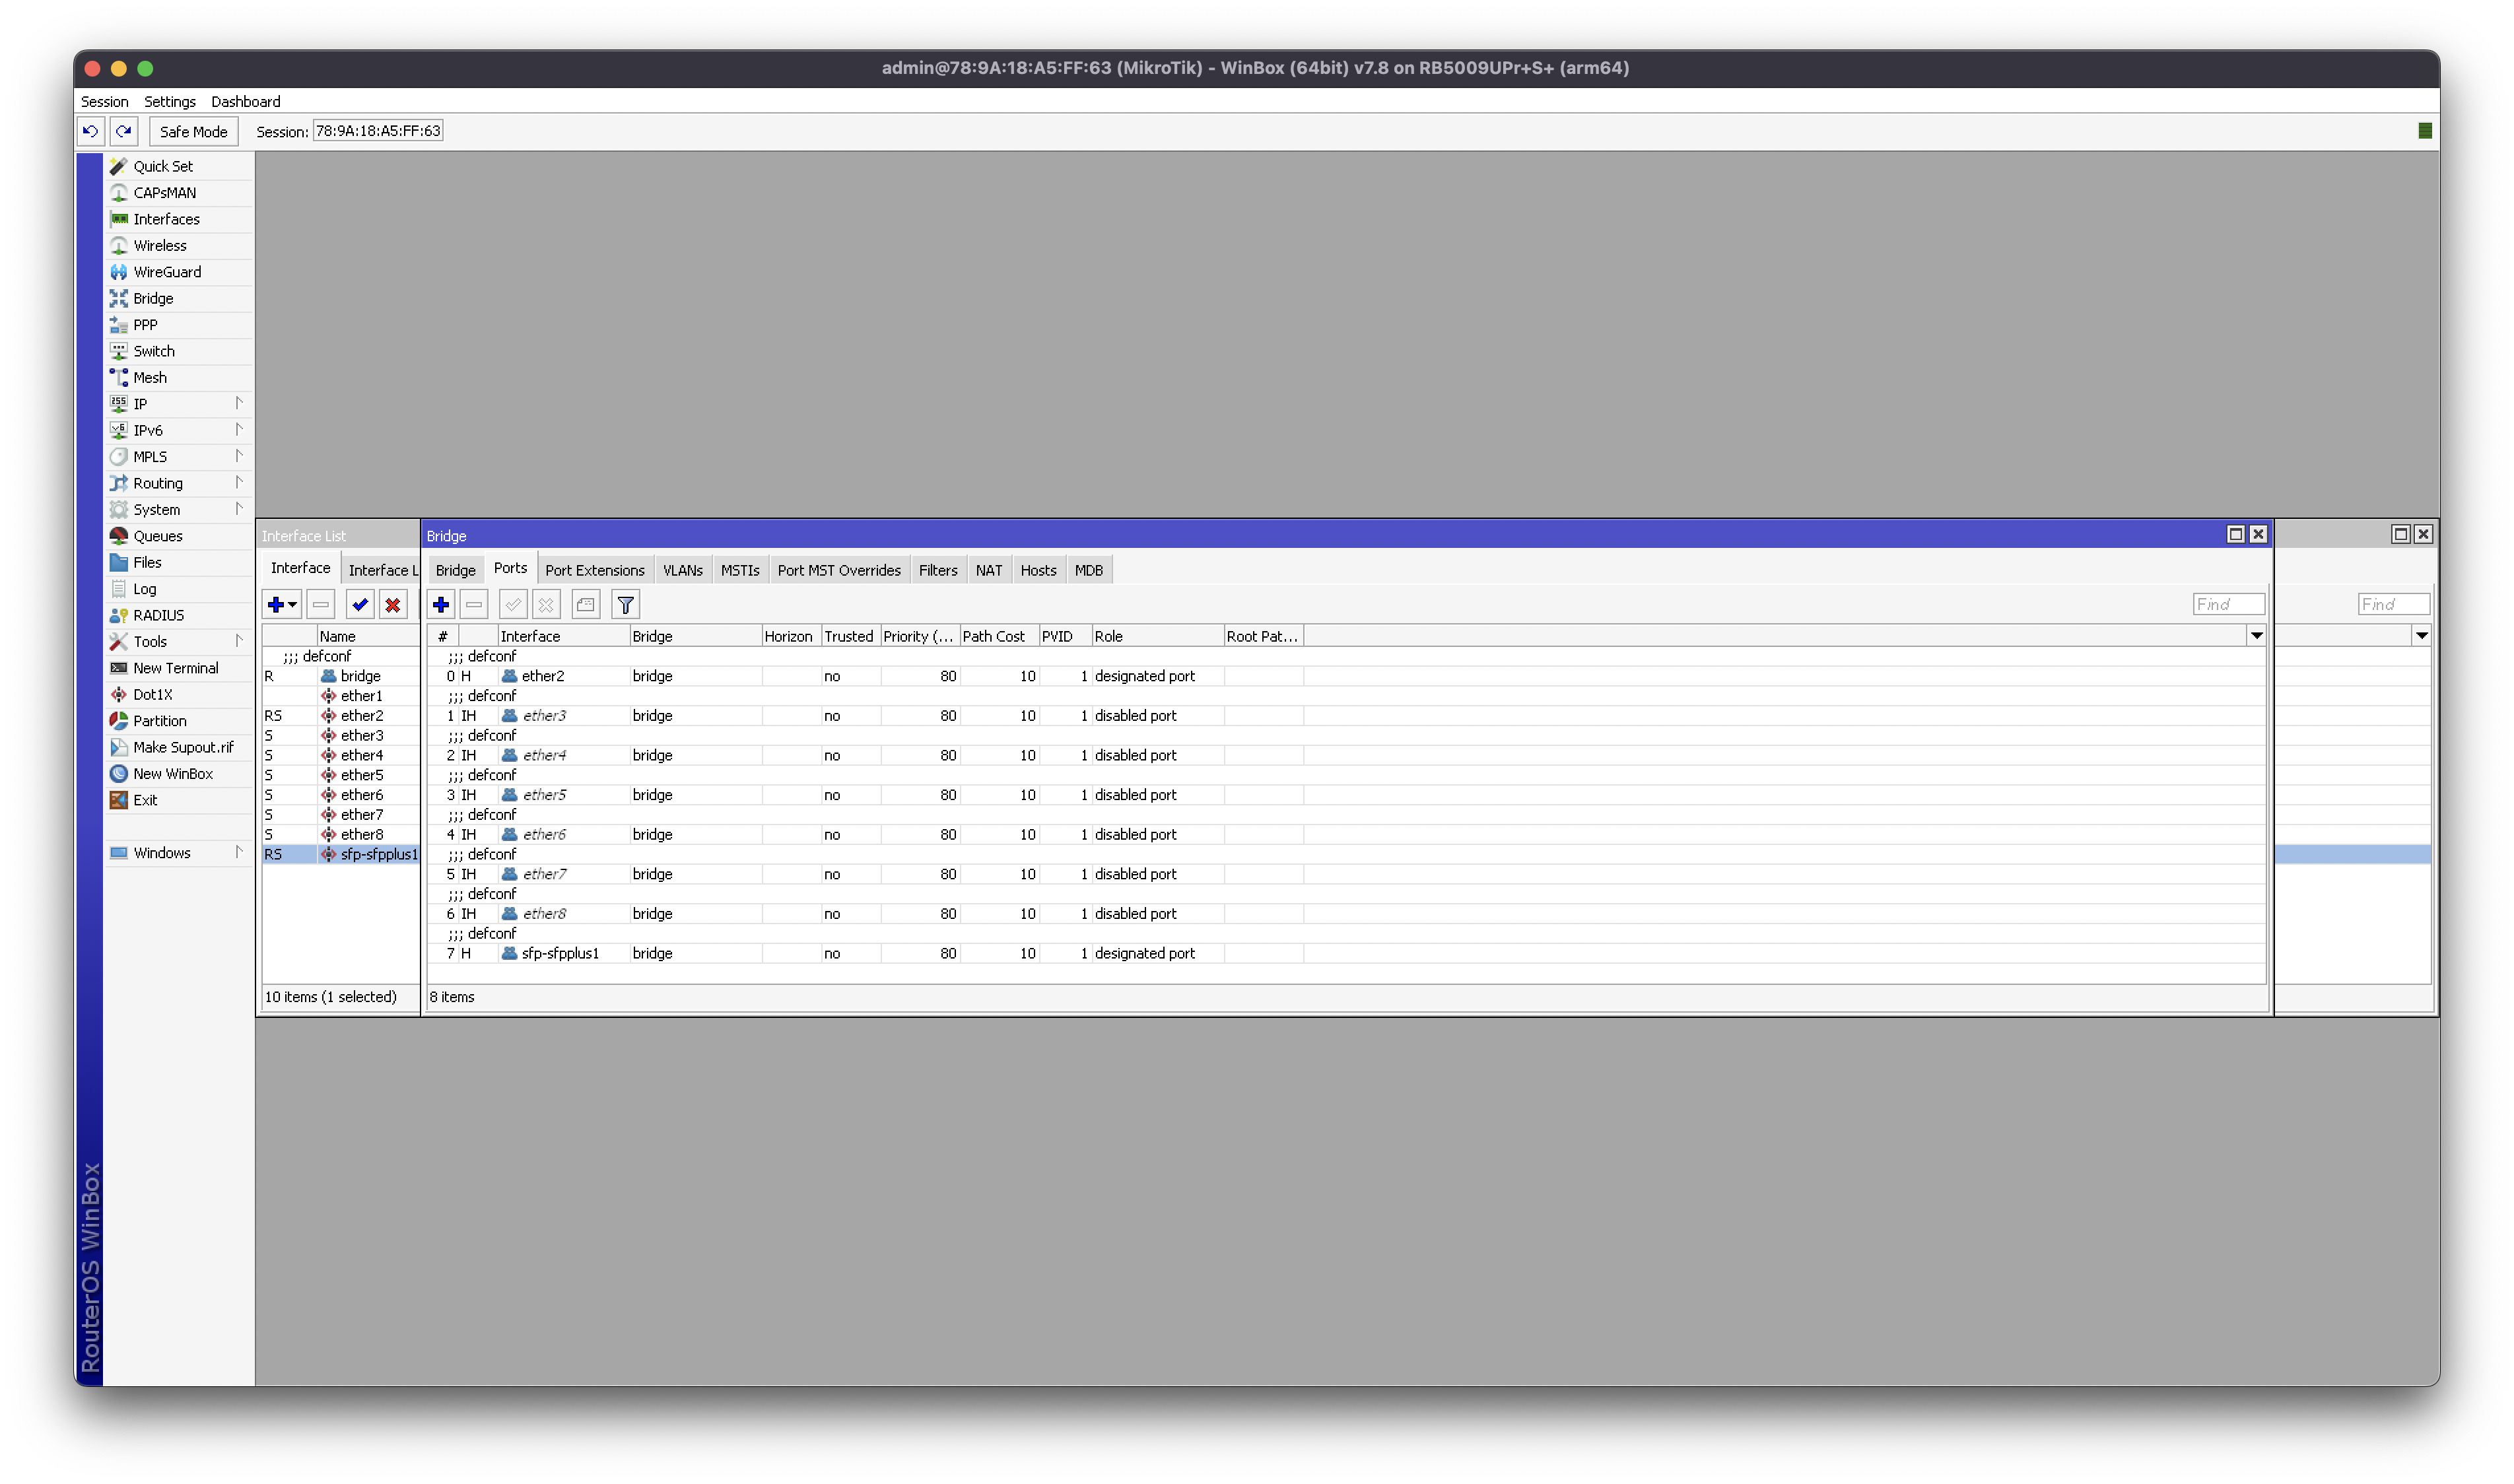
If you have a MikroTik device that you do not want to restore to factory settings, you can configure it by creating a new bridge (for the purpose of changing parameters in the GPON ONT module). Here are the steps to take:
- Create a temporary Bridge: In your MikroTik router settings, start by creating a new bridge. This bridge acts as a connector between different segments of your network, crucial for managing traffic efficiently during the configuration process.
- Adding Ports to Bridge: To this new temporary bridge, add two ports:
- sfp-sfpplus1 – This is the port where your Leox module is connected,
- Any Ethernet port – This will be the port to which your computer is connected for internet configuration purposes.
- Saving the settings:
- After setting up the bridge with the necessary ports, ensure to save your changes. This step is vital to keep the configurations intact even after rebooting the router.
- If you’re uncertain about any changes you’ve made, consider using the Safe Mode feature in WinBox for a more secure approach.
By following these steps, your MikroTik device will be primed for further configuration steps without affecting the existing settings. Once you have everything set up correctly, you can move on to the next stages of network configuration. Remember, a thorough understanding of your device’s settings and options is key to a successful configuration.
Option B: Factory settings
Settings
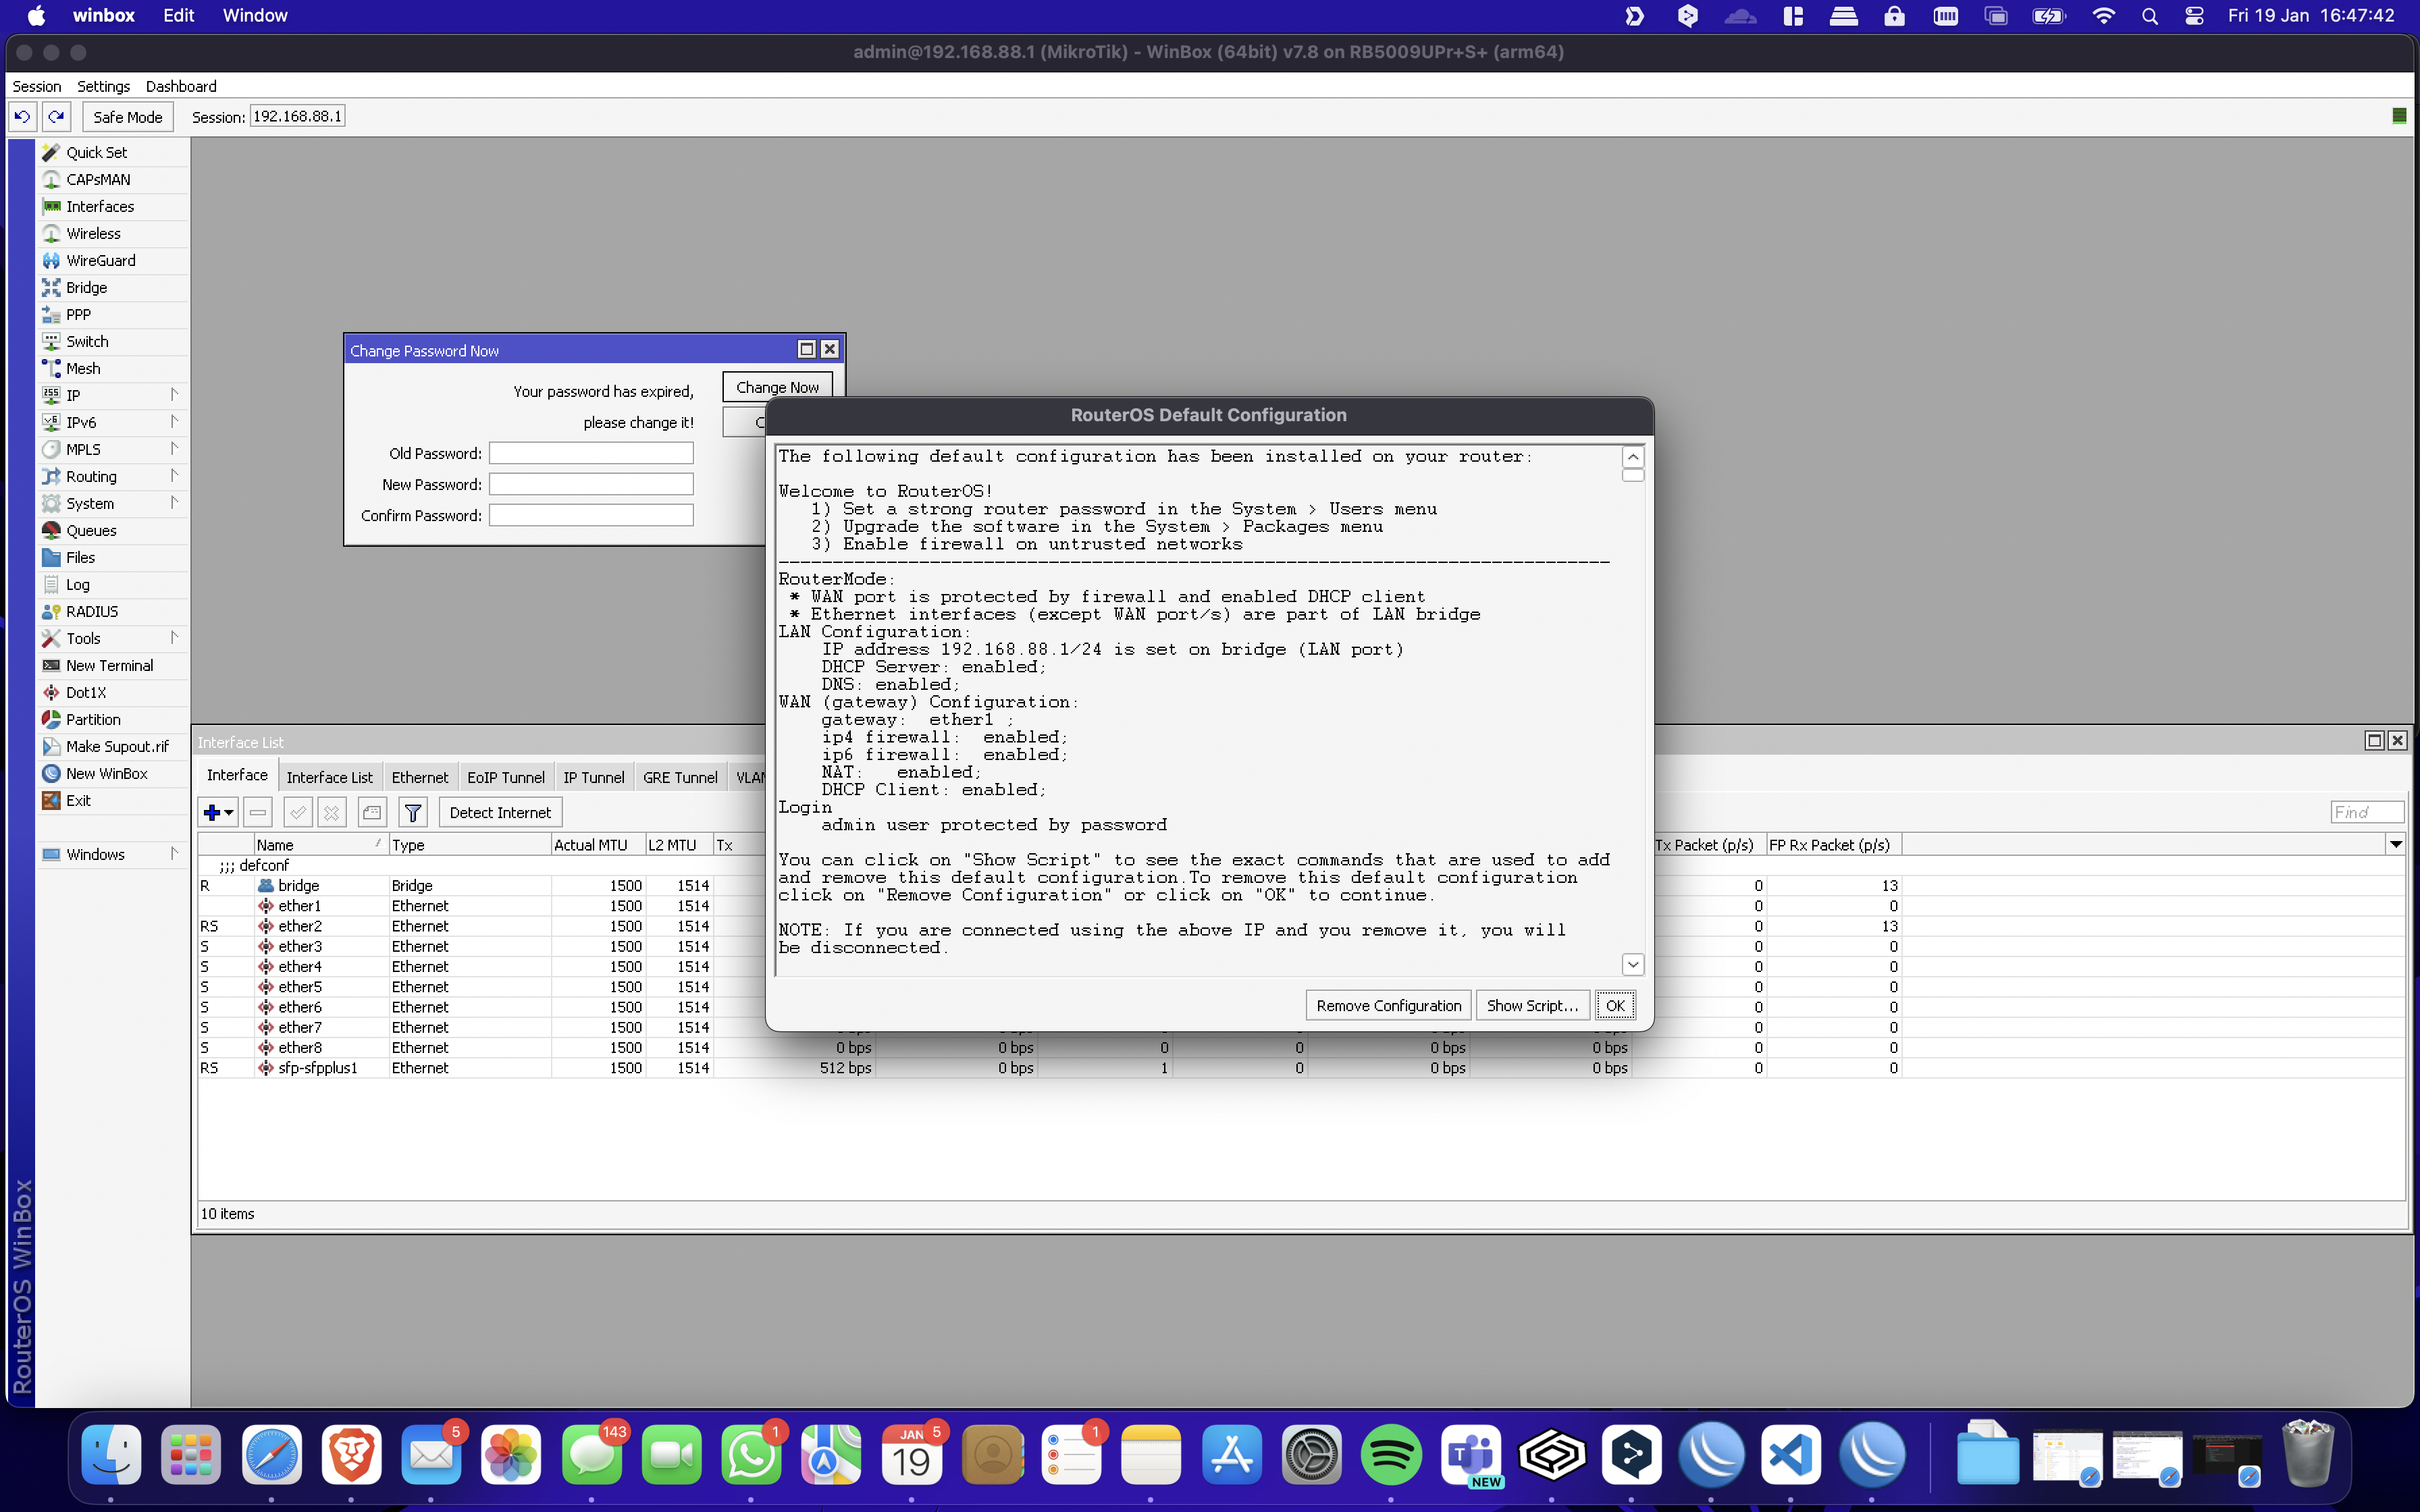
- Logging in via WinBox: The first step in the configuration is to log in to the Mikrotik device using the latest version of the WinBox application. WinBox is Mikrotik’s configuration tool that allows easy management of Mikrotik devices through a graphical user interface.
- Password Check: It is worth remembering that new Mikrotik devices have recently been equipped with preset login passwords. Be sure to check your device’s manual or documentation to find the default password. Lack of this knowledge can lead to frustration and wasted time trying to log into the device.
- Target configuration of the device: After successfully configuring the Leox module on the router and running it in place of the ONT from the operator, you will be able to proceed to configure additional parameters of the router.
GPON ONT
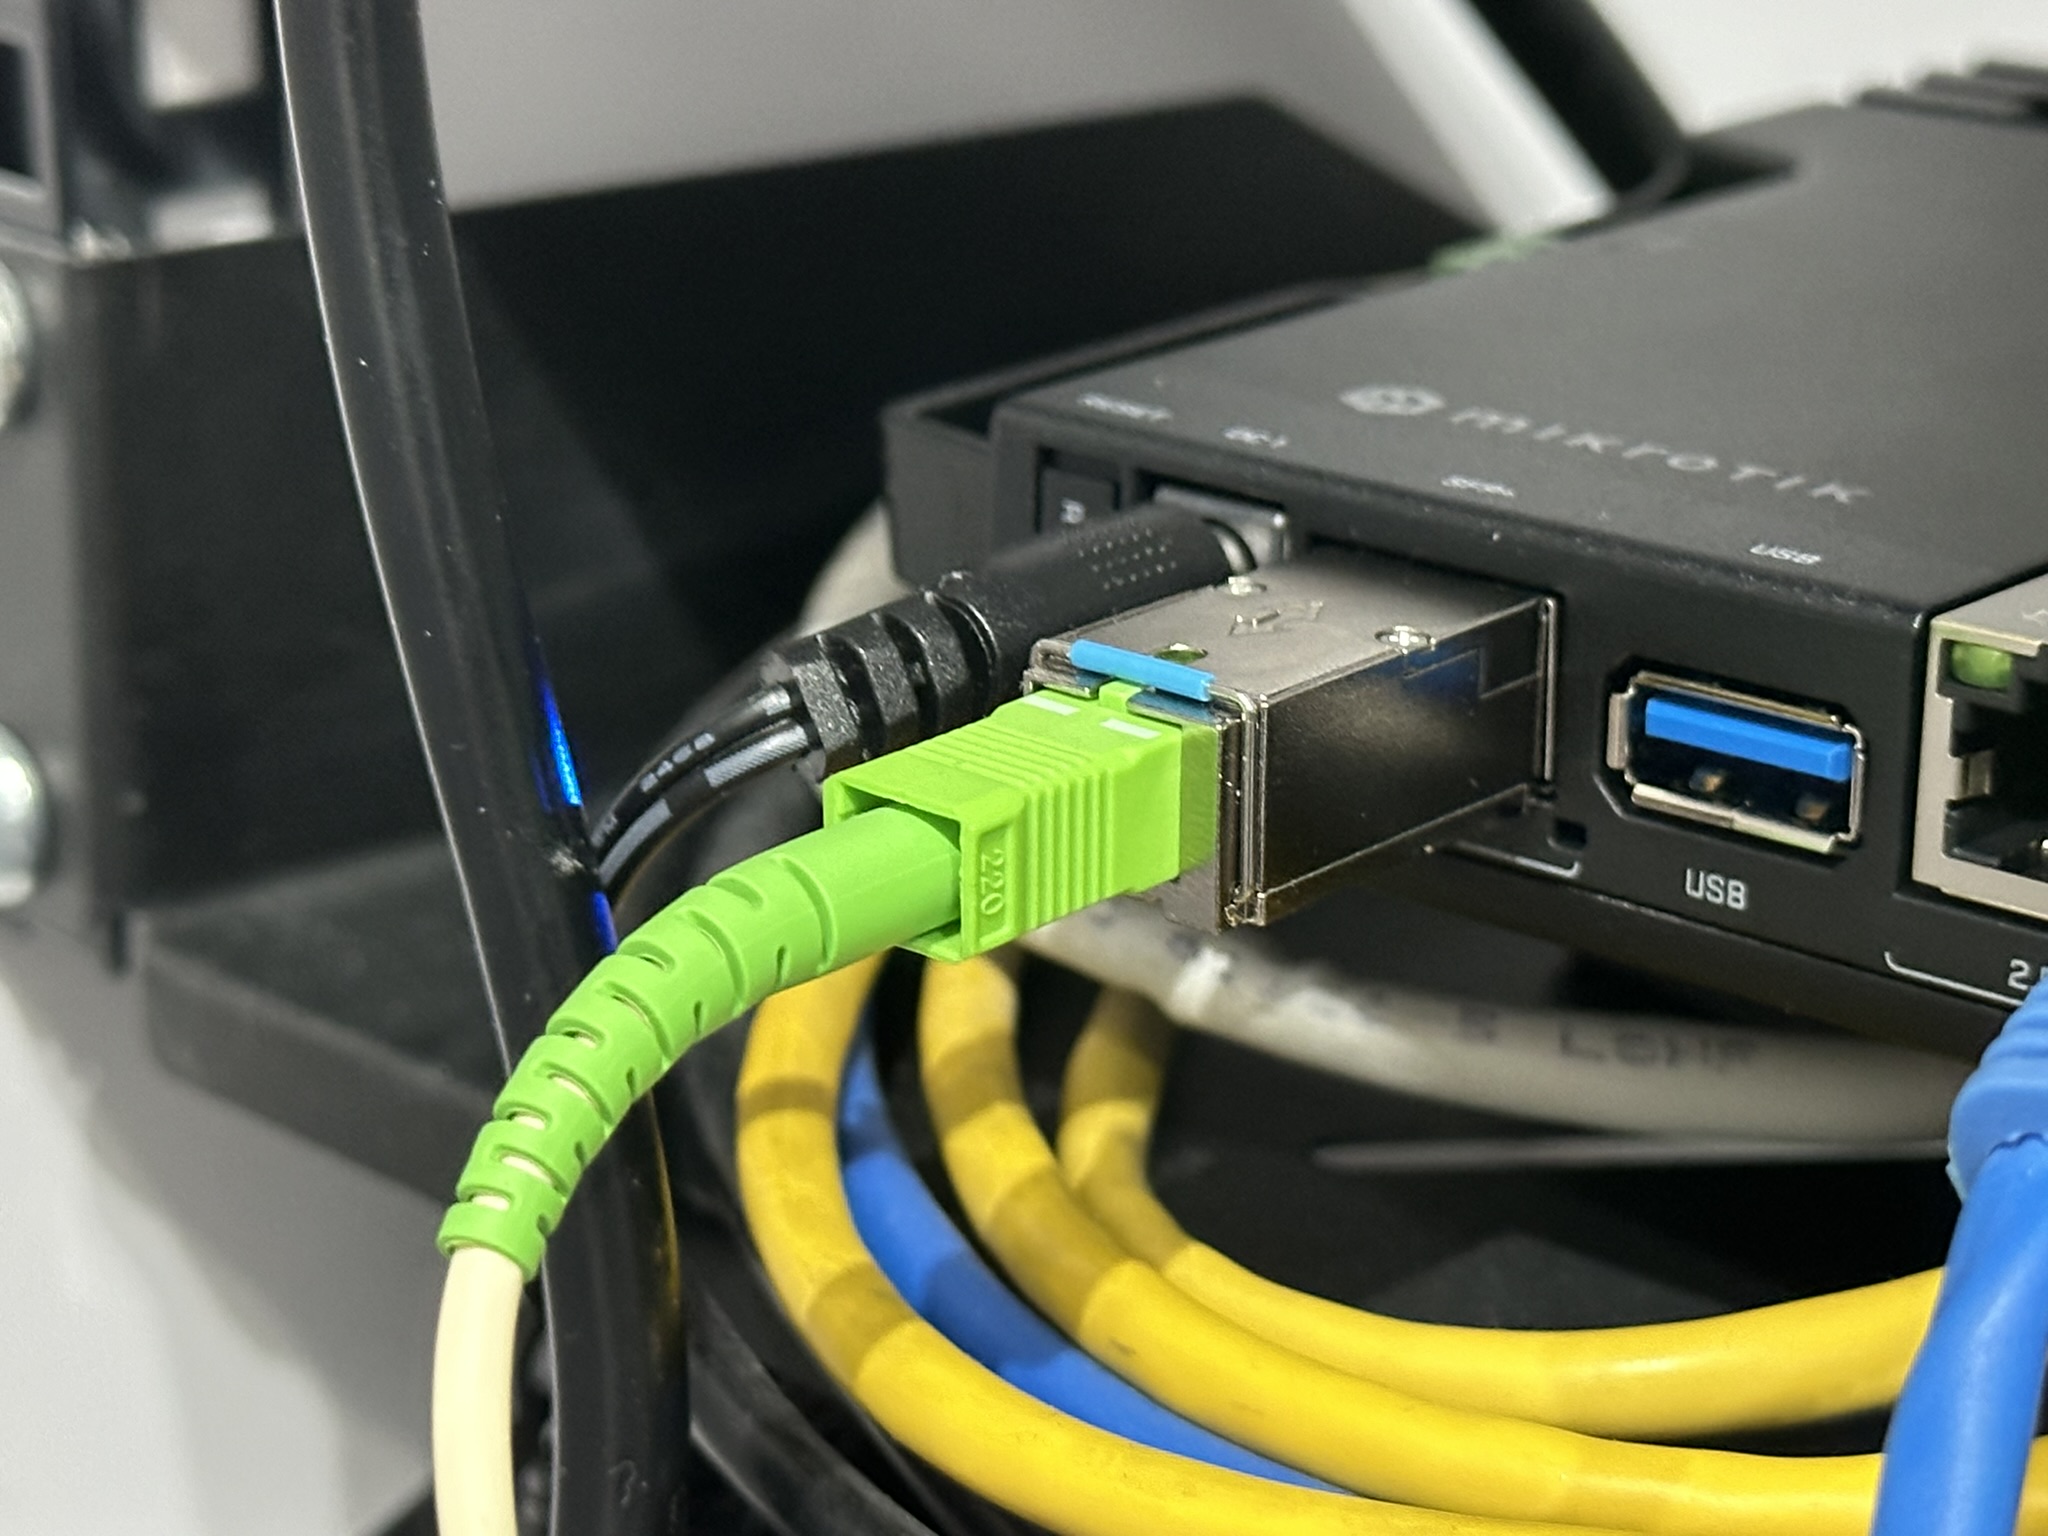
- GPON Module Installation: Insert the GPON module module into the SFP+ port on the Mikrotik router. Make sure the module is properly inserted and securely fastened. The router should automatically detect the newly installed module.
- Network Cable Connection: For stability and configuration reliability, it is recommended to connect directly to the router with a network cable. This will allow you to carry out the configuration without any problems, even if there are problems with the wireless connection.
- Using Fiber Optic from your ISP: During testing, you can use existing fiber optic cable from your ISP, which typically terminates with an SC/APC connector (green end). However, for best compatibility with the Leox module, it is recommended to use a patchcord with SC/UPC connector (blue end).
-
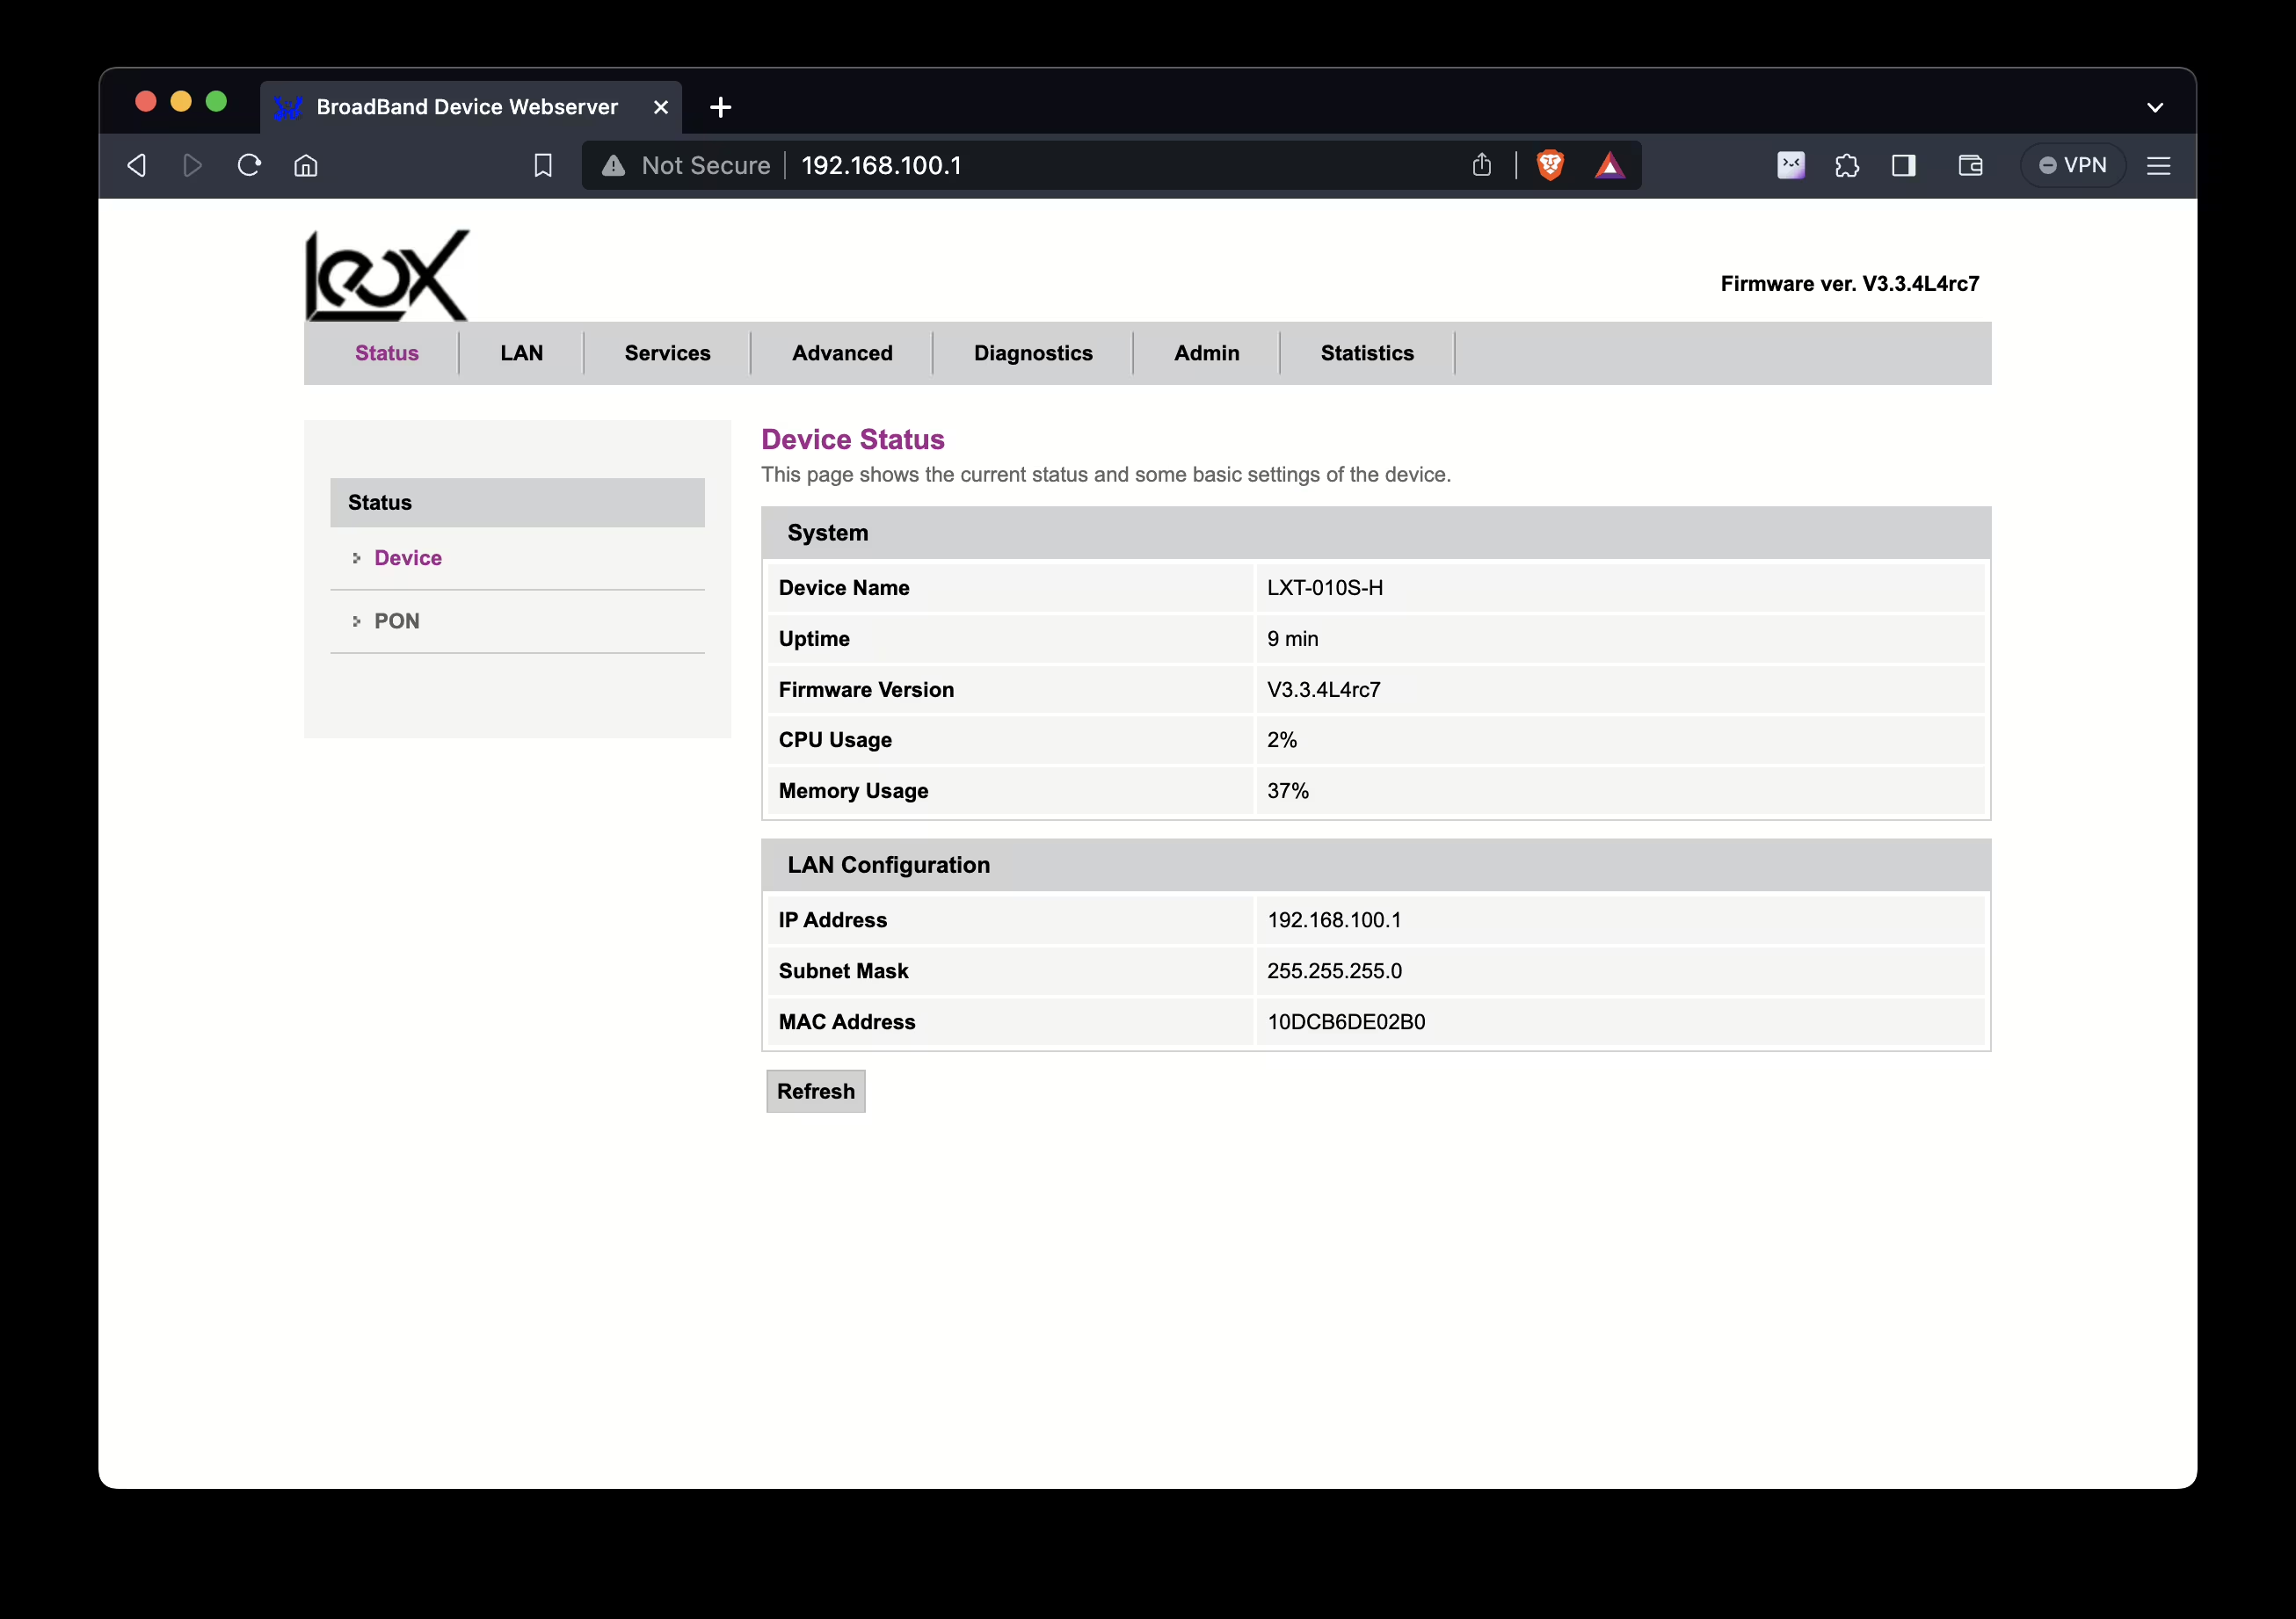
After successfully detecting the GPON ONT module, you should see detailed information about the device in the router’s user interface. This information typically includes:
- The name of the device or model that identifies the module.
- Connection status, showing whether the device is properly connected and active.
- IP address of the device, if assigned.
- Information on connection speed and mode of operation.
- Data transmission statistics such as packet errors, inbound and outbound traffic.
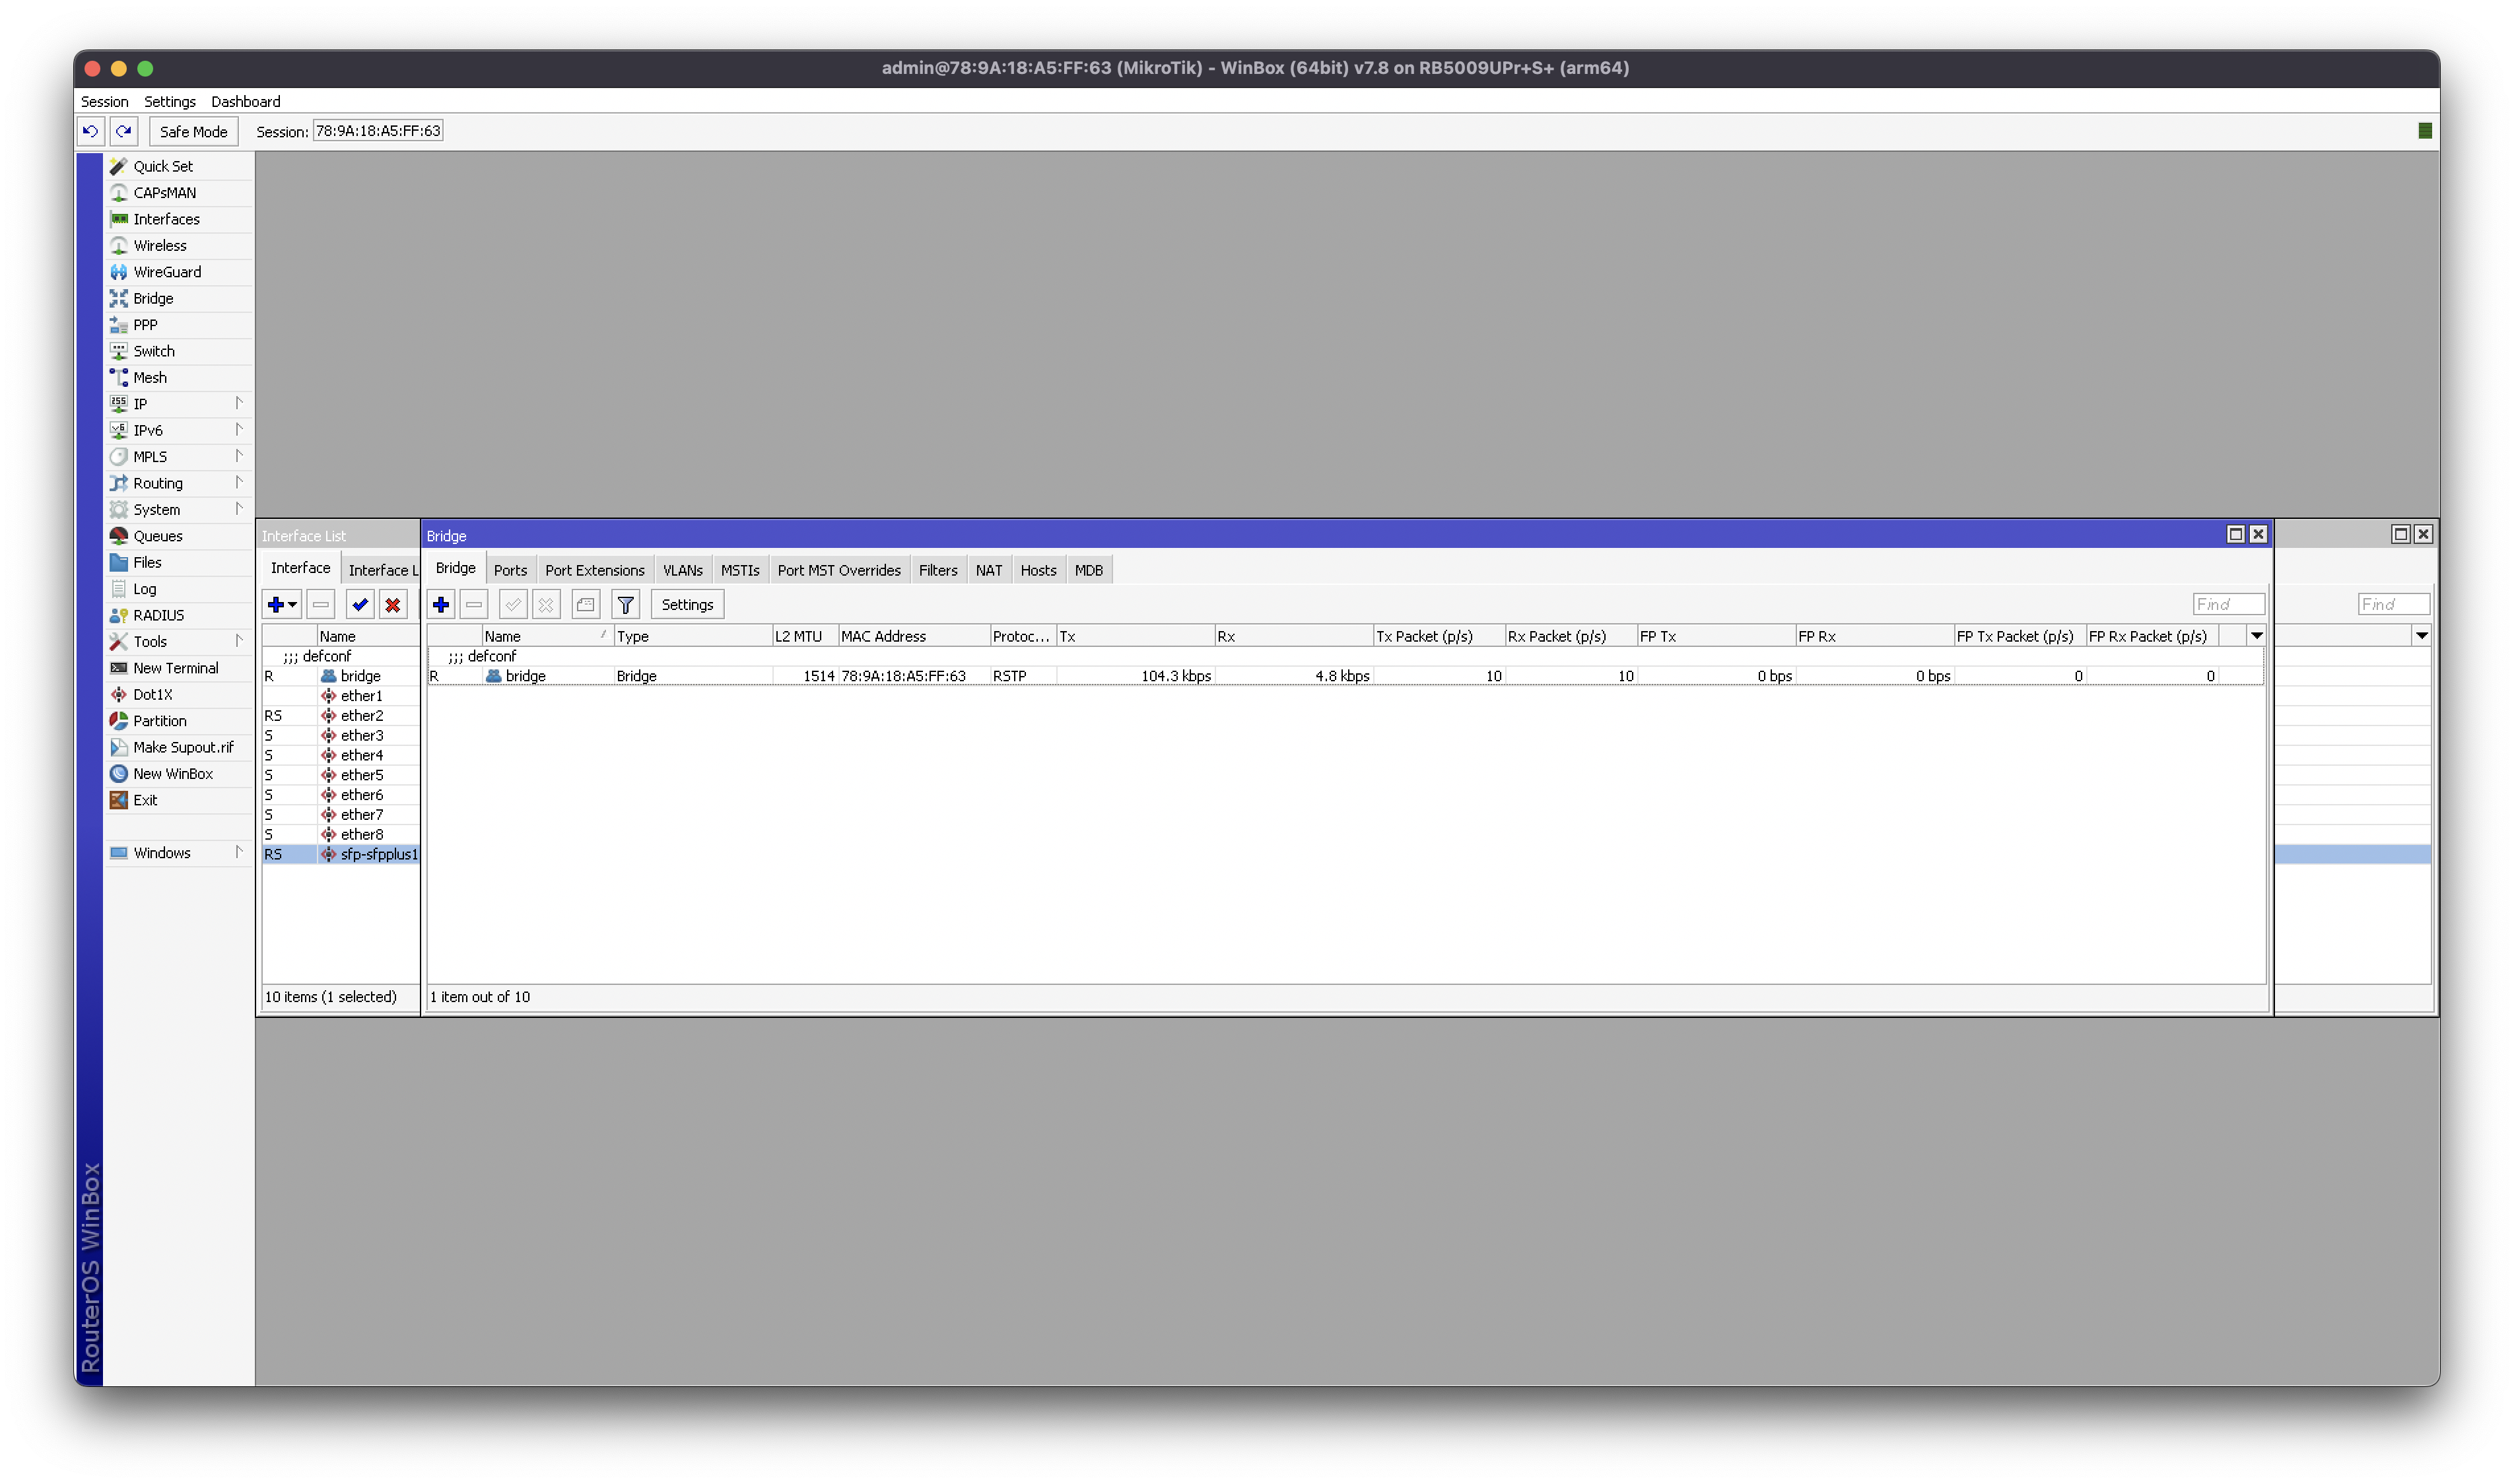
- Make sure that the sfp-sfpplus1 port (Leox ONT) and ether2 (your computer) are on the same bridge.
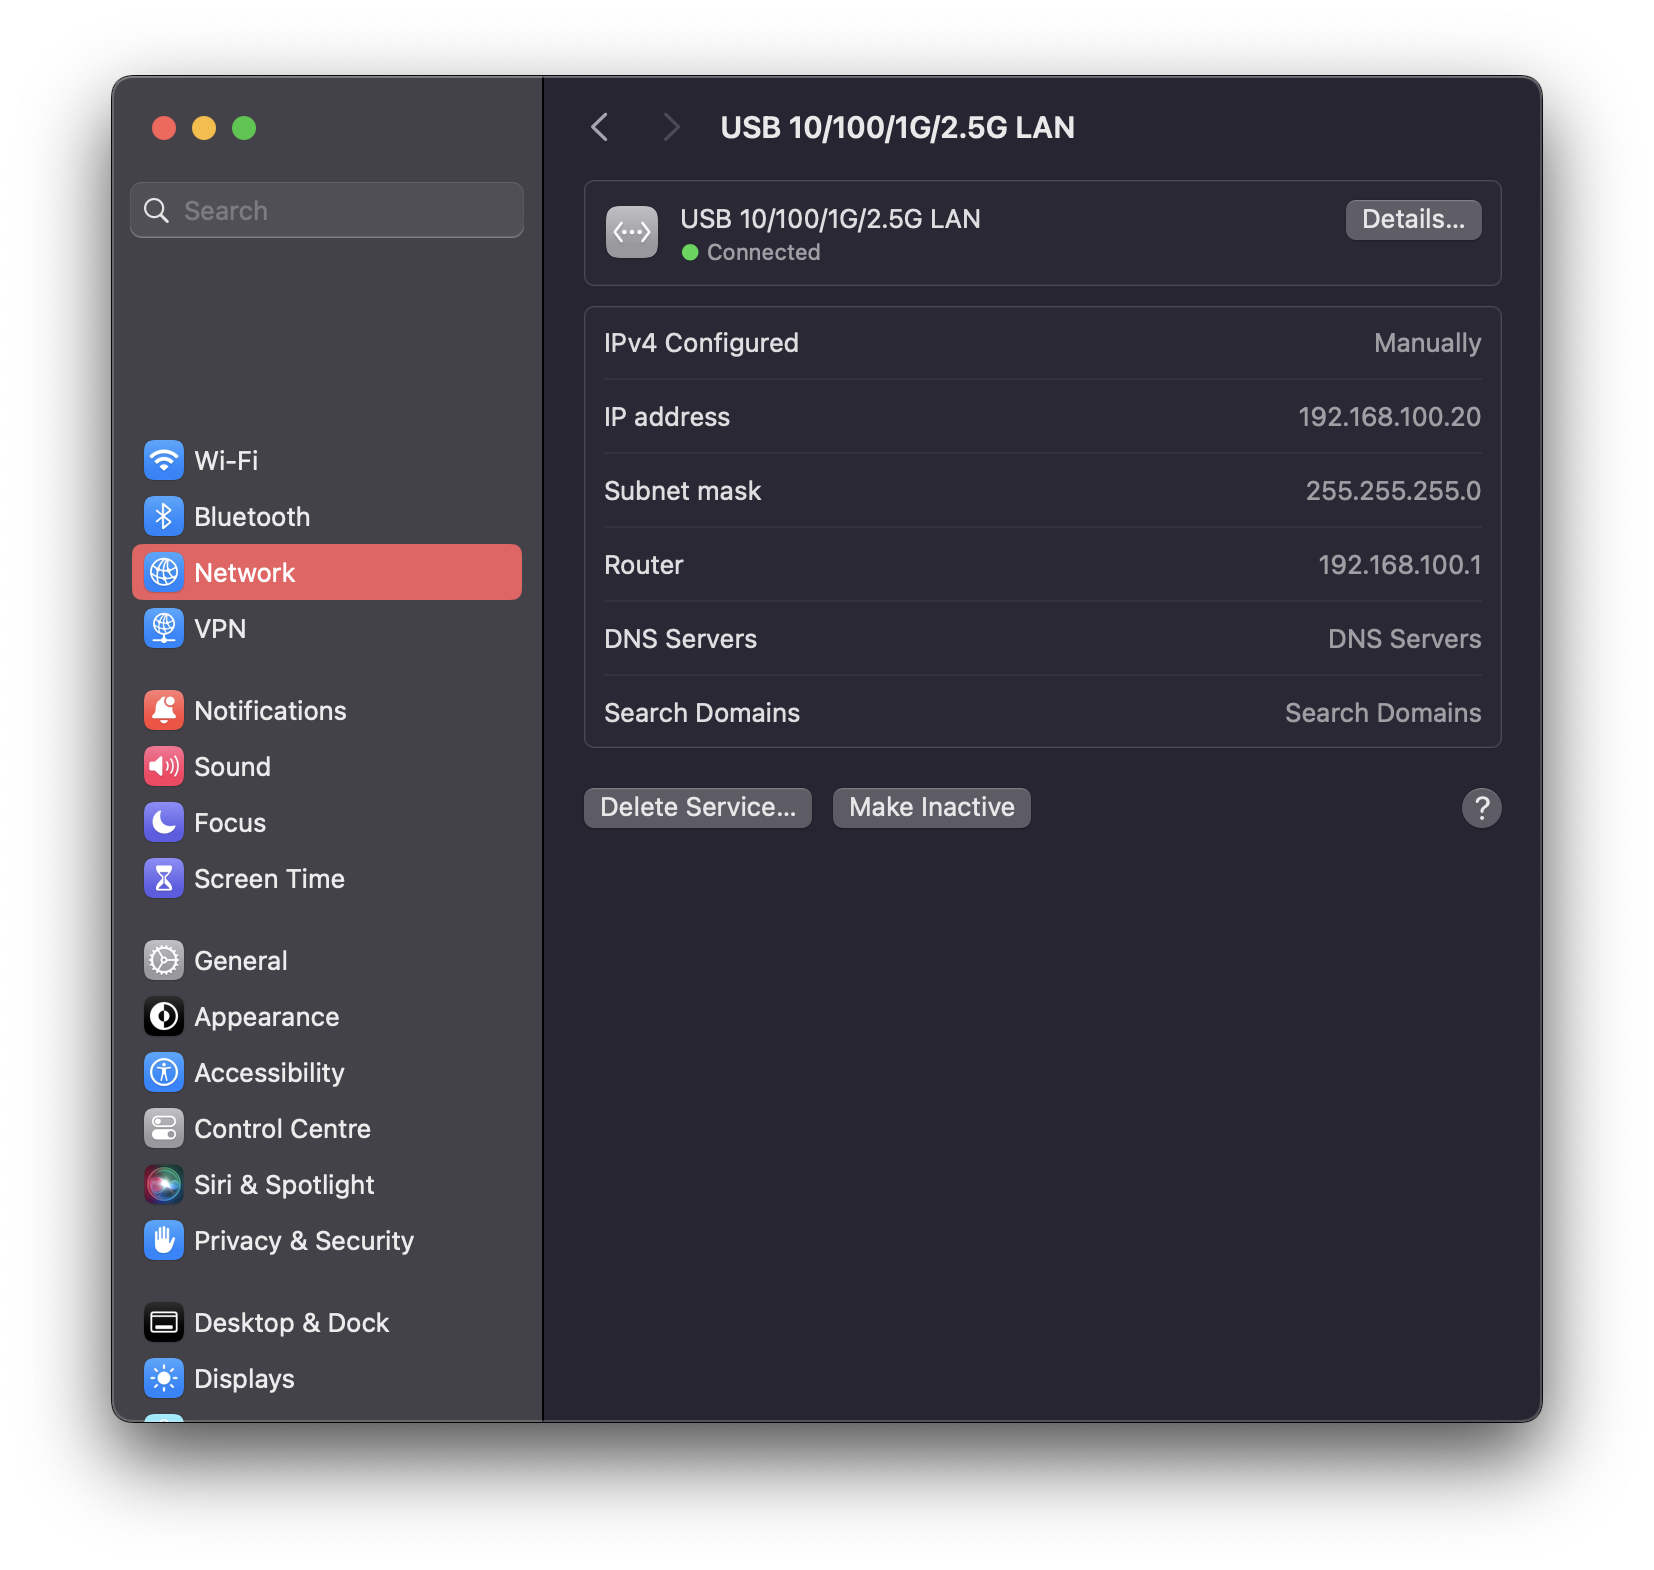
Step 2 – Change the network address on your computer
- Change your network address on your computer by entering static parameters to it, e.g.
- IPv4 Configured: Manually
- IP address: 192.168.100.20
- Subnet mask: 255.255.255.0
- Router: 192.168.100.1
- DNS Servers: leave this field blank
- Domains: leave this field blank
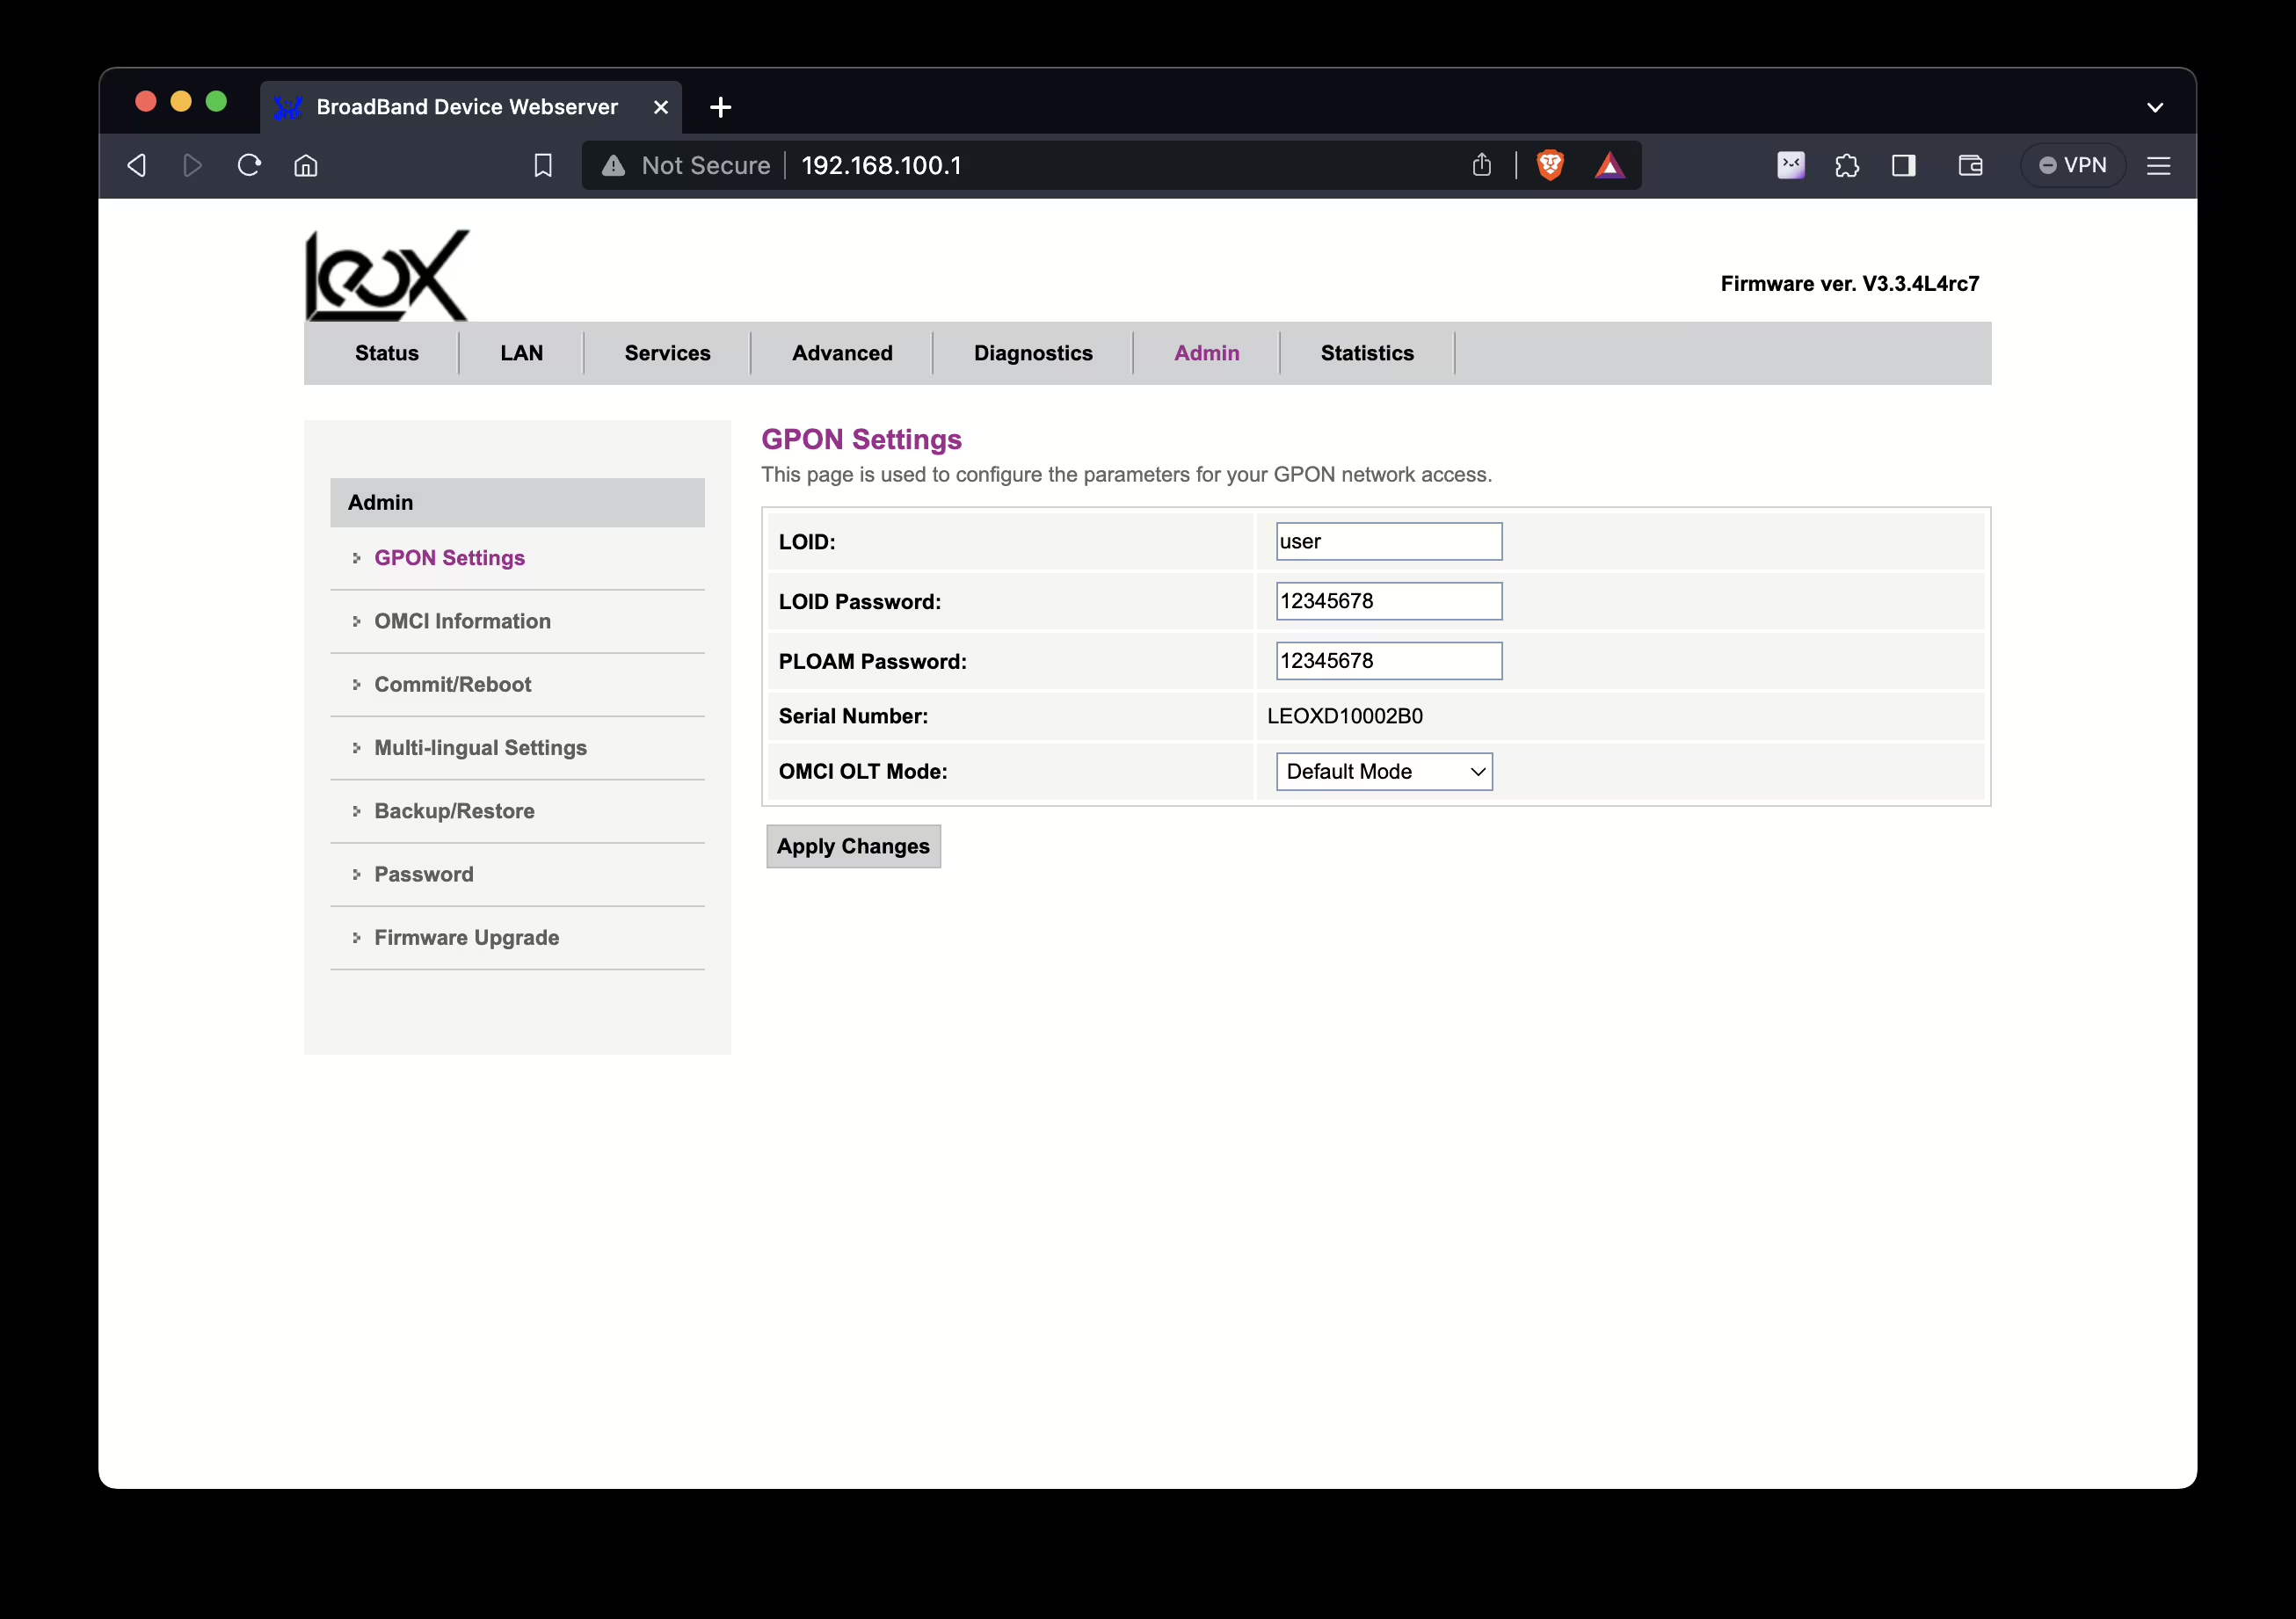
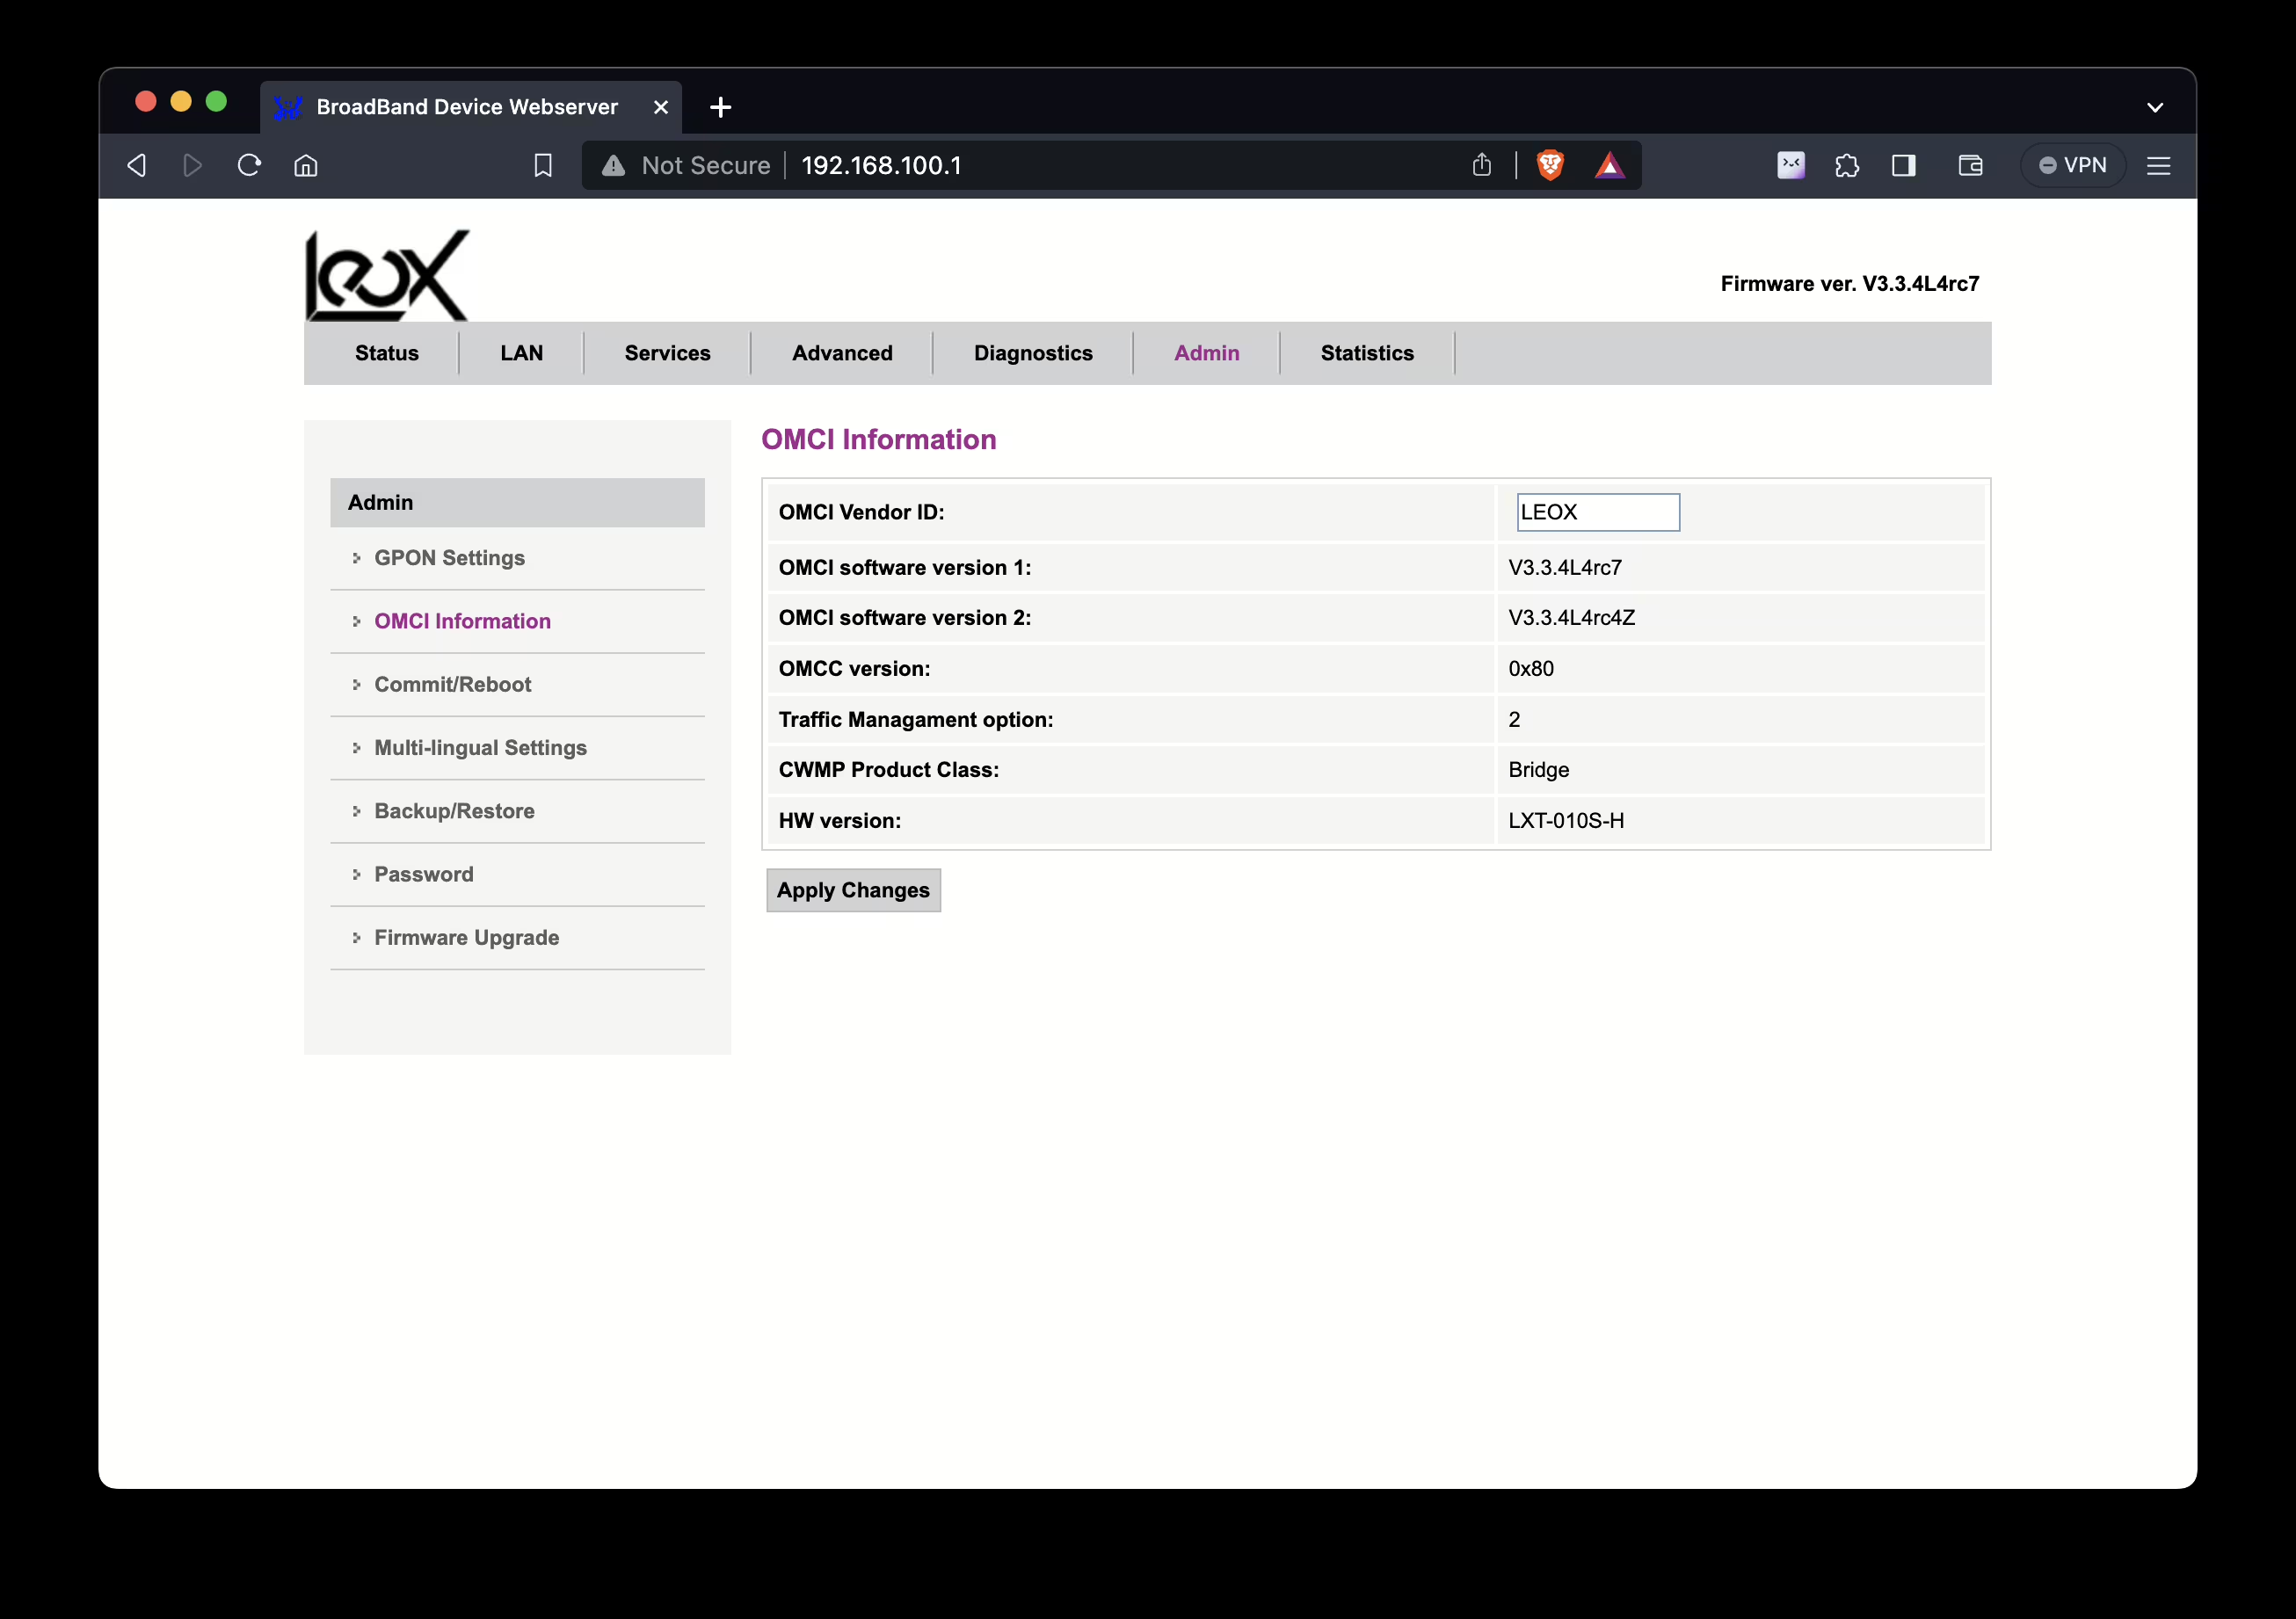
Step 3 – Log in to the GPON ONT module’s WebGui
To read the parameters of the Leox GPON ONT module via WebGui, you need to log into its interface. Here are the steps to follow:
- Launch a web browser on your computer. In the address bar of your browser, type: http://192.168.100.1. Press Enter to go to the WebGui login page of the module.
- Enter your login information:
- Login: leox
- Password: leolabs_7
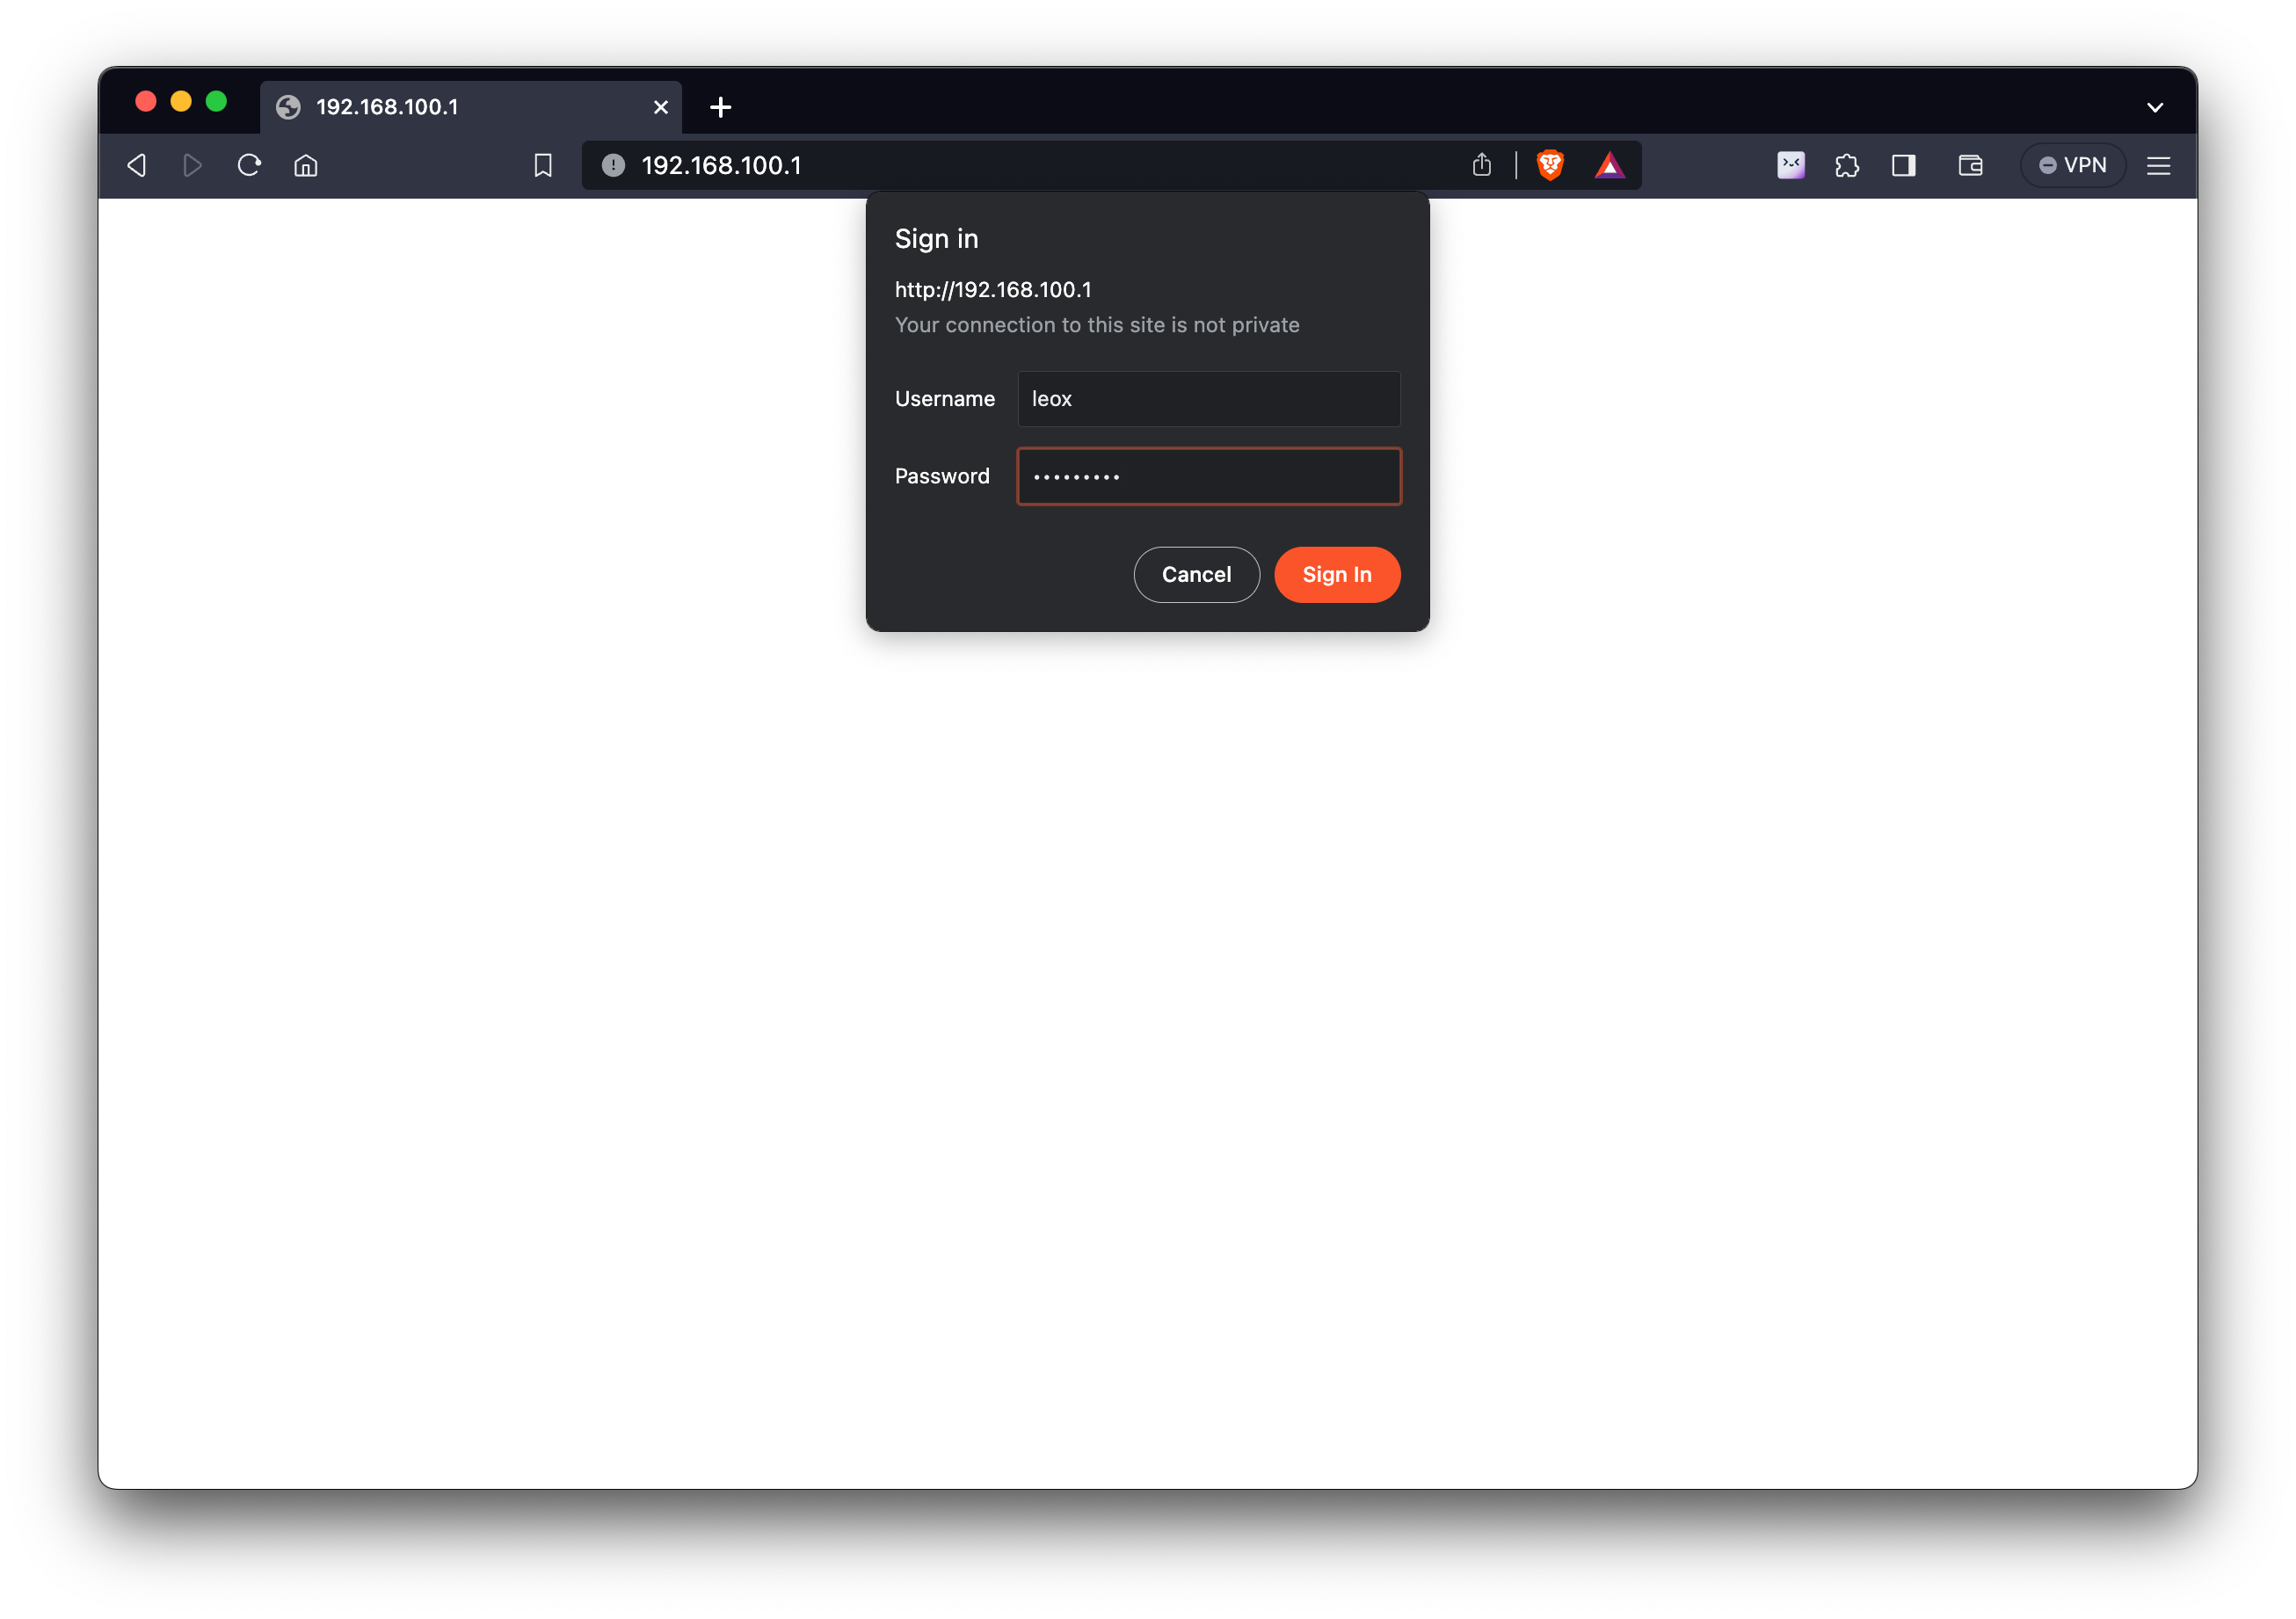
- Once you log in successfully, you’ll get access to the module’s WebGui interface. Here, you’re not only able to read but also to actively modify the device’s basic configuration parameters. This access empowers you to tailor settings to your specific needs, enhancing the device’s functionality and efficiency.
Step 4 – Edit parameters using Telnet
When configuring a GPON ONT module, it is worth noting that not all parameters are available to change via the WebGui interface. In such cases, as I mentioned earlier, the Telnet protocol becomes useful, which allows access to more advanced settings of the device.
- Log in to the device by entering the command:
telnet 192.168.100.1- Once the connection is established, you will be asked to enter your login information. Use the same credentials as when logging into WebGui.
- Login: leox
- Password: leolabs_7
Editing parameters
To configure the module to communicate on Orange’s fiber network (in place of the Funbox or Huawei’s ONT), run the following commands in Telnet:
- Set ONT serial number (GPON_ONT) – Use the command:
- The serial number can be obtained by converting the first half of the number from HEX to ASCII (for example. Huawei 48575443 -> HWTC) and adding the other half of the serial number.
flash set GPON_SN HWTC1234A6E8- Set ONT Manufacturer ID (PON_VNEDOR_ID) – Use the command:
- As with the serial number, use only the first part of the serial number, converted from HEX to ASCII.
flash set PON_VENDOR_ID HWTC- Set OMCC version (OMCC_VER) – To ensure compatibility with Huawei OLT, use the command:
flash set OMCC_VER 136- LAN speed setting (LAN_SDS_MODE) – For a standard connection with speeds up to 1000 Mbps, this change is not needed. On the other hand, if you have an Internet connection of more than 1000 Mbps (example Orange Pro 2.0 with a speed of 2000/600 Mbps) from its ISP, it is necessary to change the LAN speed settings on the Leox to take full advantage of the available bandwidth. Use the following command:
flash set LAN_SDS_MODE 8-
- A LAN_SDS_MODE value of 1 indicates a 1GbaseX connection with auto-negotiation enabled.
- A LAN_SDS_MODE value of 8 indicates a 2500baseT connection with auto-negotiation disabled.
- ONU operational status verification (ONU-STATE) – Use the command:
- A description of the ONU statuses is available at this link.
diag gpon get ONU-STATE
# Should return state 05
ONU state: Operation State (O5)- Afterward the whole procedure of configuring the module, restart the device using the command:
rebootStep 5 – Activate the link on the Mikrotik router
Removing the bridge from the sfp-sfpplus1 port
- If you have an existing configuration on the Mikrotik – remove the temporary bridge (bridge), which includes the sfp-sfpplus1 port and etherX (the port to which the computer was connected). Make sure the SFP+ port is not assigned to any bridge.
- If configured on a “clean” device – remove the sfp-sfpplus1 port from the default bridge1. Make sure the SFP+ port is not assigned to any bridge.
Creating a VLAN
- From the menu on the left side of WinBox, select Interfaces sections, then from Interfaces Lists select the VLAN tab,
- Create a new VLAN based on the parameters given below:
- Name: vlan35
- MTU: 1500 (leave default value)
- ARP: enabled (leave default value)
- VLAN ID: 35
- Interface: sfp-sfpplus1
- Save the configuration.
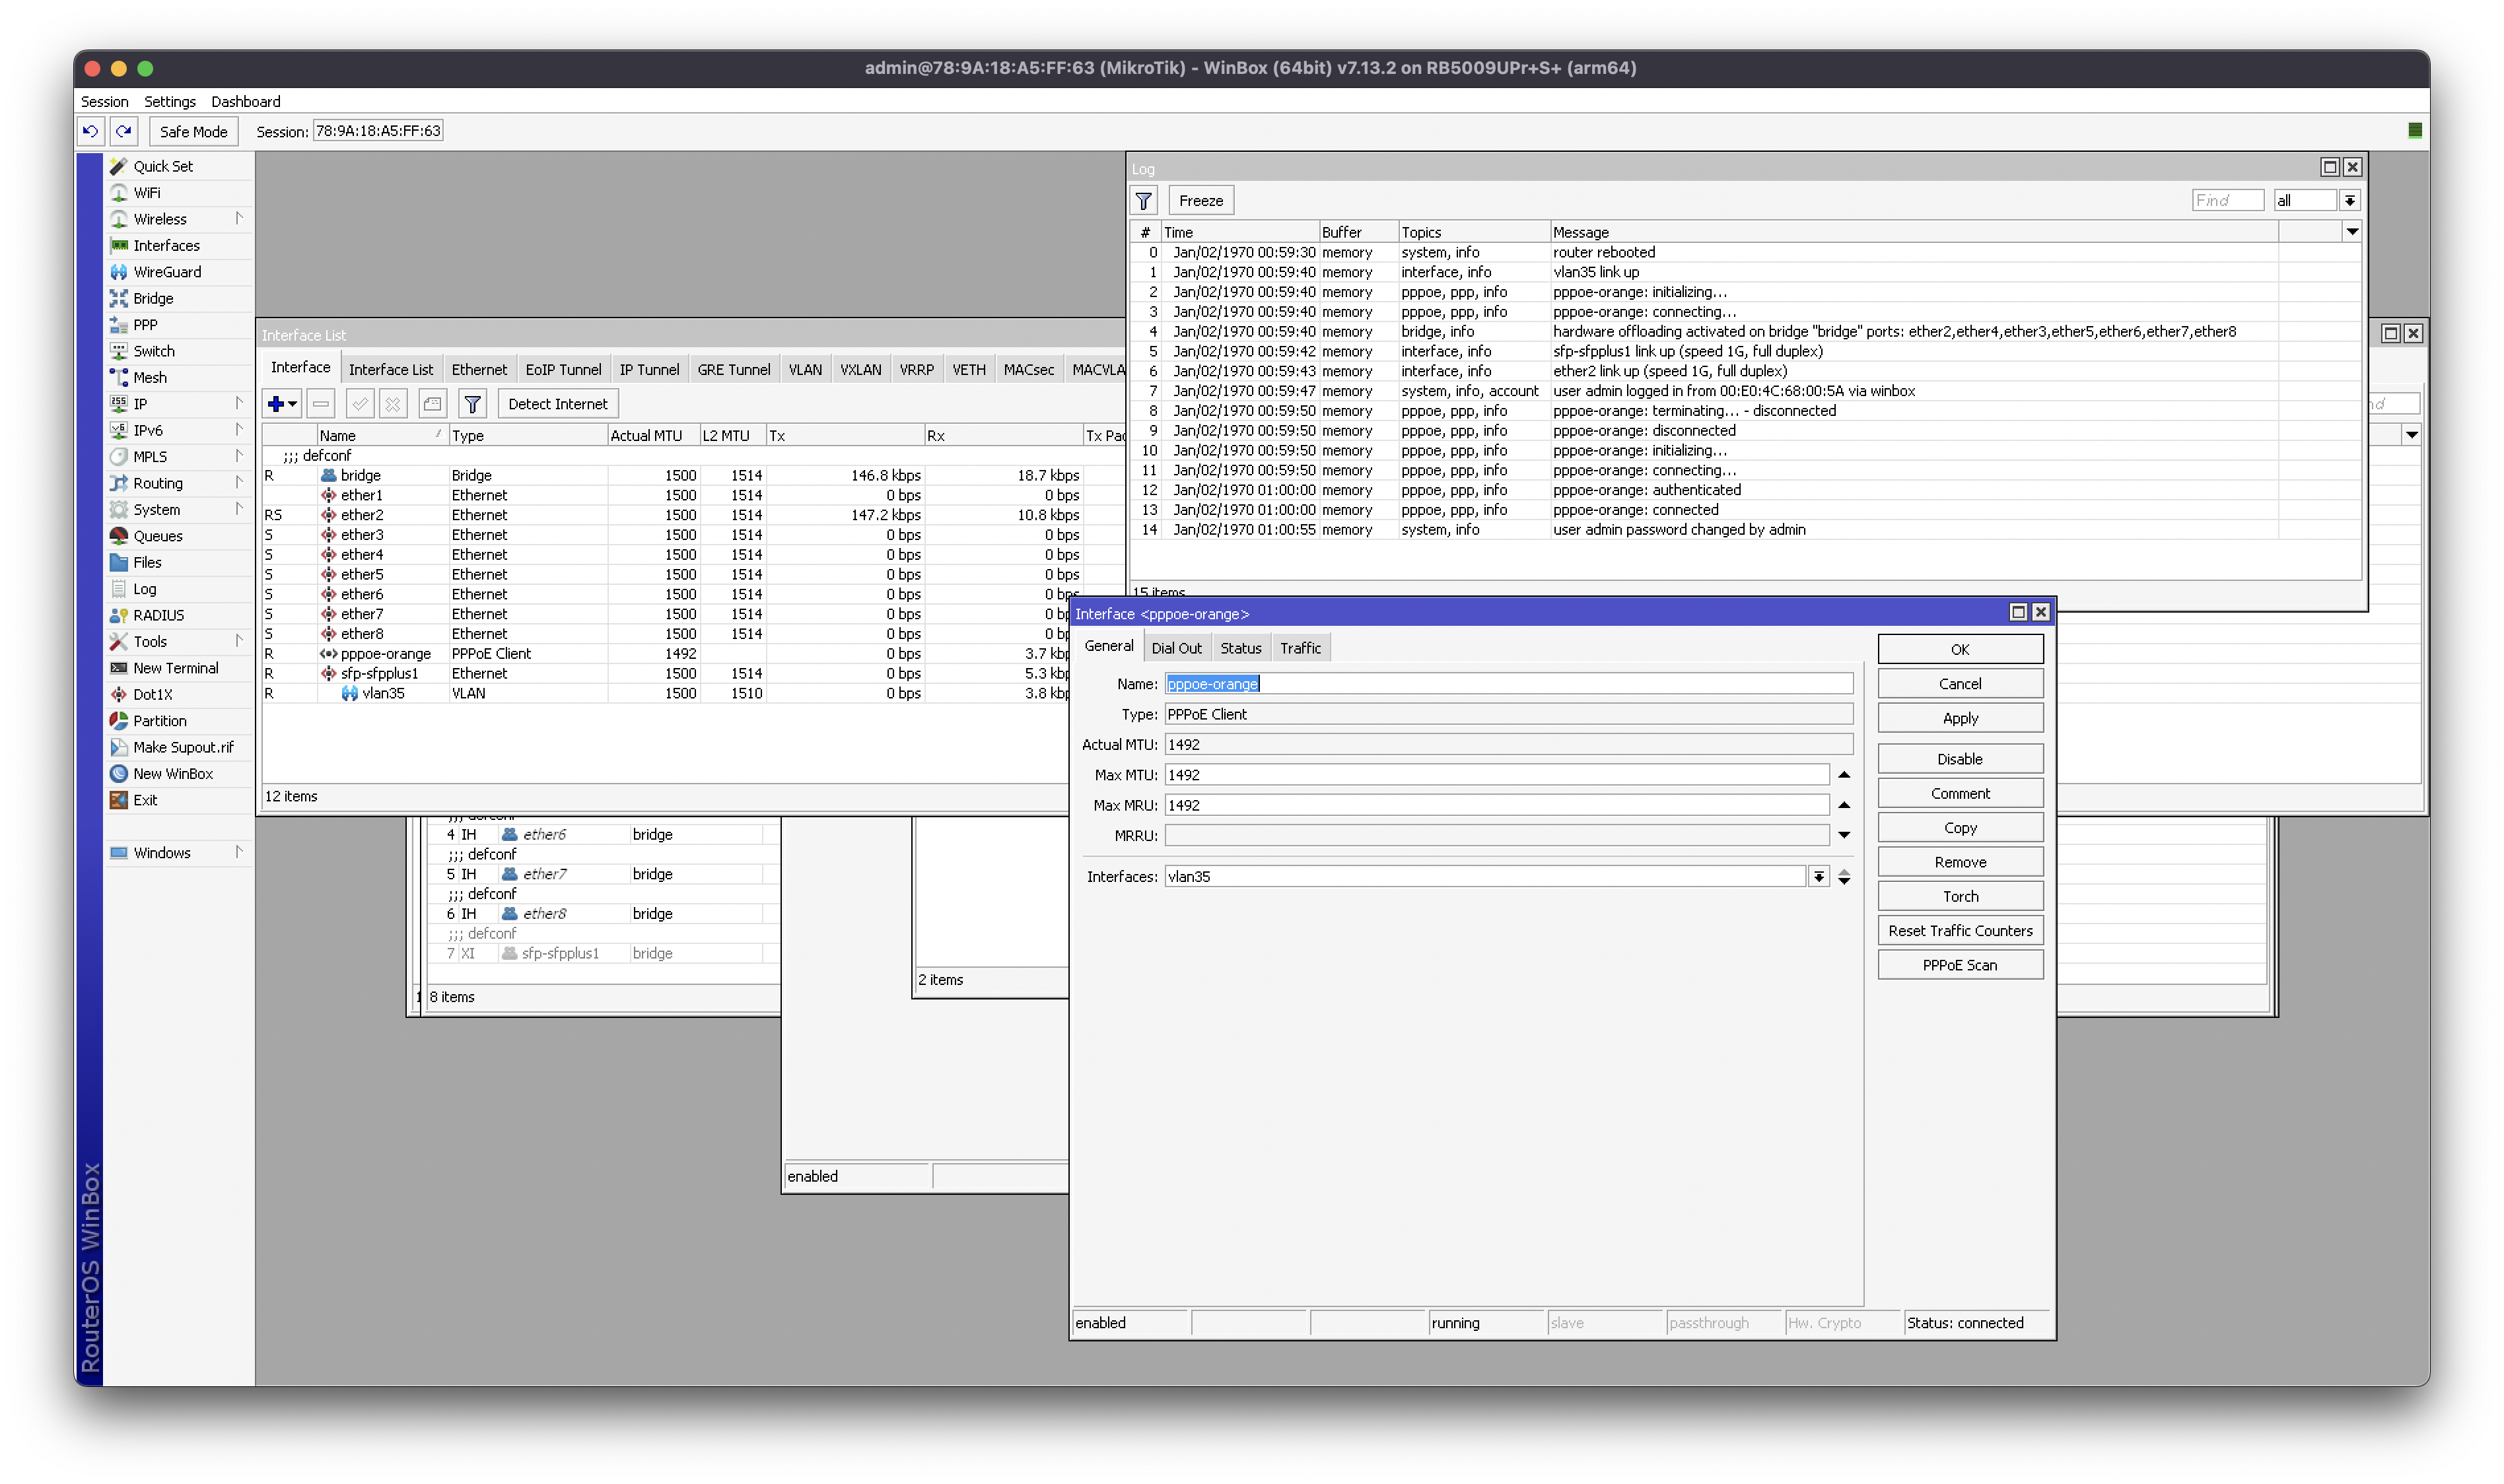
PPPoE authorization for Orange
- From the menu on the left side of WinBox, select the PPP section,
- Click the + icon and select PPPoE Client,
- Set the following parameters for the new PPPoE Client interface:
- Firstly – in the General tab:
- Name: pppoe-out1
- Max MTU: 1492 (optional)
- Max MRU: 1492 (optional)
- Interfaces: vlan35
- Secondly – in the Dial Out tab:
- User: your PPPoE login from Orange (e.g. abcdef1234@internetb2b.orange.pl)
- Password: Your PPPoE password from Orange
- Firstly – in the General tab:
- After saving the settings, wait for automatic call setup and authorization by the operator.
In conclusion, thank you for taking the time to read this guide. I hope that the information I have presented will be useful in the process of configuring the Leox module on a Mikrotik router.
If you have additional questions about the setup, go ahead and leave a comment under this article or contact me directly. I will be happy to answer any concerns and help solve any problems. Your questions can help improve this guide for other users.
Additional sources and information
For further exploration and more information, I recommend checking out the links below. They are valuable sources that were used in the development of this guide:
- Hack GPON: https://hack-gpon.org/ont-leox-lxt-010s-h/
- How to replace Orange Livebox by UDM Pro SE: https://stephangr.github.io/isp/bypass-livebox/
- RouterOS v7.12.2 Stable: https://forum.mikrotik.com/viewtopic.php?t=202423
- Orange FTTH Triple Play: https://trzepak.pl/viewtopic.php?t=51177
Read also
- Netbox: Installation Guide for Synology on Docker Compose
- UniFi Network Application: Remote Adoption of an Access Point
- UniFi Controller in Docker: Migrating to UniFi Network Application
- TVHeadend: Docker Compose installation guide on Synology
- ADS-B: Receiver installation and configuration on Raspberry Pi
- Traccar: Docker installation guide on Synology
Comments (9)
Rudi van Drunensays:
02/05/2025 at 14:33Hello,
Thanks for your webpage, this might be very helpful. However, I noticed 2 issues, that need some clarification
1. the SSP has a label that states SC/APC, so on the SFP end you should use a *green* connector for the best results. APC=Green UPC=Blue
2. is it true (cannot verify this) that the SFP only is accessible using the webinterface or telnet when there is a (lighted) fiber connected ??
I cannot get connection to my LEO SFP that is in a mikrotik (setting the bridge corrcetly). Even cannot ping 192.168.100.1 on the sfp interface through the mikrotik (web) interface.
Piotrsays:
16/10/2025 at 10:44Hi, did you happen to find a solution to your problem? I also can’t connect to 192.168.100.1 via web/ping/telnet. The GPON is correctly detected by the system.
Jonassays:
01/10/2024 at 13:41As confirmed to me by Leox tech support , it is erroneously listed as an SFP+ device.
It is a standard SFP. (non plus+)
It may not work in some routers with SFP+ ports, unless the ports are fully backwards compatible.
Jorissays:
01/10/2024 at 00:22Please note that the Leox LXT-010S-H is NOT a SFP+ , but a regular SFP.
(it is also listed wrong on their own website)
So it can be used in any router with standard SFP port (as I am using right now).
mhxsays:
17/11/2024 at 11:09Thanks a lot for the tip. Was also kinda confused about that. 🙂
Filip Chochółsays:
29/12/2025 at 15:13true! thanks!
mrgibsssays:
21/04/2024 at 18:43Does Leox LXT-010S-H gives a possibilty to change MAC address, I do not see such a command???
Filip Chochółsays:
21/04/2024 at 19:28MAC address you should change on router (if your ISP set static address by DHCP using your MAC address)
Jonassays:
01/10/2024 at 13:50This should be done on the FSP :
flash set ELAN_MAC_ADDR XXXXXXXXXXXX