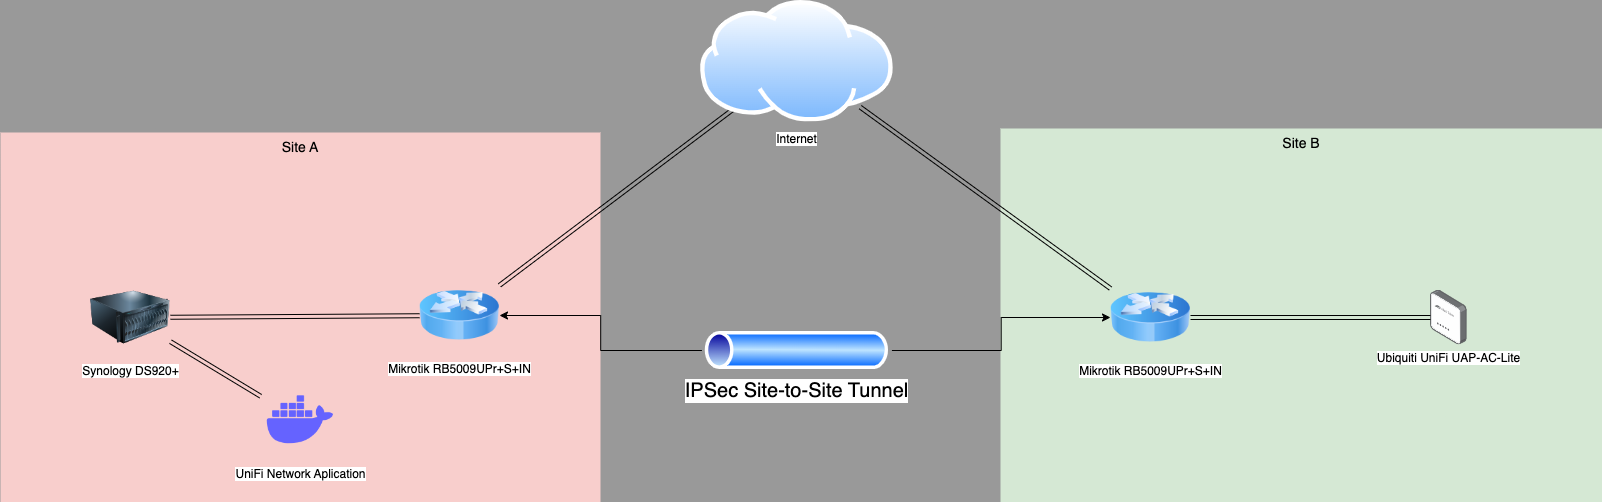
I will be doing things on a Synology DS920+, on which also stands a UniFi Network Application installed in Docker. Under this configuration, the UniFi controller is located in the Location A, while the Access Point (which you want to connect to the controller at Location A) is located in the location B.The two sites are connected by an IPSec Site-to-Site tunnel on MikroTik routers, with location A having an address of 192.168.100.0/24 and location B having an address of 192.168.101.0/24. It is possible to ping devices between these locations normally.
The discussed process of remote adoption of a UniFi device to a controller is done in a manner analogous to the situation when the controller is on another server (for example, it is Ubiquiti UniFi Cloud Key). This configuration is part of my home-lab environment, where I test and demonstrate various network scenarios.
What is the UniFi Network Application?
 Ubiquiti’s UniFi Network Applicaiton serves as a central hub for UniFi Series network devices, providing secure communication and management. This controller is responsible for the configuration and ongoing maintenance of connected devices, such as access points. Once a device is added to the controller, a permanent connection is established – likened to a parent-child relationship, where the controller acts as a “mother” to the “children” in the form of network devices. All information about each device is stored in the controller’s local file system.
An interesting aspect is that the UniFi series devices do not require a continuous controller to function. Once they receive their configuration from the controller, they can operate independently, sending only statistics about their operation to the controller for monitoring and analysis.
Preparation
In order to prepare the tutorial, we will adopt an established domain name and certain configuration names, shown below. For customized configuration, apply settings according to individual requirements.
- Full Domain Name (FQDN) of UniFi Network Application: https://unifi.xyz.com,
Hardware
- 1x Synology DS920+
- 1x Mikrotik RB5009UPr+S+IN
- 3x Ubiquiti UniFi UAP-AC-Lite (Site A – 2x, Site B – 1x)
Nginx Proxy Manager (optional)
On my Synology, I set up a reverse proxy using Nginx Proxy Manager, which allows access to the UniFi dashboard via a URL (https://unifi.xyz.com) instead of the standard IP address. It is a solution that increases the convenience of managing UniFi devices by offering an easier to remember and more intuitive address available on the LAN. Are you interested in how to do it? Take a look here.
In addition, local DNS redirection is performed by the AdGuard DNS server, also running on a containerized version of the Synology server.
Software
Ubiquiti also offers external devices that serve as controllers, such as Cloud Key. However, it is possible to replace them with a solution based on Docker Compose, which is an alternative especially for those who prefer more flexible and integrated IT environments. I will discuss the details of this solution later in the article.
UniFi Network Application od LinuxServer.io
Access to the repository of the containerized version of the UniFi Network Application developed by LinuxServer.io is available here.
Step 1 – Migrate UniFi Controller to UniFi Network Application
If you haven’t yet migrated your old UniFi Controller to a new version with a separate MongoDB database, this moment may be ideal to do so. This process may seem complicated, but it is crucial for better performance and continuous updates. Take a look here!
Step 2 – Log in over SSH to the UniFi device
The first step in adopting UniFi devices from Ubiquiti is to access the device via SSH, after resetting it to factory settings.
- First, make sure that you are connected to the same local network as the UniFi device and that SSH is active on the device. Then, using a computer with a command line interface (CLI), prepare to establish a connection.
- For Microsoft Windows operating system I recommend PuTTY, while for Apple macOS operating systems I recommend Termius.
- Run Putty (Windows OS) or Termius (macOS), then connect to your device using the SSH command format:
Leave a Reply