
Table of contents
Hello!
Today I’ll walk you through the steps you need to take to migrate UniFi Controller’s containerized version developed by LinuxServer.io to the new application, UniFi Network Application. Recent changes by Ubiquiti and the decision by LinuxServer.io authors to discontinue support of the old container with UniFi Controller, require network administrators to understand and carry out an effective migration. Below I will outline the steps to be taken in this process.
Introduction to our project
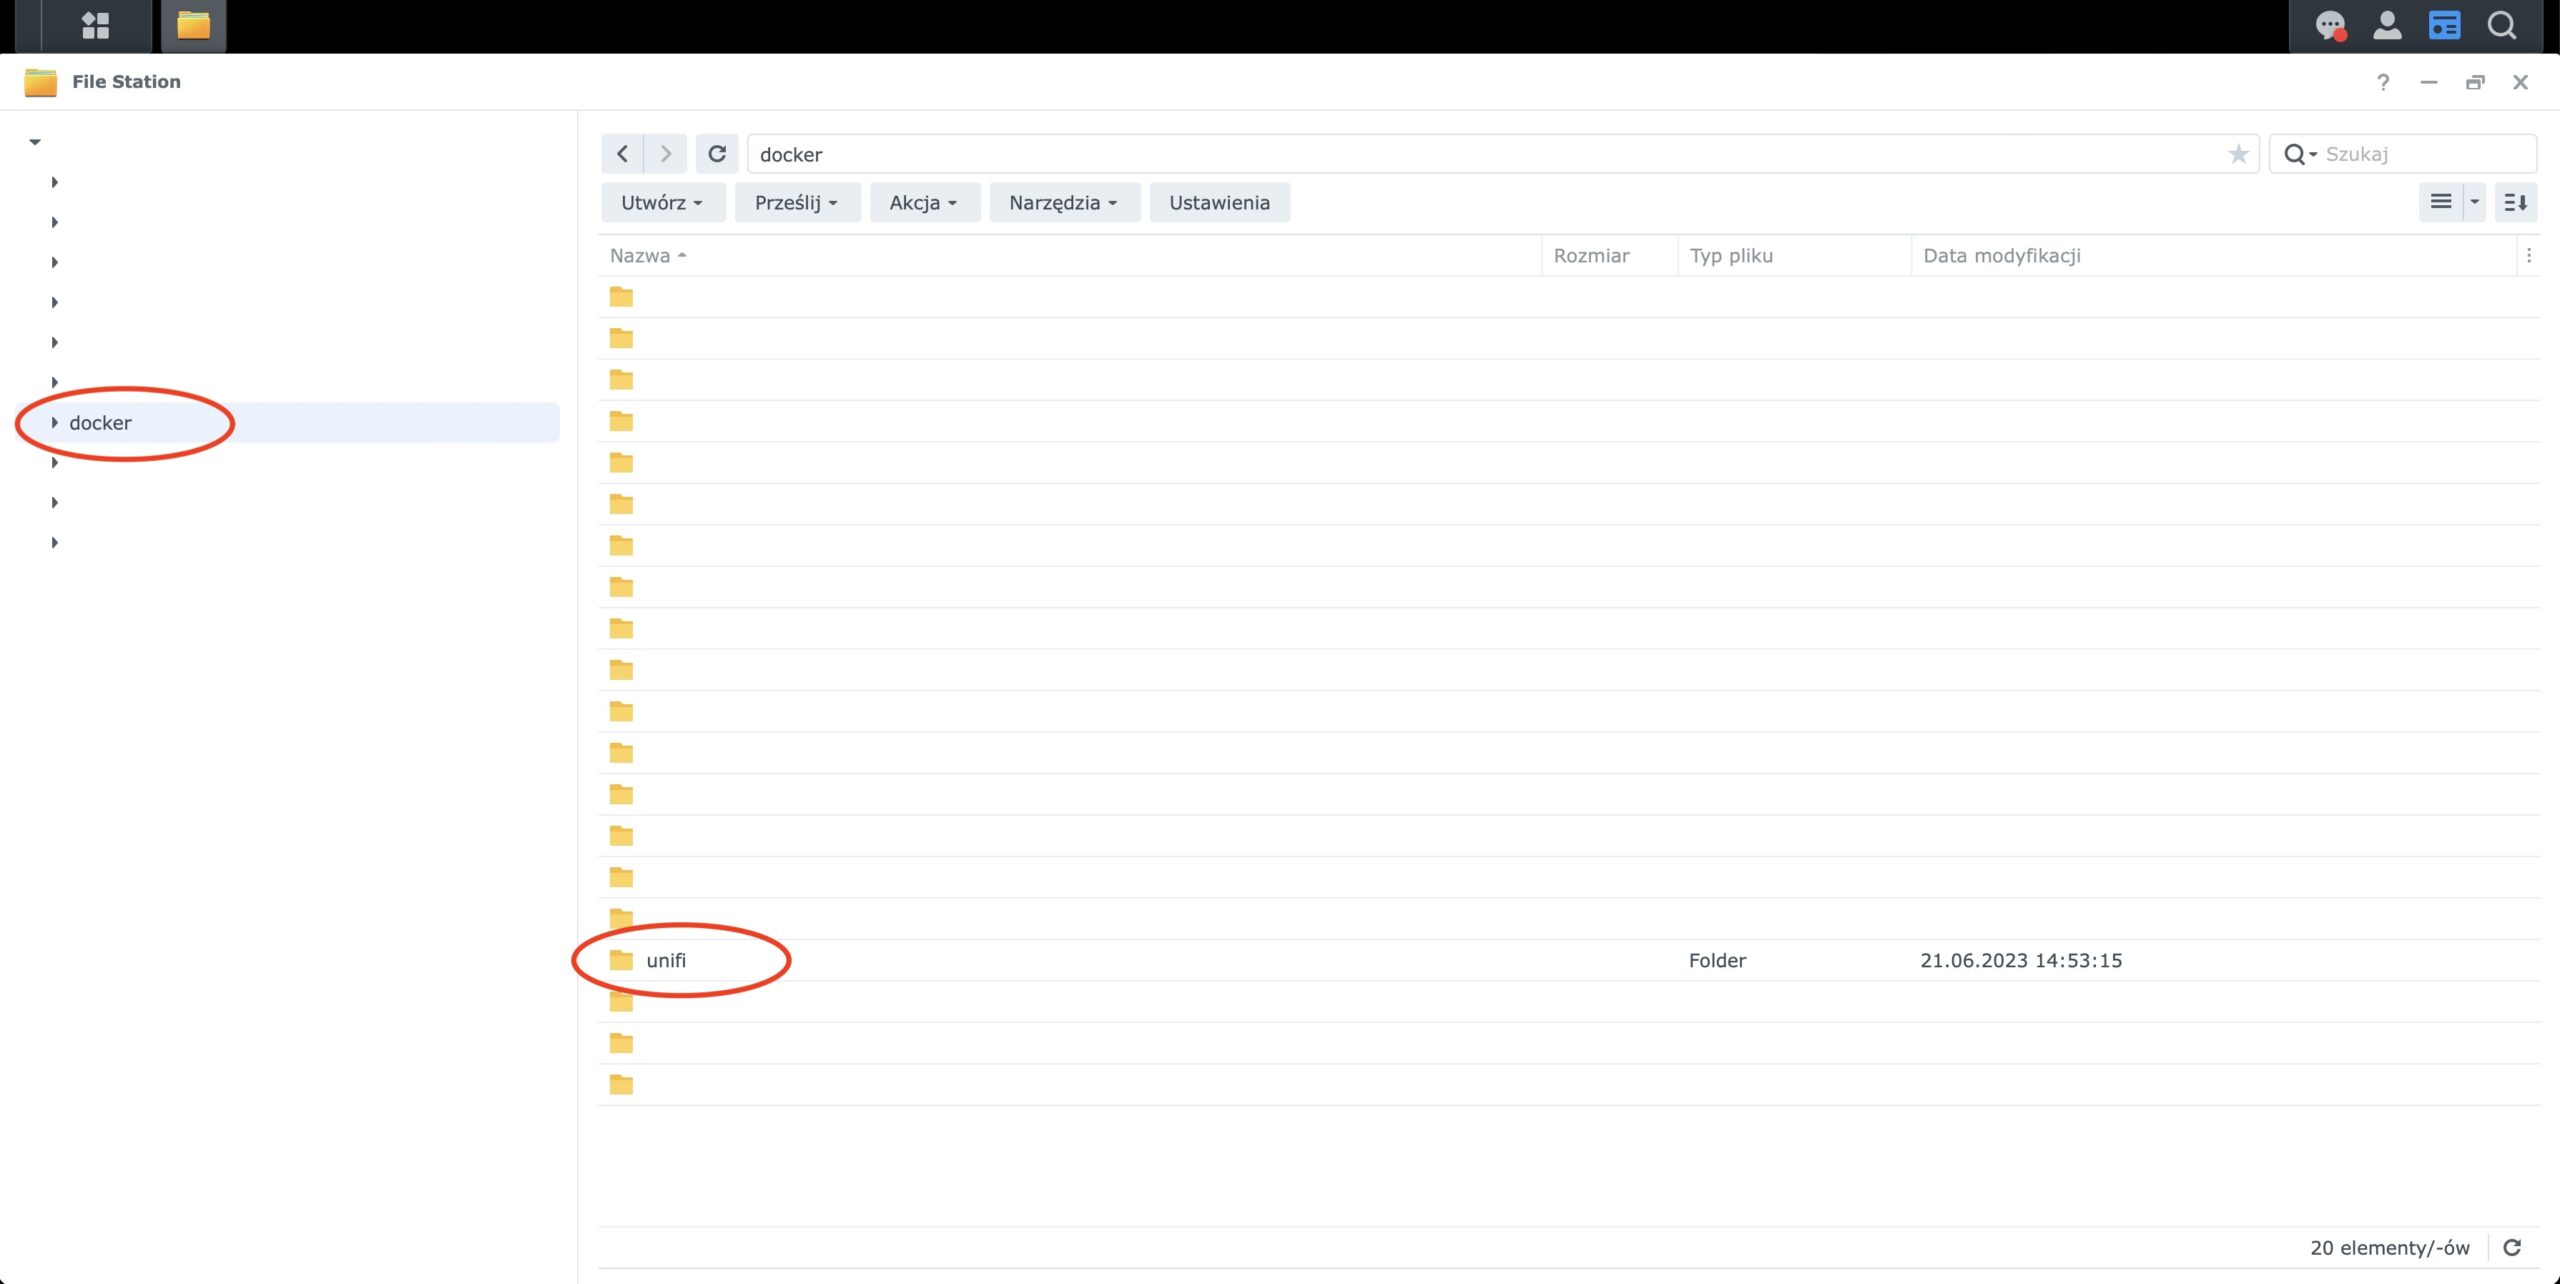
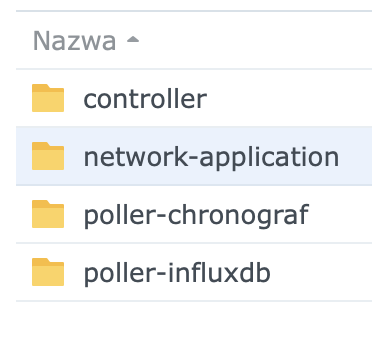
I will divide the guide into several steps – from preparing a backup, to creating folders for a new container for Network Application and final launch with Docker Compose. I will be doing the activities on a Synology DS920+, running the containers using the Portainer that I have already installed.
What is the UniFi Controller?
Ubiquiti’s UniFi Controller serves as a central hub for UniFi Series network devices, providing secure communication and management. This controller is responsible for the configuration and ongoing maintenance of connected devices, such as access points. Once a device is added to the controller, a permanent connection is established – likened to a parent-child relationship, where the controller acts as a “mother” to the “children” in the form of network devices. All information about each device is stored in the controller’s local file system.
An interesting aspect is that the UniFi series devices do not require a continuous controller to function. Once they receive their configuration from the controller, they can operate independently, sending only statistics about their operation to the controller for monitoring and analysis.
What is the difference between UniFi Controller and UniFi Network Application?
Nothing, Ubiquiti has decided since Controller 6.2 to use the term Network Application instead of Controller.
Preparation
In order to prepare the tutorial, we will adopt an established domain name and certain configuration names, shown below. For customized configuration, apply settings according to individual requirements.
- Full domain name (FQDN) of Synology DSM: https://dsm.xyz.com,
- Full Domain Name (FQDN) of UniFi Controller / Network Application: https://unifi.xyz.com,
- Installed on Synology via Docker: Portainer, AdGuard Home,
- Installed on Synology via Package Center: Container Manager,
- On the router’s DHCP server, the indicated IP address of the DNS server (AdGuard Home) installed on the Synology,
- Existing devices e.g. access points (Access Point), which were managed by UniFi Controller, and you want to transfer them to UniFi Network Application.
Hardware
Nginx Proxy Manager (optional)
On my Synology, I set up a reverse proxy using Nginx Proxy Manager, which allows access to the UniFi dashboard via a URL (https://unifi.xyz.com) instead of the standard IP address. It is a solution that increases the convenience of managing UniFi devices by offering an easier to remember and more intuitive address available on the LAN. Are you interested in how to do it? Take a look here.
In addition, local DNS redirection is performed by the AdGuard DNS server, also running on a containerized version of the Synology server.
Software
Ubiquiti also offers external devices that serve as controllers, such as Cloud Key. However, it is possible to replace them with a solution based on Docker Compose, which is an alternative especially for those who prefer more flexible and integrated IT environments. I will discuss the details of this solution later in the article.
UniFi Network Application od LinuxServer.io
Access to the repository of the containerized version of the UniFi Network Application developed by LinuxServer.io is available here. Based on this data, we will create a new Stack in the Portainer.
Database
It is worth mentioning that some Synology server models, including the DS920+ model mentioned above, do not support AVX (Advanced Vector Extensions) technology. AVX is a set of processor instructions that provide better performance for computationally intensive tasks, such as data processing and graphics operations. For this reason, in this manual we will use MongoDB version 4.4, which is compatible with devices that do not have AVX support.
MongoDB is a modern, open-source NoSQL database that stores data in a JSON-like format known as BSON. It is a database system with high performance, scalability and flexibility, especially suitable for applications requiring rapid processing of large amounts of complex data.
Step 1 – Configuration in Synology DSM
File Station
- Log in to your Synology file server and launch File Station.
- Then, navigate to the previously created shared folder named docker. Inside this folder, find and open the unifi folder.
- The next step is to create a subfolder named network-application inside the unifi folder.
- After a successful migration and installation of the new Unifi Network Application, the old folder containing the previous controller will be able to be deleted. This will clean up the space and arrange the folder structure according to the current configuration.
-
- In this article, we will not discuss additional folders related to UniFi Poller, which are part of my configuration. UniFi Poller are containers used to collect telemetry data from the UniFi controller, which can then be visualized in Grafana. We will focus on other aspects of UniFi controller configuration and migration.
- Inside the network-application folder, create two subfolders: config and mongodb. The config subfolder will be used to store configuration files, while mongodb will be for managing database data.
Step 2 – Create a script to create a database
- Return to the network-application folder, then open the mongodb folder. Here, create a file named init-mongo.js. Then, paste the contents of the code below into this file. This file will be used to initialize and configure the MongoDB database for Unifi Network Application. Make sure the code meets the specifications needed for your configuration – most importantly, change the default password.
db.getSiblingDB("unifi").createUser({user: "unifi", pwd: "unifi", roles: [{role: "readWrite", db: "unifi"}]});
db.getSiblingDB("unifi_stat").createUser({user: "unifi", pwd: "unifi", roles: [{role: "readWrite", db: "unifi_stat"}]});
Step 3 – Download the backup from UniFi Controller
To move existing Site configurations from the current controller to the new Network Application repository, an important step is to download a backup of existing devices and configurations. This will allow easy transfer of all settings and registered devices to the new environment, eliminating the need to re-register and configure each device from scratch. This will facilitate the migration process, preserving all relevant settings and data.
- To start the migration process, log in to the admin panel of your current controller.

- In the Controller admin panel, find and select the cogwheel icon that represents Settings. This option is located in the menu on the left side of the screen and provides access to various system configurations and settings.

- After selecting the settings, go to the System tab. This part of the user interface contains important system management functions.

- In the next step, under the System tab, go to the Backups section, which is located in the menu at the top of the page. This section allows you to manage system backups, which is essential to protect your data and settings before migrating to a new UniFi Network Application environment.

- Click the Download button in the Backups section to download the latest backup created by your current UniFi controller.

- After clicking, wait a while for the system to prepare and download the backup file. This file will contain all the necessary data and settings that are required for subsequent migration to the new UniFi Network Application environment.
Step 4 – Update Stack Docker Compose in the Portainer
This step involves logging into the Portainer and modifying the existing stack (Stack) by entering new Docker Compose code. In this new Docker Compose configuration, you will include separate services for the MongoDB database and for the Unifi Network Application. This way you integrate both the database and the application into a single container solution.
- Log in to your account and go to the administrative interface of the Portainer.
- If you use the Authentik single sign-on system, you can make the login process easier by integrating Portainer with Authentik. For integration instructions, see the dedicated guide.
- Select your environment (eng: Environments) in which you will edit the configuration of the created Docker Compose. Then go to Stacks and select the created Stack named unifi.

- At the top under Stack details, go to Editor.
- Replace the previous contents of Docker Compose referring to the UniFi Controller repository with the new code shown below:
---
version: "3.9"
services:
unifi_net_app_db:
image: mongo:4.4
container_name: unifi_network_application-db
hostname: unifi-net-app-db
mem_limit: 2g
cpu_shares: 768
healthcheck:
test: ["CMD", "mongo", "--eval", "db.adminCommand('ping')"]
interval: 10s
timeout: 10s
retries: 5
start_period: 20s
networks:
- unifi_network
volumes:
- /volume1/docker/unifi/network-application/mongodb/init-mongo.js:/docker-entrypoint-initdb.d/init-mongo.js:ro
- /volume1/docker/unifi/network-application/mongodb:/var/lib/mongo:rw
- /volume1/docker/unifi/network-application/mongodb:/data/configdb:rw
- /volume1/docker/unifi/network-application/mongodb:/data/db:rw
restart: unless-stopped
unifi_net_app_server:
image: linuxserver/unifi-network-application:8.0.26
container_name: unifi_network_application-server
hostname: unifi-net-app-server
environment:
- PUID=1026
- PGID=100
- TZ=Europe/Warsaw
- MONGO_HOST=unifi-net-app-db
- MONGO_USER=unifi
- MONGO_PASS=unifi
- MONGO_PORT=27017
- MONGO_DBNAME=unifi
- MEM_LIMIT=1024
- MEM_STARTUP=1024
- MONGO_TLS=false
volumes:
- /volume1/docker/unifi/network-application/config:/config
ports:
- 8443:8443
- 3478:3478/udp
- 10001:10001/udp
- 8080:8080
# - 1900:1900/udp #optional
- 8843:8843 #optional
- 8880:8880 #optional
- 6789:6789 #optional
# - 5514:5514/udp #optional
restart: unless-stopped
networks:
- unifi_network
depends_on:
- unifi_net_app_db
networks:
unifi_network:
name: unifi_network
ipam:
config:
- subnet: 192.168.200.0/24
Parameters
At startup, we can specify parameters that configure containers (such as those included above). These parameters are separated by a colon and indicate <external>:<internal>. For example, -p 8080:80 will make port 80 inside the container accessible from outside the container, from the host IP, on port 8080.
Time Zone
- After pasting the code in the editor, change the value for the time zone (TZ) by selecting the appropriate time zone from this list.
PUID i PGID
When you use volumes (-v parameter), there may be permission issues between the host OS and the container. To get around these problems, we give you the option to select a user identifier (PUID) and a user group (PGID).
-
- Before pasting the above code into the editor area, change the number values for PUID and PGID to your own PUID and PGID values. The PUID and PGID values refer to a particular account existing on Synology. You need to enter your own values.
- To check your PUID and PGID values on Linux, you can use a terminal. Enter the command id username (replacing username with your own username on the computer). The result of this command will show your PUID (UID) and PGID (GID). These values are essential to properly configure Docker containers, as they allow you to match the permissions of files and directories in the container to your system.
id jkowalski
uid=1026(jkowalski) gid=100(users) groups=100(users),101(administrators)
Step 5 – Run Network Application and upload a backup of the controller
The last step is to run Network Application with MongoDB and import the previously downloaded backup from the previous controller.
Once the new Unifi Network Application environment is up and running, you will be able to upload saved settings and configurations so that all devices and network settings are restored on the new system without the need for manual reconfiguration. This will facilitate rapid adaptation to the new environment and ensure continuity of network operations.
Log in
- Log in using the address https://unifi.xyz.com.Należy Note that the initial startup and configuration of the database may take some time.
- Once launched, let’s start by selecting the option to restore the configuration from the previous controller by clicking on Restore Server from a Backup at the bottom of the screen,
- Then select the backup file and confirm you want to upload it. The restoration process may take some time.

- Once this process is complete, your devices should already be properly integrated into the new Network Application environment.
- Done! 🚀
Additional sources and information
- Controller vs Network Application: https://www.reddit.com/r/Ubiquiti/comments/ngjjf1/controller_vs_network_application/
Read also
- TVHeadend: Guide to installing on Synology in Docker Compose / How to install TVHeadend on Synology with Docker Compose. A practical step-by-step guide for advanced users.
- How to do an internet speed test on Raspberry Pi / Check the internet speed on Raspberry Pi with speedtest-cli. Discover how to set up and use the speed tool.
- ADS-B: Receiver Installation and Configuration on Raspberry Pi / Discover the secrets of installing and configuring your own ADS-B antenna on Raspberry Pi. Develop skills and track aircraft in real time.
- Traccar: A guide to installing on Synology with Docker / Step-by-step guide: Installing Traccar on Synology using Docker. Effective vehicle tracking on your own server.
- Traccar: Configuring GPS communication in Docker / Step by step how to enable Traccar GPS communication. Using Docker Compose, open ports for managing and receiving GPS data.
Leave a Reply