
Hello!
Today I’ll walk you through the steps of setting up a single sign-on (SSO) service between a WordPress server and Authentik.
Introduction
What is WordPress?
 WordPress is one of the most popular platforms for creating websites and blogs. It is an advanced content management system (CMS) that allows you to easily create, edit and publish various types of content online. WordPress has an intuitive interface and a large community of users. It offers a huge number of free and paid themes and plugins. They extend the functionality of WordPress.
The WordPress community offers support, advice and resources. It is a popular choice for both small blogs and large corporate sites, online stores and portals. Its open nature and ease of use make it readily used for a variety of online purposes.
What is Authentik?
![]() Authentik is an open source software that serves as an Identity Provider to manage user authentication and authorization. As an alternative to commercial services such as Okta or One Login, Authentik offers similar functionality in an open-source model. Other open-source tools with a similar purpose include Keycloak and Authelia, which also allow central management of user identities in applications and web services.
Authentik is an open source software that serves as an Identity Provider to manage user authentication and authorization. As an alternative to commercial services such as Okta or One Login, Authentik offers similar functionality in an open-source model. Other open-source tools with a similar purpose include Keycloak and Authelia, which also allow central management of user identities in applications and web services.
It stands out for its configuration flexibility and broad support for various authentication protocols, making it an excellent choice for organizations looking for an advanced but accessible open-source identity management solution.
Preparation
For the purpose of preparing the guide, let’s start with the domain names and identifiers described below. Keep in mind, however, that during the setup process you should adjust the settings according to your needs.
- Full domain name (FQDN) Portainer: https://auth.xyz.com
- Full domain name (FQDN) of WordPress: https://xyz.com
With these assumed values, we can move on to the actual part of the guide. Of course, if necessary, these values should be changed to suit your configuration.
What is OpenID Connect?
The OpenID Connect (OIDC) protocol is an authentication layer based on the OAuth 2.0 protocol that enables secure authentication and acquisition of user identity information in web applications. Below are the key elements that describe how OpenID Connect works:
- OAuth 2.0 authentication: OpenID Connect uses the OAuth 2.0 protocol as the basis for authentication. OAuth 2.0 allows applications to access resources on behalf of the user, and OpenID Connect extends this protocol with an authentication layer.
- Issuing Tokens: Once a user is successfully authenticated, its gets tokens that contain identity information. These are typically:
- ID Token: Contains basic information about the user, such as ID, first name, last name, etc.
- Access Token: Allows access to protected resources on behalf of the user.
- Refresh Token: It is used to refresh or obtain new tokens after expiration.
- JSON Web Tokens (JWT): The information sent in the tokens is often encoded in the JSON form of Web Tokens, which keeps them concise and secure.
- End-User Authentication: OpenID Connect supports various methods of user authentication, such as password login, multi-factor authentication or even third-party identity providers.
- Configuration Information: The identifiers and information necessary to authorize and receive tokens are obtained from the configuration document, which is usually available at a fixed URL.
- Security over TLS: Communication between the client and the identity provider, as well as between the provider and the resource server, should take place over a secure TLS (HTTPS) connection.
In summary, OpenID Connect facilitates secure and efficient authentication of users in web applications, while allowing users to acquire their identity information through tokens.
Operation of OpenID Connect
The process of the OpenID Connect (OIDC) protocol can be divided into several steps. Below you will find a general description of the steps involved in this process:
- Initiate Authorization Request:
- The user wants to log into the application, supporting OpenID Connect.
- The application directs it to the identity provider (IdP) with an authorization request.
- This request contains the ranges (scopes) of access that the application wants, and information about what actions are required after the authorization is completed.
- User Authentication (Authentication):
- The identity provider authorizes the user.
- If the user is not logged in, they may be asked for their credentials.
- Redirection Back:
- Once the user is successfully authenticated, the identity provider redirects the user back to the application while providing an authorization code.
- Code-to-Token Exchange (Token Exchange):
- The application sends the received authorization code back to the identity provider.
- In return, it receives a set of tokens, such as an ID Token, Access Token and possibly a Refresh Token.
- Use of Tokens (Access Resources):
- The application uses the received Access Token to access protected resources on behalf of the user.
- Access to resources can be limited by the access range specified in the token.
- Token Verification:
- The application verifies the validity of the received tokens, especially the ID Token, which contains information about the user’s identity.
- Verification may include checking the token’s signature, its validity and compliance with authorization requests.
- Token Refresh:
- If Refresh Token is used, the application can refresh its tokens without having to re-authenticate the user.
Step 1 – Configuration in Authentik
- First, log in to your account and go to the Authentik administrative interface.
- After successfully logging in, go to the Applications tab on the left side of the screen and then select Providers.

- Click Create and select the OAuth2/OpenID Provider type. The next step will be to click Next to proceed.
- Fill the provider with the following values
- Name: wordpress
- Authentication flow: Choose your configured or set default (default-authentication-flow)
- Authorization flow: choose your configured or set explicit or implicit consent. (This setting refers to the function used during authorization for this application – we define whether Authentik should display a button that allows you to go to the application after logging in, or simply redirect you without asking).
- Protocol settings
- Client type: We leave Confidential
- Client ID: Copy and save for later
- Client Secret: Copy and save for later
- Redirect URIs/Origins (RegEx): https://xyz.com/openid-connect-authorize
- Signing Key: authentik Self-signed Certificate
- Leave the other values unchanged and click Finish.
- On the left side of the screen, select Applications and then Applications again.
- Kliknij Create and fill the application with the following values:
- Name: WordPress
- Slug: wordpress
- Provider: wordpress
- UI Settings you may or may not want to complete.
- Icon: download a WordPress icon from the Internet and upload it.
- Publisher: i.e. WordPress.com
- Description: example My website based on WordPress
- Finally, confirm the creation of the application with the Create button.
On the identity provider side, we have already completed the necessary steps. The time has come to configure in the WordPress system.
Step 2 – Configuration in WordPress
Plugin installation
- First, log in to the administration panel,
- It is worth noting that your admin account login in the admin panel should refer to the same login you have in SSO Authentik,
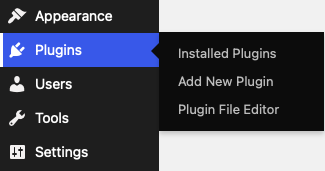
- Go to the Plugins section, and then select Add New Plugin from the pop-up menu,
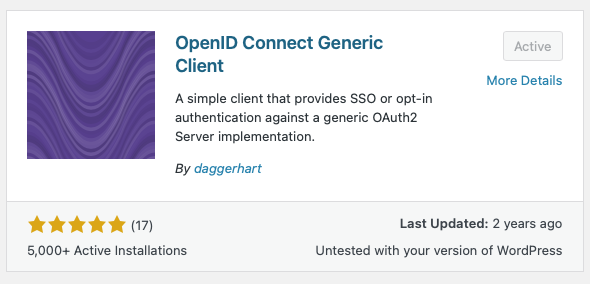
- Paste the name OpenID Connect Generic Client into the plugin search box,

- Then select the plugin created by the author of daggerhart and install it,
- Alternatively, you can also download a plugin available on the WordPress website and install it manually by uploading a .zip package.
Plugin configuration
- After successful installation of the plugin, go to Settings section. There you will find a reference to the OpenID Connect Client plug-in configuration.

- Fill in the fields with the following values
- Client Settings
- Login type: leave OpenID Connect button on login form
- Client ID: Paste Client ID from Authentik
- Client secret key: Wklej Client secret z Authentika
- OpenID Scope: email profile openid
- Login Endpoint URL: https://auth.xyz.com/application/o/authorize/
- Userinfo Endpoint URL: https://auth.xyz.com/application/o/userinfo/
- Token Validation Endpoint URL: https://auth.xyz.com/application/o/token/
- End Session Endpoint URL: https://auth.xyz.com/application/o/wordpress/end-session/
- ACR values: leave empty
- Identity Key: preferred_username
- Disable SSL Verify: leave unchecked
- HTTP Request Timeout: 5
- Nickname Key: preferred_username
- Email Formatting: {email}
- Display Name Formatting: leave empty
- Identify with User Name: leave empty
- State time limit: leave empty
- Enable Refresh Token: leave empty
- WordPress User Settings
- Link Existing Users: tick
- Create user if does not exist: tick
- Redirect Back to Origin Page: leave empty
- Redirect to the login screen when session is expired: leave empty
- Authorization Settings
- Enforce Privacy: leave empty
- Alternate Redirect URI: tick
- Log Settings
- Enable Logging: leave empty
- Log Limit: 1000
- Client Settings
- Save your settings with the Save Changes button.
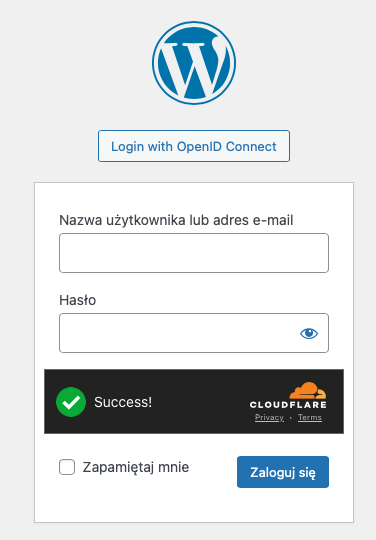
- To use single sign-on, you must first go to the WordPress administration panel (wp-admin). Then select Login with OpenID Connect.
Comments (2)
Harrysays:
28/03/2025 at 14:05When i pressed “Login with OpenID Connect”, it redirected to Authentik for login, after that, it redirected back to wordpress and then i got the error: “The page can’t be found.”
Filip Chochółsays:
16/04/2025 at 09:55The page can’t be found – is that in WordPress?