
Hello!
Today I’ll walk you through the steps of setting up a single sign-on (SSO) service between the Synology server and Authentik.
What is Synology DSM?
 Synology DiskStation Manager is an operating system developed by Synology Inc. Specifically designed to run on their NAS servers. DSM offers an intuitive and integrated environment for data management, file sharing, backup, and support for a variety of applications.
What is Authentik?
![]() Authentik is also an open-source tool that acts as an Identity Provider. Similar commercial services, such as Okta or One Login, are already operating in the market. As for similar open-source tools, on the other hand, you can mention the likes of Keycloak and Authelia.
Authentik is also an open-source tool that acts as an Identity Provider. Similar commercial services, such as Okta or One Login, are already operating in the market. As for similar open-source tools, on the other hand, you can mention the likes of Keycloak and Authelia.
Preparation
For the purpose of preparing the tutorial, we will adopt the domain names and identifiers described below. During setup, adjust the settings according to your needs.
- Full domain name (FQDN) of Synology DSM: https://dsm.xyz.com
- Full domain name (FQDN) Portainer: https://auth.xyz.com
Introduction to the guide
New system – new functionalities
Synology, with the introduction of DSM version 7.0 of its DiskStation Manager system, has opened up new possibilities for logging in via identity providers using the OpenID Connect protocol. Originally, the feature was only available for single sign-on via Azure Active Directory from Microsoft or IBM WebSphere Application Server. In addition, full use of the single sign-on feature required that the identity provider’s server be connected to Synology via LDAP or Active Directory.
With the release of DSM 7.2, Synology introduced four single sign-on protocols: OpenID Connect, SAML, CAS and Synology’s proprietary SSO. What’s more, user data no longer needs to be retrieved from LDAP/AD – it is now identified locally.
The following tutorial will focus on Single Sign-On implementation using OpenID Connect and local users.
What about devices based on DSM 7.1?
Many users may still be using a DSM 7.1-based system due to the age of their device, which will no longer receive the DSM 7.2 upgrade. In the case of identity provider Authentik, connection via OpenID Connect + LDAP is currently impossible, according to information available as of the date of writing. On the Github platform, there are open reports of problems regarding difficulties in connecting Authentik to a Synology device using the LDAP protocol.
In the near future, I plan to prepare two articles outlining ways around this problem, based on two scenarios. The first involves an existing Synology device in our home lab with DSM 7.2 installed, while the second suggests using the SSO Server application from Synology.
What is OpenID Connect?
The OpenID Connect (OIDC) protocol is an authentication layer based on the OAuth 2.0 protocol that enables secure authentication and acquisition of user identity information in web applications. Below are the key elements that describe how OpenID Connect works:
- OAuth 2.0 authentication: OpenID Connect uses the OAuth 2.0 protocol as the basis for authentication. OAuth 2.0 allows applications to access resources on behalf of the user, and OpenID Connect extends this protocol with an authentication layer.
- Issuing Tokens: Once a user is successfully authenticated, he or she gets tokens that contain identity information. These are typically:
- ID Token: Contains basic information about the user, such as ID, first name, last name, etc.
- Access Token: Allows access to protected resources on behalf of the user.
- Refresh Token: It is used to refresh or obtain new tokens after expiration.
- JSON Web Tokens (JWT): The information sent in the tokens is often encoded in the JSON form of Web Tokens, which keeps them concise and secure.
- End-User Authentication: OpenID Connect supports various methods of user authentication, such as password login, multi-factor authentication or even third-party identity providers.
- Configuration Information: The identifiers and information necessary to authorize and receive tokens are obtained from the configuration document, which is usually available at a fixed URL.
- Security over TLS: Communication between the client and the identity provider, as well as between the provider and the resource server, should take place over a secure TLS (HTTPS) connection.
In summary, OpenID Connect facilitates secure and efficient authentication of users in web applications, while allowing users to acquire their identity information through tokens.
Operation of OpenID Connect
The process of the OpenID Connect (OIDC) protocol can be divided into several steps. Below you will find a general description of the steps involved in this process:
- Initiate Authorization Request:
- The user wants to log into the application, supporting OpenID Connect.
- The application directs it to the identity provider (IdP) with an authorization request.
- This request contains the ranges (scopes) of access that the application wants, and information about what actions are required after the authorization is completed.
- User Authentication (Authentication):
- The identity provider authorizes the user.
- If the user is not logged in, they may be asked for their credentials.
- Redirection Back:
- Once the user is successfully authenticated, the identity provider redirects the user back to the application while providing an authorization code.
- Code-to-Token Exchange (Token Exchange):
- The application sends the received authorization code back to the identity provider.
- In return, it receives a set of tokens, such as an ID Token, Access Token and possibly a Refresh Token.
- Use of Tokens (Access Resources):
- The application uses the received Access Token to access protected resources on behalf of the user.
- Access to resources can be limited by the access range specified in the token.
- Token Verification:
- The application verifies the validity of the received tokens, especially the ID Token, which contains information about the user’s identity.
- Verification may include checking the token’s signature, its validity and compliance with authorization requests.
- Token Refresh:
- If Refresh Token is used, the application can refresh its tokens without having to re-authenticate the user.
Step 1 – Configure Nginx Proxy Manager in the Porter
Before you start implementing Single Sign-On on Synology with Authentik, make sure your Nginx Proxy Manager is configured. Not sure how to do it? Take it easy! In my latest article, you’ll find a quick step-by-step guide on how to do this using Docker Compose in the Porter.
👉 Check out step 1 now and get your environment ready for more reinforcements!
Step 2 – Configure Single Sign-On in the Porter
Do you already know how to make logging into Portainer simultaneous and seamless with Single Sign-On? If not, it’s time to change that! In my latest step-by-step tutorial, you’ll learn how to set up SSO using Authentik and Portainer.
👉 Visit step 2 now and get easier access to your Docker environment!
Step 3 – Configuration in Authentik
- Log in to your account and go to the administration interface,
- After successfully logging into the administrative interface, go to the Applications tab on the left side of the screen, and then select Providers.

- Click Create and select the OAuth2/OpenID Provider type. Then move on by clicking Next.
- Fill the provider with the following values:
- Name: dsm-oidc
- Authentication flow: Choose your configured or set default (default-authentication-flow)
- Authorization flow: choose your configured or set explicit or implicit consent. (This setting refers to the function used during authorization for this application – we define whether Authentik should display a button that allows you to go to the application after logging in, or simply redirect you without asking).
- Protocol settings:
- Client type: We leave Confidential
- Client ID: Copy and save for later
- Client Secret: Copy and save for later
- Redirect URIs/Origins (RegEx): https://dsm.xyz.com/#/signin
- Signing Key: authentik Self-signed Certificate
- Leave the other values unchanged and click Finish.
- On the left side of the screen, selectApplications, and then Applications again.
- Kliknij Create and fill the application with the following values:
- Name: Synology DSM
- Slug: synology-dsm
- Provider: dsm-oidc
- UI Settings you may or may not want to complete.
- Icon: download the Synology DSM icon from the Internet and upload it.
- Publisher: Synology Inc.
- Description: NAS
- We approve the creation of the application with the Create button.
On the identity provider side, we have already completed the necessary steps. Now it was time to configure the operating system from Synology.
Step 4 – Configuration in Synology DSM
- Log in to your Synology with your administrator account,
- Go to the Control Panel, and then select Domain/LDAP from the System section,
- Go to the SSO Client tab and set the following parameters described below:
- Login Settings: Mark as active Select SSO as the default option on the login page,
- Services: Mark as active Enable OpenID Connect SSO service,
- Go to OpenID Connect SSO single sign-on settings, then after opening the OIDC settings window, complete the form with the following parameters:
- Profile: OIDC
- Account type: Domain/LDAP/local
- Name: Authentik
- Well-known URL: https://auth.xyz.com/application/o/dsm-oidc/.well-known/openid-configuration
- Application ID: Paste the Client ID copied earlier from Authentik
- Application Secret Key: Paste the previously copied Client Secret from Authentik
- Redirection URI address: https://dsm.xyz.com/#/signin
- Scope of authorization: email openid profile
- Username claim: preferred_username
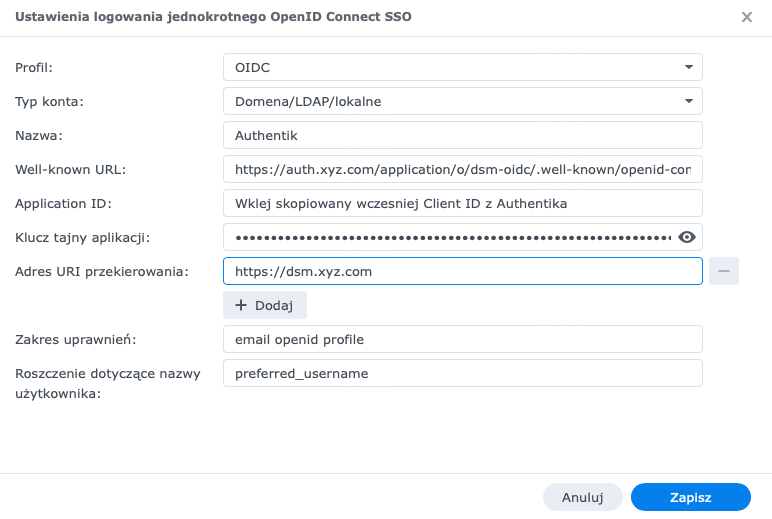
- Save your settings with the button located in the lower right corner on the blue background.
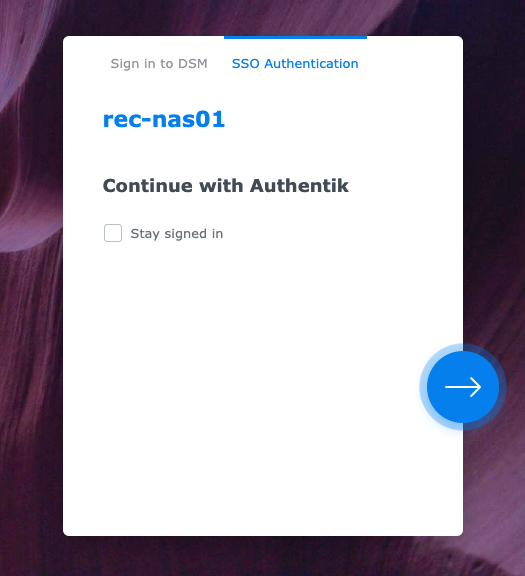
- After applying the changes, log in to DSM again, already using the OpenID Connect protocol single sign-on.
Comments (5)
Håkon Kampensays:
27/10/2025 at 07:13Any news on SSO for the applications (like Drive, Photos etc)? I use different subdomains for different applications (like drive.mydomain.com, photo.mydomain.com as opposed to nas.mydomain.com for DSM). If I access https://nas.mydomain.com/?launchApp=SYNO.SDS.Drive.Application, SSO works for Drive, and I can switch between Drive and Photo with the app menu top left with the same login. I don’t want to expose the login page for DSM online, but feel more OK with Drive/Photos, so I’m not sure how this can be done without exposing the possibility to reach DSM login page.
Any ideas?
anthonysays:
24/03/2025 at 21:14HI followed this video … Almost great But stuck on last stage. Using ldap and well imported in authentik. But I cannot login . After authentification 🙁 . really need help for this . Thx a lot .
Jeffrey Herrsays:
24/03/2024 at 18:49A great write-up, thank you. I found this page in trying to solve an issue with Synology and Authentik. Though I have many other SSOs set up and running in my environment, logging in with Synology returns an error (user/account is invalid) and the Synology logs show no user ID being returned by Authentik. Any suggestions?
“User [] from [192.168.2.130] failed to sign in to [DSM] via [sso] due to authorization failure.”
Filip Chochółsays:
24/03/2024 at 20:34Hey! Thanks for your message! 🙂
Which version of DSM do you have?
Tyler Dosays:
25/03/2024 at 17:15Hi Jeffrey,
I’m running into the same issue as you. But I’m also running DSM 7.1, which this article stated that 7.1 requires LDAP in order to populate users. I’m going to see if I can update my Synology to 7.2 and match it to a local user. Best of luck!