
Hello!
In today’s article, I’ll give you a practical guide on how to connect and configure an NVMe drive with your new Raspberry Pi.
What is a Raspberry Pi?
Raspberry Pi is a family of single-board computers (SBCs) created by the Raspberry Pi Foundation, a non-profit organization based in the United Kingdom. The first Raspberry Pi model appeared on the market in 2012. Since then, the series has continued to evolve, delivering newer and more advanced capabilities at an affordable price.
The Raspberry Pi is used for a variety of purposes, from educational to hobbyist to professional, as an inexpensive and compact computer. It takes the form of a small board with a built-in processor, RAM, input/output (GPIO) ports, USB ports, an Ethernet port, and often with built-in Wi-Fi and Bluetooth modules.
Although the Raspberry Pi is not equivalent to traditional desktop computers in terms of performance, it offers enough computing power for a wide range of applications, such as learning programming, creating IoT (Internet of Things) projects, home servers, monitoring systems and more.
All Raspberry Pi models run on open-source software, usually based on a Linux operating system such as Raspberry Pi OS (formerly known as Raspbian), although other operating systems such as Windows 10 IoT Core can also be run on them. Thanks to its popularity, the Raspberry Pi has become an essential tool for hobbyists, students, developers and even some professionals in various fields of computer science and electronics.
New generation of Raspberry Pi
Raspberry Pi 5 is the next release in the popular series of single-board computers. Compared to the Raspberry Pi 4B, it makes some significant changes:

- CPU: The Raspberry Pi 5 uses a Broadcom BCM2712 processor with four Arm Cortex-A76 cores clocked at 2.4 GHz. This means higher performance compared to the previous version.
- RAM: 4GB and 8GB LPDDR4X-4267 SDRAM variants are available.
- Video output: Raspberry Pi 5 supports two 4Kp60 HDMI displays with HDR support. This is a significant step forward in image quality.
- USB ports: the new version has two USB 3.0 ports, which enable simultaneous operation at 5 Gbps. This makes it easy to connect additional devices.
- Wi-Fi and Bluetooth: The Raspberry Pi 5 supports dual-band Wi-Fi 802.11ac and Bluetooth 5.0 / Bluetooth Low Energy (BLE).
- PCIe: The Raspberry Pi 5 has a PCI Express (PCIe) interface that allows the connection of additional devices such as NVMe drives. This allows you to use a high-performance NVMe drive in your project.
- Other features: Supports microSD card in SDR104 mode, has a standard 40-pin connector, a real-time clock (RTC) powered by an external battery, and a power button.
Preparation
Before diving into adapting the system, it’s a good idea to prepare properly. Poniżej znajdują się kluczowe kroki do rozpoczęcia projektu. Upewnij się, że masz wszystkie niezbędne materiały:
- Raspberry Pi 5 (Link to store),
- An attachment for the Raspberry Pi HAT, allowing the installation of an NVMe drive (Link to store),
- Original power supply for Raspberry Pi 27W USB-C (Link to store) or if you intend to power via PoE – Waveshare PoE HAT Compatible (Link to store),
- (optional) MicroSD memory card – for EEPROM changes in Raspberry Pi.
Compatibility of HAT+ vs non-HAT+ add-ons
The Raspberry Pi 5 has an FPC connector located on the board. This connector allows you to use the PCIe Gen 2.0 ×1 interface to quickly connect peripheral devices.
To connect a PCIe HAT+ device, simply plug it into the Raspberry Pi. The accessory should be automatically detected by the Raspberry Pi. As for non-HAT+ devices, you must first connect them to the Raspberry Pi and then manually enable PCIe interface support.
The NVMe drive attachment is not an original addition from the Raspberry Pi Foundation, so we will have to manually enable support for the PCIe interface. Without this, the board will not detect our disk.
Step 1 – Installing the Raspberry Pi OS on a microSD card
For the purposes of the tutorial, we will use the Raspberry Pi OS Lite operating system, which has no desktop environment. On the other hand, we will give it commands over SSH.
For Microsoft Windows operating system I recommend PuTTY, while for Apple macOS operating systems I recommend Termius.
- Use the official installer to install Raspberry Pi OS Lite on your device.
Raspberry Pi Imager
- Raspberry Pi Device: Select Raspberry Pi 5,
- Operating System: Select Raspberry Pi OS (other) and then Raspberry Pi OS Lite (64-bit),
- Storage: select your storage media that you have connected to your computer,
- Then click Next,
- When the Use OS customization information prompt appears, click Edit settings,
- For macOS computers – When you see the next prompt stating Would you like to prefill the wifi password from the system keychain, select No.
- When the operating system customization window opens, go to the General tab and complete it with the following parameters:
- Check Set hostname and type: rpi01
- Check Set username and password and type:
- Username: pi
- Password: Set your own password
- Go to the next Services tab and check Enable SSH, leaving Use password authentication.
- To save your settings, click Save.
- Then return to the previous Use OS customization window and click Yes to apply the modifications you made.
- A warning window will pop up informing you that all the data on the memory card will be erased permanently. Confirm this action. At this point, the Imager tool will format the card and install the operating system on it with the modifications made.
- Once the installation process is complete, insert the memory card into the Raspberry Pi. Then connect them to the power supply and to the router or switch using a network cable terminated with an RJ45 connector.
Step 2 – Edit BOOT_ORDER for NVMe drive booting
For the Raspberry Pi 5, you can specify whether to boot from USB or the network if a microSD card is not inserted. This is what the startup order is responsible for. This allows you to customize which source you want the system to run from. For example, if you have an NVMe drive connected, you want the system to first try to boot from that drive and only then from other sources, such as a microSD card.
The BOOT_ORDER line determines the order in which the devices are booted. The value 0xf416 means that the Raspberry Pi 5 will first try to boot from the NVMe drive (if connected), and only then from other sources (such as a microSD card). It’s crucial that the operating system on the NVMe drive be the first choice at startup.
- Run Putty (Windows OS) or Termius (macOS), then connect to your device over SSH,
- Enter the command:
sudo rpi-eeprom-config --edit- In the configuration file, find the BOOT_ORDER line, change it to:
BOOT_ORDER=0xf416If you are using a non-HAT+ adapter (that is, not an official HAT protocol-compliant adapter), adding the PCIE_PROBE=1 line will allow you to manually enable PCIe port support. This option is needed only when using unofficial adapters.
- Add the following line:
PCIE_PROBE=1- After editing, save the changes to the configuration file by clicking Ctrl + O (to save the changes to the file) and then Ctrl + X (to exit the editor),
- Then restart the Raspberry Pi 5 so that the new settings are applied.
Step 3 – Installing the Raspberry Pi OS on an NVMe drive
After setting the boot priority on the Raspberry Pi, we proceed to install the Raspberry Pi OS on the NVMe drive.
- Connect an NVMe drive using an adapter/disk enclosure. For my own needs, I use Unitek on USB-C.
- Select a system to install on the disk using Raspberry Pi Imager,
- Select the target NVMe drive on which to install the system.
- Click Write (or change necessary parameters by the way, e.g. SSH/Locale, etc.).
- When you install the operating system on the NVMe drive, do not install it immediately in the Raspberry Pi. It is still necessary to adjust the parameters in the config.txt file on the NVMe drive to activate the PCIe interface.
Step 4 – Edit config.txt on the NVMe drive
To boot the Raspberry Pi 5 from an NVMe drive, it is necessary to add the appropriate parameter to the config.txt file, located on the system partition on the NVMe drive. However, editing this file can be a challenge, as Windows and macOS do not support the ext4 partition, used on most Linux-based systems, by default. Below you will find the steps to take:
- Reconnect the NVMe drive (if it has been disconnected) using a USB adapter to the computer,
- Install ext4 partition utility
- If you are using Windows, you can install the Ext2Read tool,
- If you are using macOS, install the extFS for Mac tool from Paragon Software (I personally use it for other applications as well and am very satisfied),
- Read the config.txt file
- Open the ext4 partition on the NVMe drive using the tools mentioned above,
- Go to the /boot/firmware folder and open the config.txt file located there,
- Add the parameter described below:
#  Add to the bottom of the /boot/firmware/config.txt file
dtparam=nvme- After adding this parameter, save the changes and remove the NVMe drive from the computer. Now you can connect the drive to the Raspberry Pi 5 and boot the system with the new settings.
PCIe Gen 3.0
The Raspberry Pi 5 has five active PCI Express lines: four are dedicated to the new RP1 chip, supporting various interfaces such as USB, Ethernet, MIPI cameras, displays and GPIO, and one is dedicated to an external PCIe connector. By default, all PCIe lines operate in Gen 2.0 mode, achieving about 5 GT/s per line.
However, it is possible to force Gen 3.0 mode, reaching about 8 GT/s, which is almost twice as fast. To achieve this, add the following lines to the /boot/firmware/config.txt file:
# Optionally, you can force a change in PCIe bus speed with the command below
dtparam=pciex1_gen=3
After making these changes, save the file. The new settings will be included, and the Raspberry Pi 5 will operate in PCIe Gen 3.0 mode.
It’s worth noting that while some devices can significantly benefit from Gen 3.0 speeds, such as high-speed network cards and NVMe SSDs, others may encounter problems due to signal interference or other factors. Therefore, it is recommended to experiment with different configurations to achieve optimal performance depending on your specific use case!
Step 5 – Installing the adapter and connecting the NVMe drive
Now it’s time to mount the NVMe adapter on the Raspberry Pi 5 and connect the NVMe drive. Below are the steps you should follow:
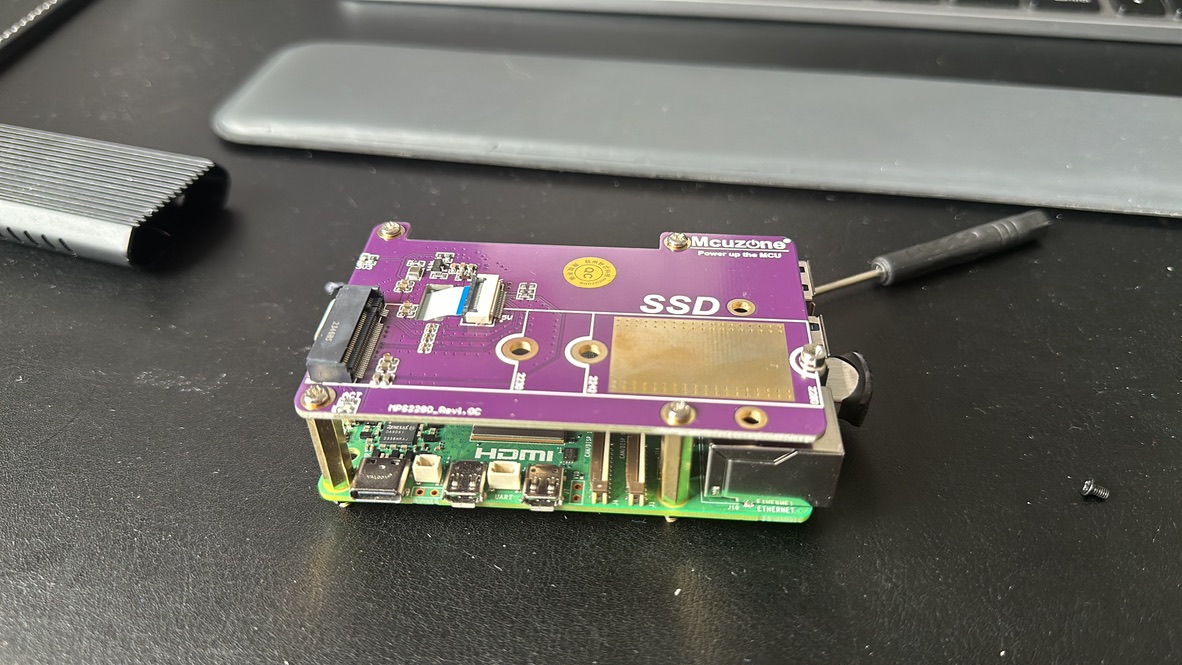
- PCIe NVMe adapter installation
- Install the adapter according to the instructions provided by the manufacturer. Connect the cable to the FPC connector, which is responsible for communication over PCIe, making sure that it is properly seated.
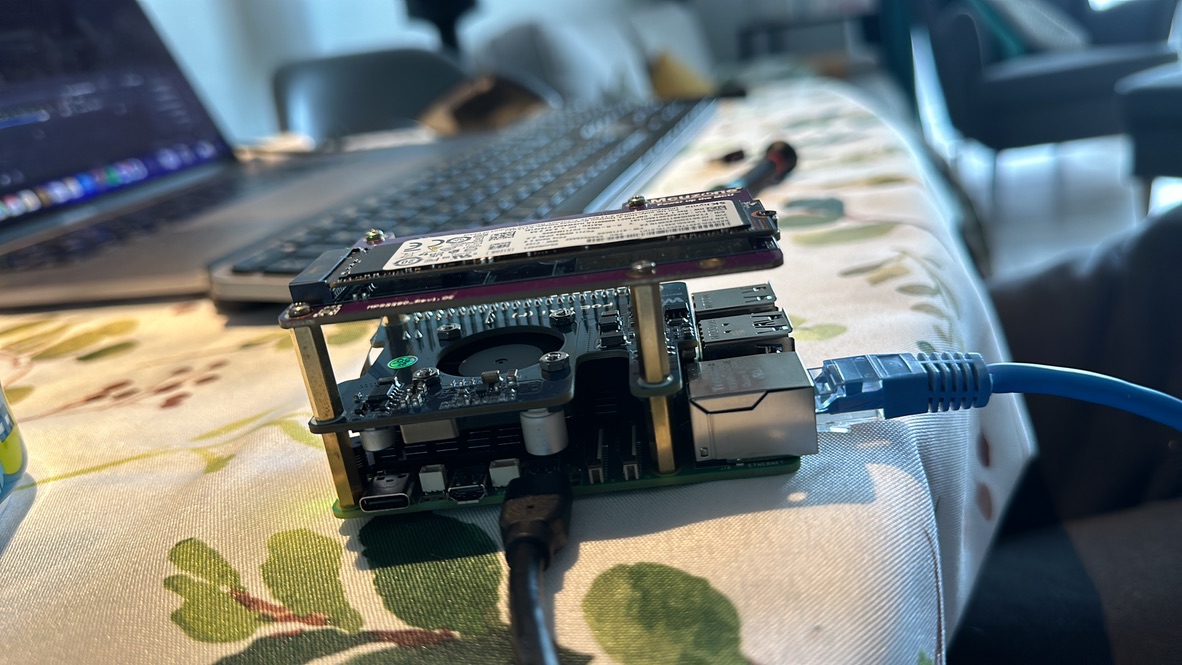
- Install the disk on the board
- Gently tighten the locking screw to prevent the disk from falling out.
- Start the board
- Turn on the Raspberry Pi 5 and watch to see if the NVMe drive is detected.
- Done! 🚀
If you have additional questions about the setup, go ahead and leave a comment under this article or contact me directly. I will be happy to answer any concerns and help solve any problems. Your questions can help improve this guide for other users.
Problems with disk recognition
If you’re having trouble getting your NVMe SSD up and running or recognizing it, here are some steps that can help:
- Make sure you use the operating system (Bookworm), as it is the only one that supports PCIe. OS Bullseye is not supported. You can check the available operating systems at: https://www.raspberrypi.com/software/operating-systems/
- Make sure you use the right type of SSD. Only M.2 drives are supported NVMe (Sata) Key-M. M.2 NGFF Key-B drives are not supported.
- Make sure the FPC cable is properly and tightly inserted into the Raspberry Pi 5. Also check that the direction of the FPC cable is correct.
- If you still have problems, consider the compatibility of the SSD. You can try switching to other brands of NVMe SSDs.
Additional materials and information
For further exploration and more information, I recommend checking out the links below. They are valuable sources that were used in the development of this guide.
- Reddit, How to use ext4 filesystems in Windows?: https://www.reddit.com/r/linux/comments/11pkgjv/how_to_use_ext4_filesystems_in_windows/
- Raspberry Pi, NVMe SSD boot: https://www.raspberrypi.com/documentation/computers/raspberry-pi.html#nvme-ssd-boot
- Raspberry Pi, Updating the EEPROM Configuration: https://www.raspberrypi.com/documentation/computers/raspberry-pi.html#updating-the-eeprom-configuration
- Raspberry Pi, PCIe Gen 3.0: https://www.raspberrypi.com/documentation/computers/raspberry-pi.html#pcie-gen-3-0
Read also
- Home Assistant: Installation and integration of the Eastron DSM120M meter. Installation and integration of Eastron energy meter with Home Assistant using ESPHome. A detailed step-by-step guide.
- Home Assistant: BME280 sensor installation via ESPHome. Create a simple weather station for your balcony with ESPHome and Home Assistant. With this tutorial, you will build a system with the BME280 sensor.
- TVHeadend: SAT>IP decoder installation and configuration. Telestar Digibit Twin: Discover the step-by-step configuration of a SAT>IP decoder with TVHeadend in Docker Compose in blog post.
- How to configure a Leox GPON ONT module on a Mikrotik router. Step-by-step guide on how to configure Leox LXT-010S-H GPON ONT module on Mikrotik RB5009 router, instead of ONT module from Orange.
- UniFi Network Application: Connecting an Access Point from another network. Discover how to connect a device from Ubiquiti UniFi from another network to Network Application – using Mikrotik’s IPSec tunnel as an example.
- ADS-B: Installing and configuring the receiver on a Raspberry Pi. Discover the secrets of installing and configuring your own ADS-B antenna on a Raspberry Pi. Develop skills and track aircraft in real time.
- Traccar: A guide to installing on Synology in Docker. Step-by-step guide: Installing Traccar on Synology using Docker. Effective vehicle tracking on your own server.
Leave a Reply