Hello!
In this article, we will discuss how to install Traccar on a Synology server using Docker containerization. We will perform the entire installation using Docker Compose via the Portainer tool. Next, we will configure a reverse proxy using the already installed Nginx Proxy Manager. To access Traccar by domain name on the local network, we will configure DNS rewriting using AdGuard Home.
What is Traccar?

Traccar is an open-source vehicle tracking tool that enables fleet monitoring and management. It works on the principle of a GPS server, which allows it to collect data from GPS devices and other sensors. The system then presents this information in a web-based interface. Moreover, Traccar allows you to track the location of vehicles in real time, analyze route history, and monitor fuel consumption and other parameters.
The following tutorial was created based on version: Traccar 5.10.
Preparation
For the purpose of preparing the guide, let’s start with the domain names and identifiers described below. Keep in mind, however, that during the setup process you should adjust the settings according to your needs.
- Traccar’s full domain name (FQDN): https://traccar.xyz.com,
- Installed on Synology via Docker: Ngninx Proxy Manager, AdGuard Home and Portainer,
- Installed on Synology via Package Center: Cointaner Manager,
- On the router’s DHCP server, the specified IP address of the DNS server (AdGuard Home) installed on the Synology.
What is Docker Compose?
Docker Compose provides a tool for defining and managing multiple Docker containers simultaneously. By describing application configurations, services and dependencies in a YAML file, Docker Compose makes it easy to uniformly create, run and scale applications composed of multiple containers. This tool simplifies the process of setting up a development, test or production environment while ensuring consistency in managing containers and their parameters. With Docker Compose, it is possible to define a comprehensive application infrastructure in a single file, which in turn makes it easier to collaborate and replicate environments in different scenarios.
Step 1 – Configuration in Synology
- Log in to your file server and open File Station.
- In the shared folder named docker, create a new folder and name it traccar
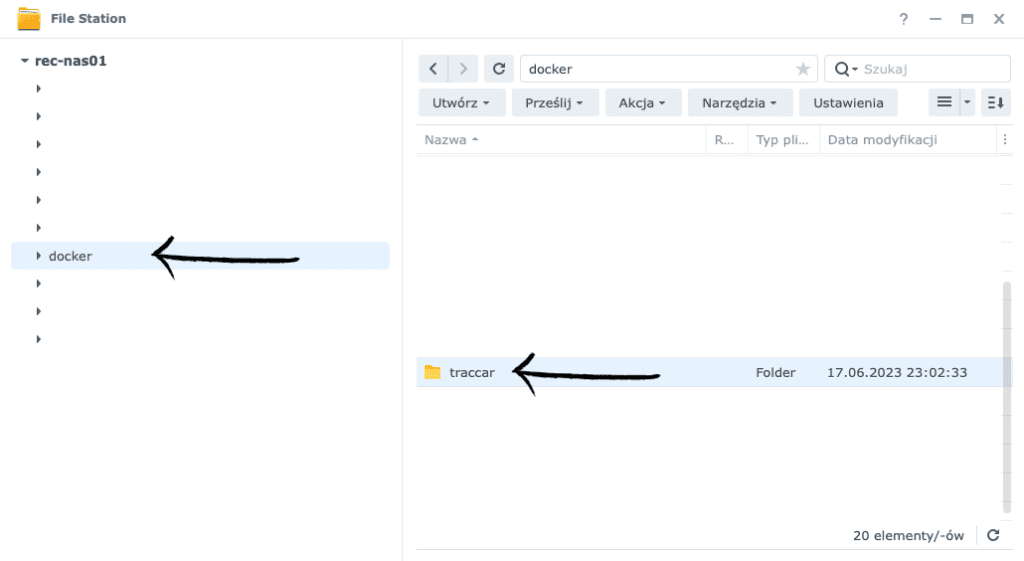
- Inside the traccar folder, create two additional folders – config and mysql.
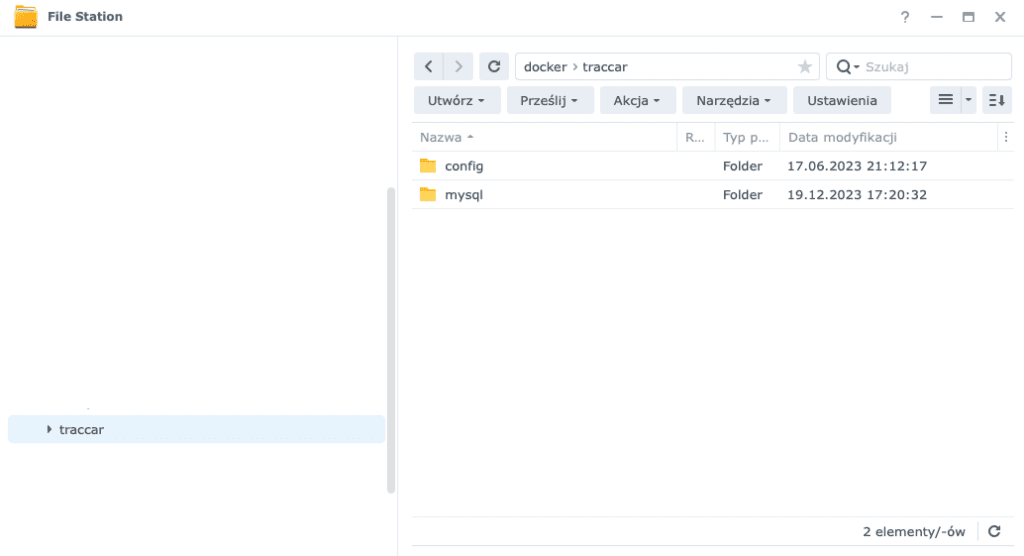
- Go to the config folder and create data and logs folders there.
- The File Station steps on DSM have already been completed. Now we are still missing the configuration file. To get it, we will download it via SSH while logged into our Synology. For more information, follow this link.
- If you don’t already have SSH enabled on your Synology, follow these steps
- Go to the Control Panel, then under Connectivity, select Terminal and SNMP;

- Click Enable SSH service and set any high port such as 45000.
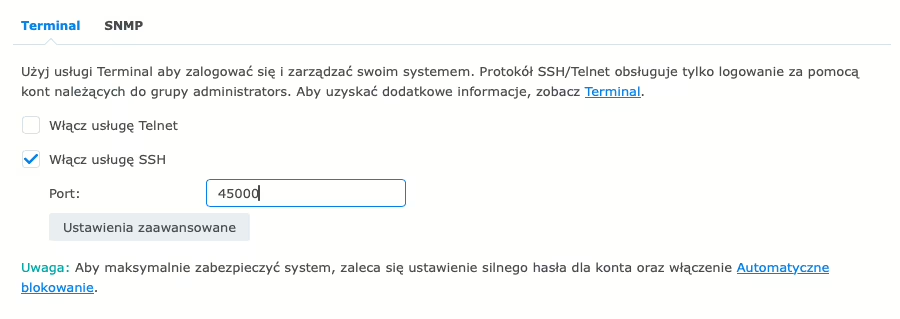
- Save the settings and proceed to log in via SSH to our Synology.
For Microsoft Windows operating system I recommend PuTTY, while for Apple macOS operating systems I recommend Termius.
- I personally use macOS, thus I will use Termius. The following action is performed on the right root,
- Log in to your Synology account over SSH.
sudo su -- Download traccar.xml file
docker run \
--rm \
--entrypoint cat \
traccar/traccar:latest \
/opt/traccar/conf/traccar.xml > /volume1/docker/traccar/config/traccar.xml
Wait a while until the file is downloaded. Once this process is complete, we can continue with the configuration in the Portainer.
Step 2 – Configure Docker Compose in the Portainer
- Log in to your account and go to the administration interface.
- Are you using the Authentik single sign-on system? Make the login process easier for yourself by integrating Portainer with Authentik with the help of these instructions.
- Select Stacks from the dashboard.
- From the upper right corner (under your login), select Add stack.
- Fill in the Docker Compose file creation with the following values:
- Name: traccar
- Build method: Web editor
- Web editor: copy the content described below and paste
version: "3.9"
services:
  mysql:
    image: mysql:5.7
    container_name: traccar_mysql
    command: --character-set-server=utf8mb4 --collation-server=utf8mb4_unicode_ci --skip-log-bin  --explicit_defaults_for_timestamp=on
    hostname: traccar-mysql
    volumes:
      - /volume1/docker/traccar/mysql:/var/lib/mysql
    restart: always
    environment:
      MYSQL_ROOT_PASSWORD: traccar
      MYSQL_DATABASE: traccar
      MYSQL_USER: traccaruser
      MYSQL_PASSWORD: traccar

  traccar:
    depends_on:
      - mysql
    image: traccar/traccar:latest
    container_name: traccar_server
    hostname: traccar-server
    volumes:
      - /volume1/docker/traccar/config/logs:/opt/traccar/logs:rw
      - /volume1/docker/traccar/config/traccar.xml:/opt/traccar/conf/traccar.xml:ro
      - /volume1/docker/traccar/config/data:/opt/traccar/data:rw
    ports:
      - "8082:8082"
    restart: always
    environment:
      CONFIG_USE_ENVIRONMENT_VARIABLES: "true"
      DATABASE_DRIVER: "com.mysql.cj.jdbc.Driver"
      DATABASE_URL: "jdbc:mysql://traccar-mysql:3306/traccar?zeroDateTimeBehavior=round&serverTimezone=UTC&allowPublicKeyRetrieval=true&useSSL=false&allowMultiQueries=true&autoReconnect=true&useUnicode=yes&characterEncoding=UTF-8&sessionVariables=sql_mode=''"
      DATABASE_USER: traccaruser
DATABASE_PASSWORD: traccar- Click Deploy the stack and wait for Portainer to download the content and create containers.
- If everything goes successfully, the message Success: Stack successfully deployed will appear in the upper right corner of the screen, and then two newly created containers will appear in the container list.
- To access Traccar at the moment, type the following address into your browser: http://IP-ADRES-SYNOLOGY:8082
Step 3 – Configuration in Nginx Proxy Manager
In the following instructions, access to Traccar will be configured over HTTP (without SSL).
- Log in to the administrator account in Nginx Proxy Manager.
- Go to Hosts.
- In the upper right corner, click Add Proxy Hosts.
- Complete the parameters with the following values:
- Domain Names: traccar.xyz.com
- Scheme: http
- Forward Hostname/IP: IP-ADDRESS-SYNOLOGY
- Forward Port: 8082
- Save the configuration with the Save button.
Web access over HTTPS (SSL Certificate).
If you have uploaded an SSL certificate for your domain that supports subdomains (Wildcard certificate):
- In the Edit Proxy Host window on the Details tab, check:
- Cache Assets,
- Websockets Support,
- and Block Common Exploits.
- Then go to the SSL tab, select your SSL certificate and check all available additional options:
- Force SSL,
- HTTP/2 Support,
- HSTS Enabled,
- and HSTS Subdomains.
Step 4 – Configuration in AdGuard Home
In order to access Traccar from our computer via a domain name defined in Proxy Manager (e.g. traccar.xyz.com) on our local network, it is necessary to configure the DNS server to point to the location of this site.

- Log in to the AdGuard Home administration panel.
- Go to the Filters tab, and then select DNS Rewriting from the menu.
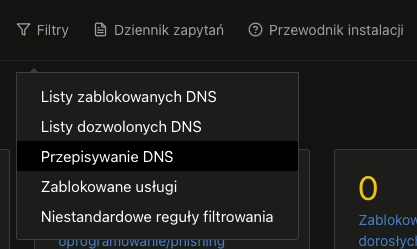
- Click Add DNS rewriting, then fill in the fields with the following values:
- Enter the domain name you want to rewrite: traccar.xyz.com
- IP Address: IP-ADDRESS-SYNOLOGY
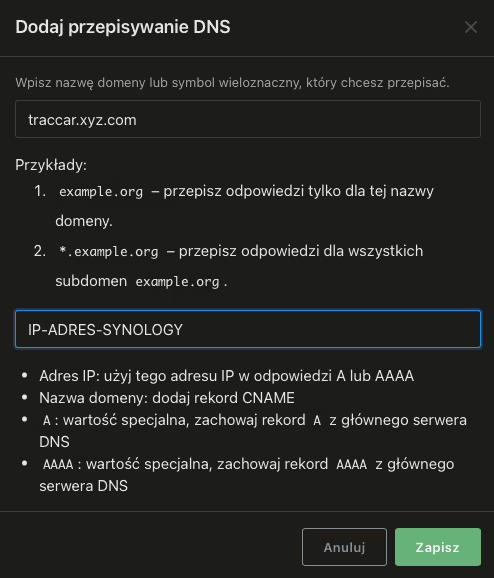
- Done! Wait a while until the configuration is saved. Once the process is complete, you will be able to access the server traccar.xyz.com. 🚀
Step 5 – Configuration setup with GPS tracker
Additional Sources and information
For further exploration and more information, I recommend checking out the links below. They are valuable sources that were used in the development of this guide.
- Synology, Container Manager: https://www.synology.com/pl-pl/dsm/feature/container-manager
- Portainer: https://www.portainer.io
- Nginx Proxy Manager: https://nginxproxymanager.com
- AdGuard Home: https://adguard.com/pl/adguard-home/overview.html
Read also
- Nginx Proxy & Cloudflare: How to restore real IP address / Learn how to restore the display of users’ real IP addresses in server logs using Nginx Proxy Manager and Cloudflare as reverse proxy.
- TVHeadend: Installing and configuring SAT>IP decoder / Telestar Digibit Twin: Discover in today’s blog post the step-by-step configuration of SAT>IP with TVHeadend in Docker Compose.
- Home Assistant: ESPHome and estate barrier control / Learn how to integrate and control a residential barrier or entrance gate remotely using ESPHome and the Home Assistant platform.
- How to configure Leox GPON ONT insert on Mikrotik router / Step-by-step guide on how to configure Leox LXT-010S-H GPON ONT insert on Mikrotik RB5009 router, instead of ONT module from Orange.
- UniFi Network Application: Connecting an Access Point from another network / Discover how to connect a device from Ubiquiti UniFi from another network to Network Application – using Mikrotik’s IPSec tunnel as an example.
- UniFi Controller in Docker: Migrating to UniFi Network Application / UniFi Controller: Discover step-by-step how to successfully migrate to Network Application using Docker Compose.
- ADS-B: Receiver Installation and Configuration on Raspberry Pi / Discover the secrets of installing and configuring your own ADS-B antenna on Raspberry Pi. Develop skills and track aircraft in real time.
Leave a Reply