
Hello!
Today, online security and privacy are key aspects of running websites and managing data. SSL certificates play an important role in ensuring that communications between users and servers are encrypted. What’s more, as one of the most popular NAS solutions, Synology offers flexibility and advanced configurability, making it the ideal tool for implementing such certificates.
In this article, I will show how to configure a Wildcard SSL certificate on a Synology server using Cloudflare and the ACME protocol. With this guide, you will learn how to effectively secure your domain and all its subdomains using the automation offered by the acme.sh tool.
Introduction
What is Synology?
![]() Synology is a company specializing in the production of network hardware and software for data storage and management. Their main products are NAS (Network Attached Storage) servers, which offer a wide range of functions such as file storage, media sharing, backup, and hosting network services.
Synology is a company specializing in the production of network hardware and software for data storage and management. Their main products are NAS (Network Attached Storage) servers, which offer a wide range of functions such as file storage, media sharing, backup, and hosting network services.
Thanks to their flexibility, Synology devices are used both in home networks, where they serve as a central data storage and media server, and in businesses, where they are used to store and share files and run a variety of business applications, such as email servers, file servers, and project management platforms.
What is Cloudflare?

 Wildcard SSL is a type of SSL/TLS certificate that allows you to secure not only one domain, but also all its sub-domains with a single certificate. This is an extremely convenient solution for companies and organisations that have multiple subdomains and want to ensure their protection with minimal certificate management.
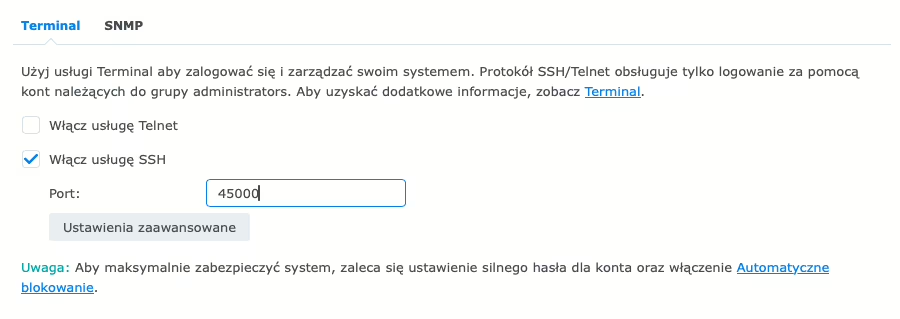
- Do not close the terminal and disconnect the SSH connection to the Synology, we will come back to it in a moment.
Step 2 – Configure Cloudflare’s DNS and obtain an API token
Make sure your domain is registered and managed by Cloudflare. If you haven’t already done so, add the domain to Cloudflare and configure its support. Next, configure DNS so that ACME can use the generated API token in Cloudflare to perform a DNS challenge when issuing a Let’s Encrypt SSL certificate.
- Go to the menu for creating a user API Token in Cloudflare:
- Go to the home page and select your domain name,
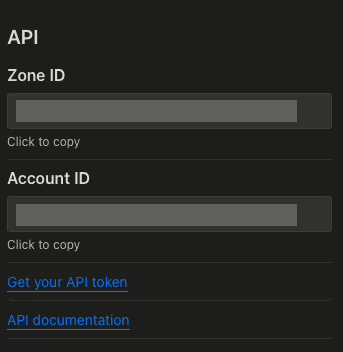
- In the domain management interface (Overview tab), on the right side, search and click Get your API Token,
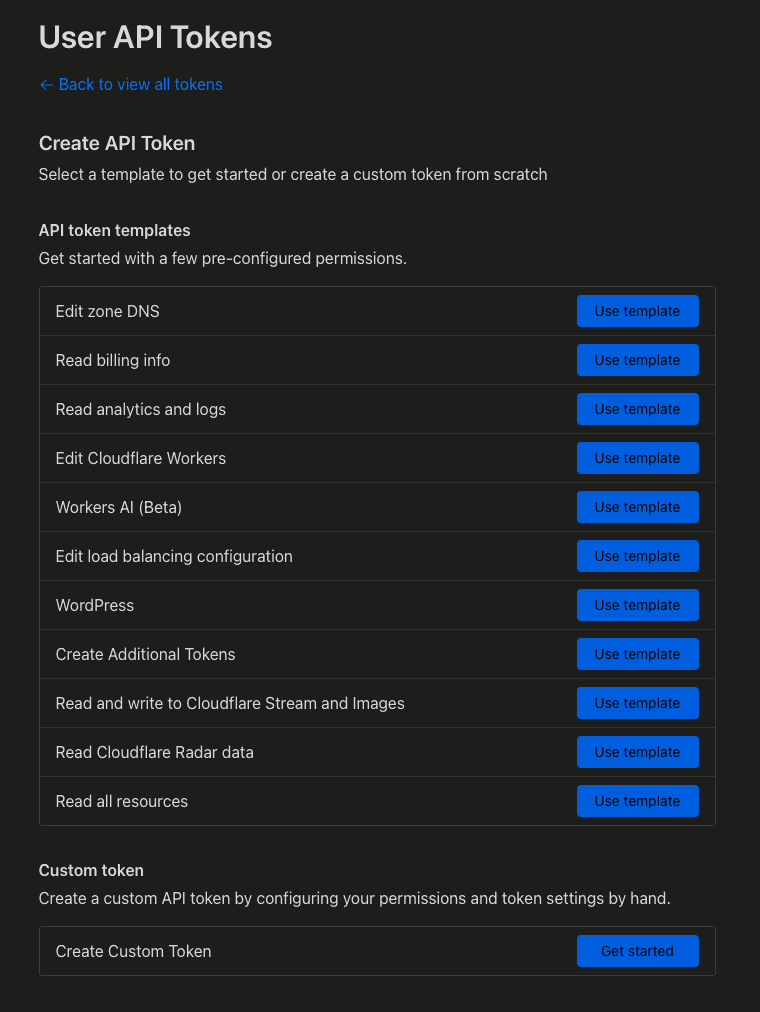
- In the list of your API Tokens, click Create Token,
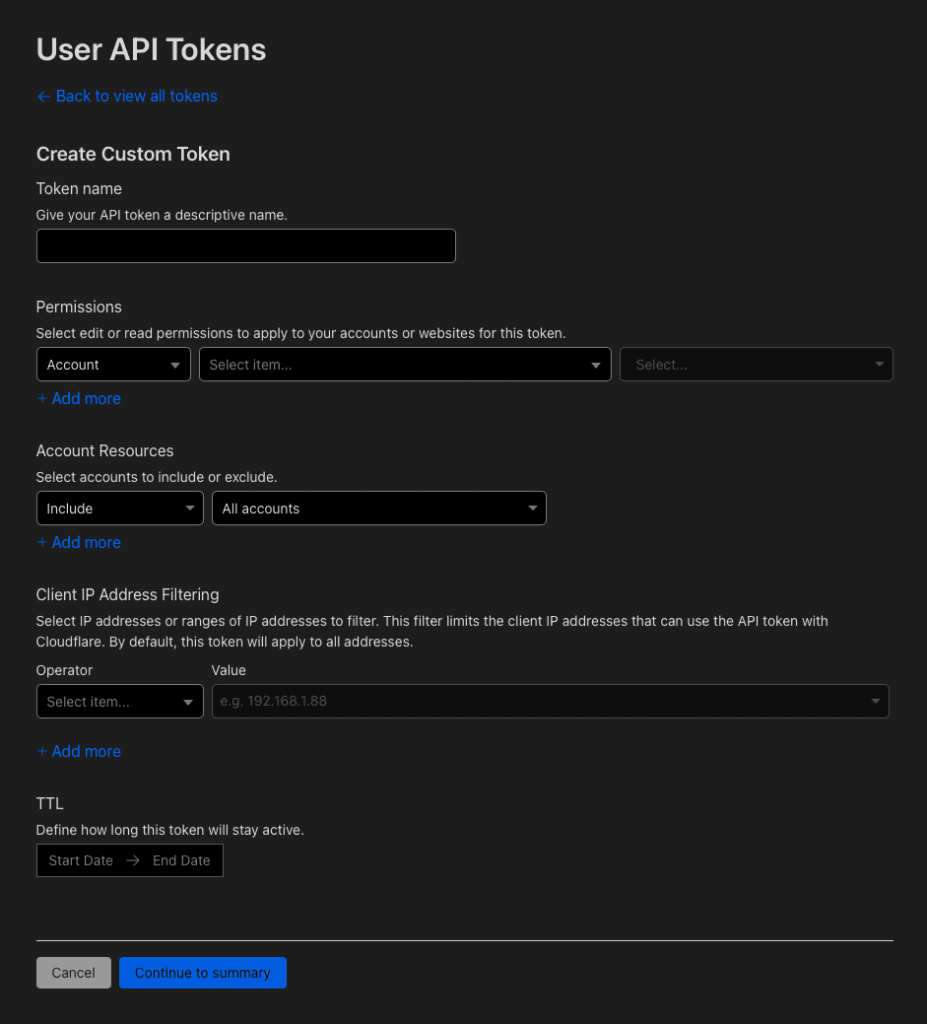
- In the API Token creation menu, click on Get Started next to Create Custom Token in the Custom Token section.
- When you go to create Custom API Token, fill the form with the following values:
- Token name: e.g.
acme-xyzcom, - Permissions: Set as follows
Zone | DNS | Edit, - Zone Resources: Set as follows
Include | Specific zone | Your domain xyz.com, - Filtering client IP Address:
leave without filling in, - TTL:
leave without filling in.
- Token name: e.g.
- When you go to create Custom API Token, fill the form with the following values:
- During the final stage, a summary of the API Token creation will appear. If all the information is correct, click Create Token.
- Once the API Token is created, you will receive detailed information about it, along with the option to test it in the terminal.
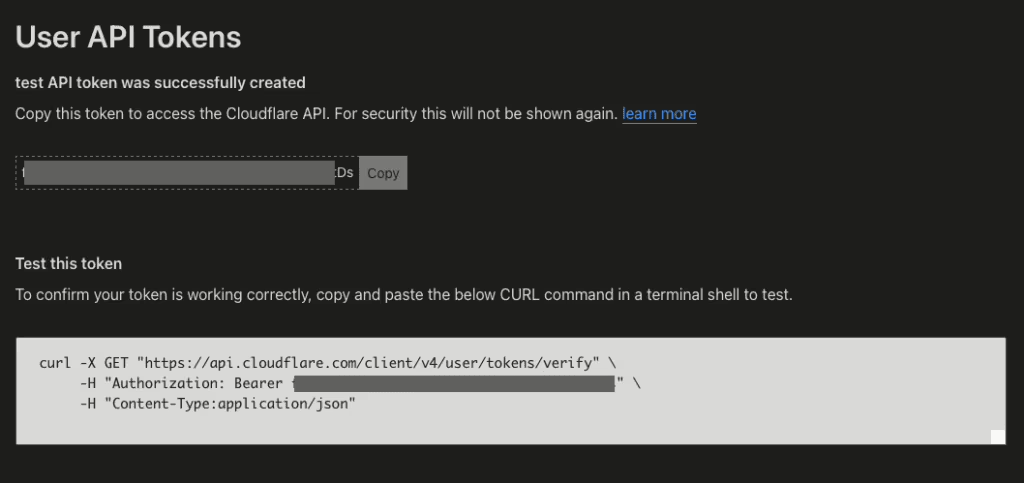
- Save the copied API Token in a notepad, as you will need it when configuring the SSL certificate in ACME.
API export to ACME
- Set environment variables for Cloudflare: Export your sensitive data, such as your Cloudflare token and email address, as environment variables. Type:
- Make sure you replace
API_TOKENwith your actual Cloudflare private token andmail@gmail.comwith your email address assigned to your Cloudflare account.
- Make sure you replace
- Done! Wait a moment for the configuration to be saved. 🚀
Step 5 – Setting up automatic certificate renewal
To ensure the continued validity of the SSL certificate, it is recommended to configure automatic renewal.
On the Synology system, you can use the built-in tools to run the acme.sh script at regular intervals. To do this, you can create a task scheduler using the DSM control panel to execute the automatic certificate renewal script.
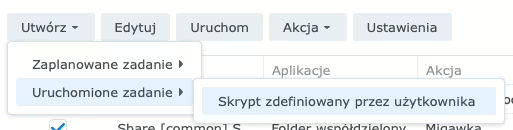
- Go to the Control Panel, then scroll down to find the Task Scheduler.
- Click Create and select Run task – User-defined script,
- On the Edit task – General tab, enter the following values:
- Task:
renew certificate ssl, - User:
root,
- Task:
- On the Edit task – Schedule tab, enter the following values:
- Run on the following date:
today's date, Repeat monthly
- Run on the following date:
- On the Edit task – Task Settings tab, enter the following values:
- Send launch details in an email:
Select and enter your e-mail address, - Send launch details only if the script is unexpectedly terminated:
Check, - Run the command:
Paste the following script into a text editor:
- Send launch details in an email:
- After making these settings, click OK to save and activate the new scheduled task.
- Now our script will run automatically every month.
Step 6 – Setting up certificates for individual applications in Synology DSM
Now that you have a valid SSL certificate, you can assign it to individual applications on your Synology DSM to ensure secure connections. Here’s how to do it:
- Log in to DSM on your Synology device.
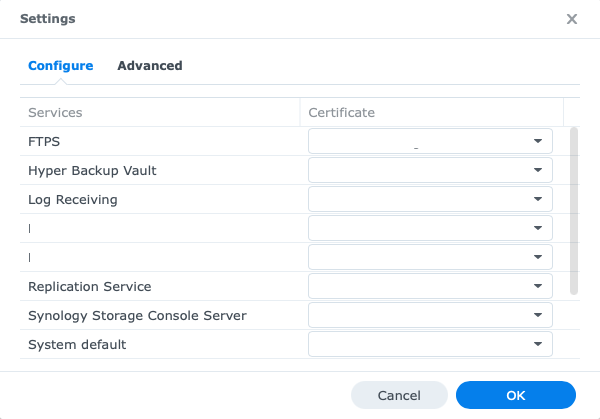
- Go to the Control Panel, then to the Security – Certificate tab.
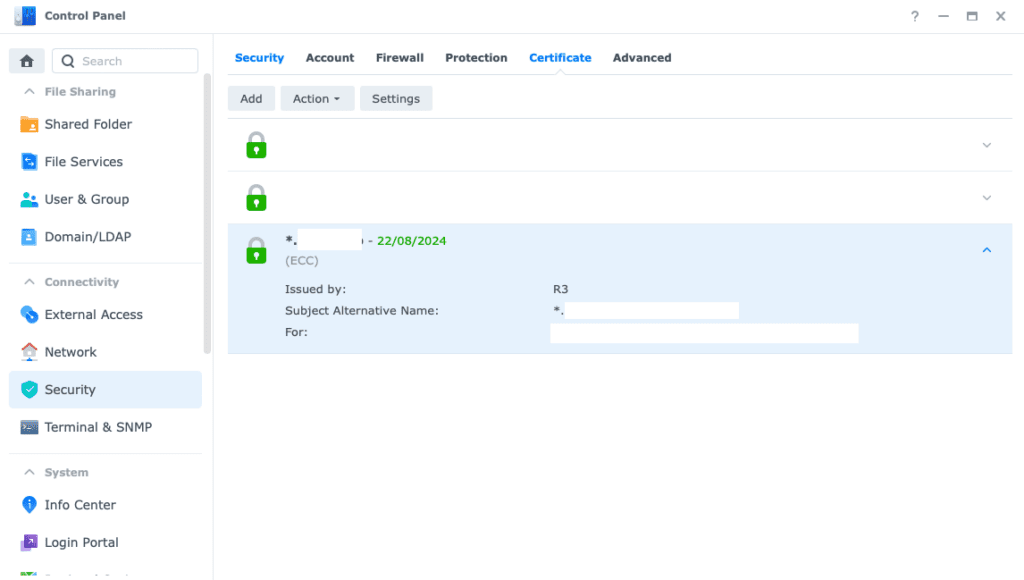
- Click on Settings and go to the settings tab. All services/applications and their corresponding applications will be displayed.
- Click the current certificate of the target service and select the appropriate certificate from the drop-down menu.
- Once the certificates have been configured, click OK.
- Done! 🚀
If you have additional questions about the setup, go ahead and leave a comment under this article or contact me directly. I will be happy to answer any concerns and help solve any problems. Your questions can help improve this guide for other users.
Additional sources and information
Thank you for reaching this point. For further exploration and more information, I recommend checking out the links below. They are valuable sources that were used in the development of this guide.
- Synology, Certificate. https://kb.synology.com/en-nz/DSM/help/DSM/AdminCenter/connection_certificate?version=7
- ACME, Synology NAS Guide. https://github.com/acmesh-official/acme.sh/wiki/Synology-NAS-Guide
Step by step how to enable GPS communication with Traccar. Using Docker Compose, open ports for managing and receiving GPS data.
Discover how to configure Synology RADIUS Server on Mikrotik devices. Learn about the steps and benefits of integration in our article.
Learn how to integrate and remotely control a housing estate barrier or entrance gate using ESPHome and the Home Assistant.
Install Paperless-ngx on Synology with Docker Compose to easily manage paperless documents. A simple step-by-step guide.
Take benefit of Traccar’s single sign-on. A simple way to manage users. See how easy it is to control access.
Discover iPerf3, a network testing tool for the Raspberry Pi. Explore how it measures TCP/UDP network performance in a simple way.
Comments (10)
Steven De Beldersays:
29/12/2025 at 10:52Dear Sir,
Thanks for the sharing this procedure for creating a Wildcard certificate in combination with cloudflare and synology NAS.
I’ve tried to follow your instruction to create my own certificate for my domain which is located in the cloudflare environment (Cloudflare isn’t the ‘registrar’).
Everything went smoothy till I tested my certificate in my browser. My browser still give an unsecure https-connection. When I look in the certificate window of my browser the message is ‘This certificate is not valid’. What went wrong? Can I re-do the creation of the certificate? I’ve tried, however to force it, I have to put the parameter ‘–Force’ in your command : ‘./acme.sh –issue –server letsencrypt –home . -d “$CERT_DOMAIN” –dns “$CERT_DNS”‘.
I didn’t execute the command with –Force. I was afriad to screw up my synology NAS system. Thanks for your insights in advance.
Just one remark. From the internet the DSM has been accessed with port number ‘17000’. My router convert this to port ‘5001’ which is the port on my NAS for HTTPS traffic. Best regards, Steven.
Filip Chochółsays:
29/12/2025 at 15:15Hey
I corrected deploy command. I used wrong quotation marks. Sorry 🙂
From my experience, you shouldn’t expose the DSM panel “to the world”.
mikesays:
17/12/2025 at 19:30Ran into two problems:
ash-4.4# export SYNO_PASSWORD=SuperSecureP455w0rd
ash: !: event not found
Then I got :
ash-4.4# ./acme.sh –deploy –insecure –home . -d “$CERT_DOMAIN” -d “*.$CERT_DOMAIN” –deploy-hook synology_dsm
./acme.sh: line 8229: –deploy: command not found
How can I correct this? Thanks
Filip Chochółsays:
29/12/2025 at 15:11Hey,
In SYNO_PASSWORD you should use ‘ ‘ and then inside ” write your password.
Regarding deploy – i corrected. I used the wrong quotation marks, and when I recently implemented this, I had it on my mind to correct it. My mistake.
Stanleysays:
24/11/2025 at 13:43Really glad i found this topic! Lifesaver!
Jonathansays:
07/04/2025 at 18:10Great article. Worked Perfectly. One suggestion, most people would probably want the base domain in the certificate, I suggest the following change:
export CERT_DOMAIN=”where-is-my-money.pl”
and
./acme.sh –deploy –insecure –home . -d “$CERT_DOMAIN” -d “*.$CERT_DOMAIN” –deploy-hook synology_dsm
Filip Chochółsays:
16/04/2025 at 10:01Suggestion added 😉 Thanks!
Adamsays:
31/03/2025 at 14:33This was very helpful. I’m curious, is it necessary to leave the SSH service enabled on the Synology for for automatic renewals to work?
Filip Chochółsays:
16/04/2025 at 09:56If you want to do something later – then yes. Otherwise you can disable it 😀
Stefansays:
23/02/2025 at 18:49Super helpful guide, thank you so much! I managed to set up my wildcard cert by following it step by step. I only stumbled over my own mistakes, e.g. when I changed the default port number, I changed it in the wrong place. Thanks again, this was a huge help!