Hello!
Today we will address a very simple issue that arises when setting up a website and connecting it to a proxy from Cloudflare.
Case study
When your site is handled by Cloudflare, the IP addresses recorded in the server logs come from Cloudflare, not from actual users visiting the site. That’s because the traffic goes through Cloudflare’s network first. Cloudflare acts as a reverse proxy, speeding up page loads and caching static resources.
This situation can create problems for some web applications. Many of them require access to users’ real IP addresses, for example, to identify them or analyze their traffic. Fortunately, there is a way to restore the display of real IP addresses in the server logs using Nginx Proxy Manager and Cloudflare. In this article, we will explain how to do this and configure the Nginx server to correctly log the real IP addresses of users.
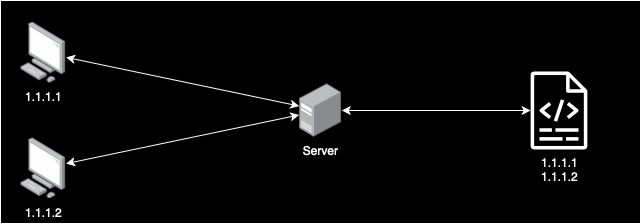 Server without proxy – the logs show the actual public IP address of the client.
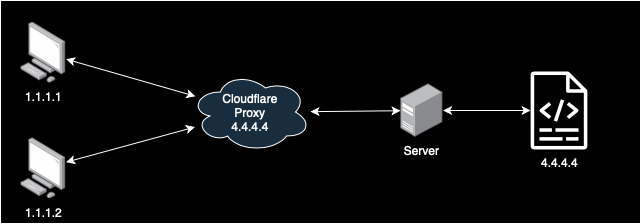 Use of Cloudflare proxy – the logs show the Cloudflare proxy address as the incoming IP.
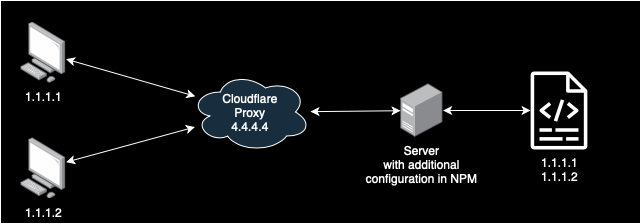 Use of Cloudflare proxy and new configuration in NPM – the logs show the actual public IP address of the client.
Introduction
What is a proxy from Cloudflare?

Reverse proxy from Cloudflare is a service that bridges the communication between clients (browsers) and the server on which your website is running. When traffic is routed through the proxy, it is Cloudflare that receives requests from clients. It then passes them to your origin server and sends the response back to the clients.
Cloudflare’s operation as a reverse proxy has several key advantages:
- Speeds up the loading of web pages. Cloudflare caches static resources such as images, JavaScript and CSS files. It then distributes them from its global network of edge servers.
- It provides an additional layer of security, protecting against many types of attacks, including DDoS.
- It optimizes network traffic by routing it along the shortest routes.
However, this architecture causes you to see Cloudflare server IP addresses in the origin server logs instead of the real IP addresses of customers visiting your site. This is the problem we will solve by configuring the Nginx server to display users’ real IP addresses.
What is Nginx Proxy Manager?

Nginx Proxy Manager (NPM) is a popular open-source tool that greatly simplifies the management and configuration of the Nginx proxy server. Next to Apache, it is one of the most widely used HTTP servers in the world. However, its text file-based configuration can be complicated, especially for less experienced users.
NPM provides a user-friendly point-and-click GUI that abstracts the main Nginx concepts, such as proxy servers, upstream hosts, SSL certificates and redirection rules. As a result, even people without in-depth knowledge can easily configure advanced HTTP traffic routing rules and manage multiple sites and applications running on a single server.
NPM is particularly useful in scenarios where the server is used as a central reverse proxy in front of services such as Nginx, Apache, or other web applications. It allows for easy configuration and maintenance of complex HTTP/HTTPS traffic routing topologies in one place.
Preparation
In order to prepare the tutorial, we will adopt an established domain name and certain configuration names, shown below. For customized configuration, apply settings according to individual requirements.
- Nginx Proxy Manager installed on the server,
- Configured DNS in Cloudflare for the domain,
- Prepared list of proxy IP addresses from Cloudflare – IPv4 addresses: https://www.cloudflare.com/ips-v4
- Prepared list of proxy IP addresses from Cloudflare – IPv6 addresses: https://www.cloudflare.com/ips-v6
Step 1 – Logging into Proxy Manager
- Log in to the manager:
- Open a web browser and go to the address where NPM is running (e.g. http://IP-ADDRESS:81).
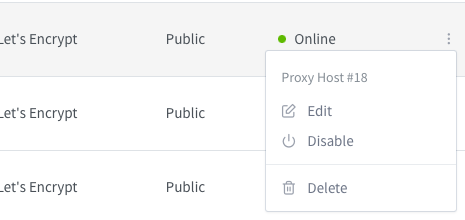
- Go to the list of Proxy Hosts and select the desired host you want to edit.
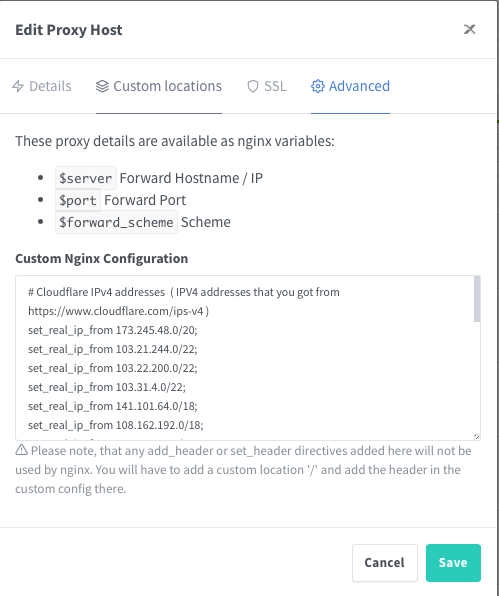
- Go to the Advanced tab and paste the following code. It is created based on the list of IP addresses described above from Cloudflare.
# IPv6 Cloudflare - Jeżeli nie obsługujesz połączeń w tej adresacji, nie musisz wklejać tego do konfiguracji hosta
set_real_ip_from 2400:cb00::/32;
set_real_ip_from 2606:4700::/32;
set_real_ip_from 2803:f800::/32;
set_real_ip_from 2405:b500::/32;
set_real_ip_from 2405:8100::/32;
set_real_ip_from 2a06:98c0::/29;
set_real_ip_from 2c0f:f248::/32;

# IPv4 Cloudflare
set_real_ip_from 173.245.48.0/20;
set_real_ip_from 103.21.244.0/22;
set_real_ip_from 103.22.200.0/22;
set_real_ip_from 103.31.4.0/22;
set_real_ip_from 141.101.64.0/18;
set_real_ip_from 108.162.192.0/18;
set_real_ip_from 190.93.240.0/20;
set_real_ip_from 188.114.96.0/20;
set_real_ip_from 197.234.240.0/22;
set_real_ip_from 198.41.128.0/17;
set_real_ip_from 162.158.0.0/15;
set_real_ip_from 104.16.0.0/13;
set_real_ip_from 104.24.0.0/14;
set_real_ip_from 172.64.0.0/13;
set_real_ip_from 131.0.72.0/22;

real_ip_header X-Forwarded-For;- The whole setup looks as follows, as shown in the following screen shot.
- Save the configuration by clicking on the Save button.
- Done!
In conclusion – If you have additional questions about the configuration, go ahead and leave a comment under this article or contact me directly. I will be happy to answer any concerns and help solve any problems. Your questions can help improve the guides for other users.
Additional materials and information
For further exploration and more information, I recommend checking out the links below. They are valuable sources that were used in the development of this guide.
- Cloudflare, Restoring original visitor IPs: https://developers.cloudflare.com/support/troubleshooting/restoring-visitor-ips/restoring-original-visitor-ips/
- Nginx, Module ngx_http_realip_module: https://nginx.org/en/docs/http/ngx_http_realip_module.html
Read also
- TVHeadend: Installing and configuring SAT>IP decoder / Telestar Digibit Twin: Discover in today’s blog post the step-by-step configuration of SAT>IP with TVHeadend in Docker Compose.
- How to configure Leox GPON ONT insert on Mikrotik router / Step-by-step guide on how to configure Leox LXT-010S-H GPON ONT insert on Mikrotik RB5009 router, instead of ONT module from Orange.
- UniFi Network Application: Connecting an Access Point from another network / Discover how to connect a device from Ubiquiti UniFi from another network to Network Application – using Mikrotik’s IPSec tunnel as an example.
- UniFi Controller in Docker: Migrating to UniFi Network Application / UniFi Controller: Discover step-by-step how to successfully migrate to Network Application using Docker Compose.
- Home Assistant: Install mirror lighting on ESPHome / Set up simple mirror lighting with ESPHome in Home Assistant. Discover simple integration and control light with ease.
- ADS-B: Receiver Installation and Configuration on Raspberry Pi / Discover the secrets of installing and configuring your own ADS-B antenna on Raspberry Pi. Develop skills and track aircraft in real time.
- Traccar: A guide to installing on Synology with Docker / Step-by-step guide: Installing Traccar on Synology using Docker. Effective vehicle tracking on your own server.
Leave a Reply